FAQ and Known Issues
Common Questions
1. End user IP is blocked and I do not know why
If you use CSF, then try to find the IP in CSF Allow/Deny Lists using their documentation and support. If not, then do the following:
Go to cPanel Plugins section, choose Imunify360 and enter the Incidents page.
Make sure that the IP checkbox at the top of the table is ticked. Enter proper IP or part of IP in the input field and click Enter.
- If the IP was found, then follow instructions on Incidents page and perform the actions you need, like: add IP to the White List or disable the security rule that has detected this incident.
If the IP was not found on the Incidents page, then go to Firewall page and using the same way as in the previous step try to find proper IP in Black List or Grey List.
- If the IP was found then follow this instruction for Grey List or Black List and move the IP to the White List or just remove from the Black List or Grey List.
If nothing helps, then contact our support team.
Note
There is a corner case of IP whitelisting/port blocking precedence
2. Could I disable IPtables (firewall) or OSSEC, when using Imunify360?
No. Imunify360 will not be able to stop an attack without IPtables and will not be able to detect an attack without OSSEC.
3. Does Imunify360 log events such as adding or removing an IP to/from the Gray List?
Most Imunify360 logs are saved in /var/log/imunify360/console.log. For example, when IP is blocked and added to the Black List, the following lines are added:
INFO [2017-04-15 18:30:00,889]
defence360agent.plugins.protector.lazy_init: IP 103.86.52.175 is BLOCKED
with 300 sec (expiration: 1492281300) (due to SensorAlert)
INFO [2017-04-15 18:30:00,889]
defence360agent.plugins.protector.lazy_init: Unblocking 103.86.52.175 in
CSF as it is already in our graylist
INFO [2017-04-15 18:30:01,663] defence360agent.internals.the_sink:
SensorAlert:
{'rule_id': 'LF_SMTPAUTH', 'timestamp': 1492281000.8720655, 'attackers_ip': '103.86.52.175', 'plugin_id': 'lfd', 'method': 'ALERT', 'ttl': '1'}
When user unblocks himself by Anti-bot Challenge, logs look like this:
INFO [2017-04-17 00:51:26,956] defence360agent.internals.the_sink:
CaptchaEvent:
{'timestamp': 1492404686.9496775, 'errors': [], 'user_agent': 'Mozilla/5.0 (X11; Linux x86_64) AppleWebKit/537.36 (KHTML, like Gecko) Chrome/56.0.2924.87 Safari/537.36', 'accept_language': 'ru-RU,ru;q=0.8,en-US;q=0.6,en;q=0.4', 'event': 'PASSED', 'method': 'CAPTCHA', 'attackers_ip': '10.101.1.18'}
INFO [2017-04-17 00:51:26,967]
defence360agent.plugins.protector.lazy_init: IP 10.101.1.18 is UNBLOCKED
(due to ClientUnblock)
Adding and removing IPs from the White List is only possible manually, no IPs will be added automatically.
5. To start using Imunify360 we need to know which information is sent to your servers. Could you please give us some more information?
The following info is sent to our server:
- all the messages from IDS OSSEC (can be found in OSSEC logs)
- all the messages from mod_security (can be found in
modsec_audit.log) - users domains (to be checked in reputation engine);
- Anti-bot Challenge verification info
- all running scans for malware (maldet scans) and information on cleaning up or discovering suspicious files
- optionally, suspicious files can be sent to us for the analysis. Files can be sent via UI by marking a proper checkbox
6. No valid Imunify360 License Found.
Check if the agent is running:
systemctl status imunify360
Check access to the central server (e.g. using telnet) (imunify360.cloudlinux.com port: 443).
Run imunify360-agent rstatus and ensure that status is OK
If not, register the agent.
7. I have an error peewee.DatabaseError: database disk image is malformed. What should I do?
Imunify360 uses SQLite database to store its data. Although this database has proved its reliability, database files become corrupted in rare cases. To restore data try to perform the steps from the section 23. "Imunify agent is not running" troubleshooting
8. Why does my cPanel with LiteSpeed and OWASP ModSecurity rule set trigger 500 error on all web pages after installing Imunify360?
OWASP rule set may conflict with Imunify360 default rule set on a server running LiteSpeed Web Server. We recommend to turn off OWASP rule set prior to installing Imunify360.
Please find more FAQs in our Knowledge Base.
9. Disabling WAF rules for certain countries.
It is possible to disable some WAF rules for IPs that are resolved to be from some country (or other geographical entity). To implement this, a customer should create his own modsecurity configuration file, and include it into the default modsecurity configuration. In case of cPanel, this can be done by creating /etc/apache2/conf.d/includes/countrywafrules.conf and adding it as an include to the /etc/apache2/conf.d/modsec/modsec2.cpanel.conf. Otherwise configuration files might be rewritten by Imunify360 rules update.
Example of contents of such config file:
SecGeoLookupDb /path/to/GeoLiteCity.dat
# ModSecurity relies on the free geolocation databases (GeoLite City and GeoLite Country) that can be obtained from MaxMind http://www.maxmind.com. Currently ModSecurity only supports the legacy GeoIP format. Maxmind's newer GeoIP2 format is not yet currently supported.
So a customer need to download this IP database and locate somewhere.

# Lookup IP address
SecRule REMOTE_ADDR "@geoLookup" "phase:1,id:155,nolog,pass"

# Optionally block IP address for which geolocation failed
# SecRule &GEO "@eq 0" "phase:1,id:156,deny,msg:'Failed to lookup IP'"

# Skip rules 942100 and 942101 for GB country as example

SecRule GEO:COUNTRY_CODE "@streq GB" "phase:2,auditlog,id:157,pass,severity:2,\
ctl:ruleRemoveById=942100,\
ctl:ruleRemoveById=942101"
Make sure that you have replaced /path/to/GeoLiteCity.dat with the real path to the GeoLiteCity.dat file installed in your system.
Variable GEO is a collection populated by result of the last @geoLookup operator. The collection can be used to match geographical fields looked from an IP address or hostname.
Note
Available since ModSecurity 2.5.0.
Fields:
COUNTRY_CODE: two character country code. Example:US,GB, etc.COUNTRY_CODE3: up to three character country code.COUNTRY_NAME: full country name.COUNTRY_CONTINENT: two character continent that the country is located. Example:EU.REGION: two character region. For US, this is state. For Canada, providence, etc.CITY: city name if supported by the database.POSTAL_CODE: postal code if supported by the database.LATITUDE: latitude if supported by the database.LONGITUDE: longitude if supported by the database.DMA_CODE: metropolitan area code if supported by the database. (US only)AREA_CODE: phone system area code. (US only)
10. How to clone Imunify360 configuration on another system?
The solution is available in FAQ section
11. How to disable Support icon in the Imunify360 UI?
- Go to
/etc/sysconfig/imunify360/imunify360.config. - And set
PERMISSIONS.support_form:option tofalse.
OR, better, run the following command:
imunify360-agent config update '{"PERMISSIONS": {"support_form": false}}'
12. How to hide the Ignore List tab for end users in the Imunify360 UI?
- Go to
/etc/sysconfig/imunify360/imunify360.config. - And set
PERMISSIONS.user_ignore_list:option tofalse.
OR, better, run the following command:
imunify360-agent config update '{"PERMISSIONS": {"user_ignore_list": false}}'
13. How to delete malware scan results from Imunify360’s database?
Sometimes, you may need to delete all users’ scan results from the server. This should not be common practice, and we do not recommend doing it on a regular basis. But, if you do need to erase the results of all Imunify360 scans, you can find the instructions below.
- First, you need to stop the agent:
systemctl stop imunify360
(on CentOS 7)
service imunify360 stop
(on CentOS 6, Ubuntu)
- Connect to the Imunify360 database by running this command:
sqlite3 /var/imunify360/imunify360.db
- Execute the following SQL commands:
IMPORTANT
This will remove all scan results from Imunify360!
DELETE FROM malware_history;
DELETE FROM malware_hits;
DELETE FROM malware_scans;
DELETE FROM malware_user_infected;
- Start the Imunify360 service:
systemctl start imunify360
(on CentOS 7)
service imunify360 start
(on CentOS 6, Ubuntu)
We don’t recommend cleaning the scan results for specific users, as it may cause inconsistencies in the malware_scans table. But, in emergencies, you can do it with these SQL commands:
DELETE FROM malware_history WHERE file_onwer = <user>;
DELETE FROM malware_hits WHERE user = <user>;
DELETE FROM malware_user_infected WHERE user = <user>;
Unfortunately, there’s no easy way to delete records in the malware_scans table for a specific user, so the table should be either truncated with the other tables shown in step 2 above, or the records should just be ignored.
If you need any more information on this or anything else related to Imunify360 administration, please get in touch .
14. Imunify360 WebShield ‘Could not allocate memory’ problem. How to fix?
Symptoms: It can have pretty different symptoms (increased IO, CPU and memory usage), but the main one is that WebShield blacklisting (through CDN) does not work.
How to check: Just browse wsshdict log (/var/log/wsshdict/wsshdict.log). If you face the issue, the log will have entries like:
2019-07-09 16:50:06 [WARN]: Could not allocate memory for 192.126.123.115/32 in rbtree
2019-07-09 16:52:23 [WARN]: Could not allocate memory for 179.108.244.125/32 in lpctrie
This means that the shared memory is full and no new address is allowed to be added. Shared memory has a fixed size (it’s set in configuration files) and cannot change it dynamically. Currently, the size of shared memory is 20 MB, and it can take up to 89k IPv4 addresses. However, some of our clients have more blacklisted addresses, and when Imunify360 agent tries to place all these IP addresses into shared memory, the aforementioned error occurs.
How to fix: We want to increase the shared memory size.
- Modify the second parameter of the
shared_storagedirective of the/etc/imunify360-webshield/webshield.confconfig file, to make it look like:
shared_storage /opt/imunify360-webshield/shared_data/shdict.dat 21m;
Modify the
data_sizedirective of the/etc/imunify360-webshield/webshield-shdict.confconfig file to22020096(21 MB in bytes: 1024 * 1024 * 21):Restart
imunify360-webshield:
systemctl restart imunify360-webshield
Or
service imunify360-webshield reload
The wsshdict daemon is expected to be restarted automatically.
- Make sure the shared memory size is actually changed. Run
ipcs -mcommand. It’s expected to have the output like this:
# ipcs -m
------ Shared Memory Segments --------
key      shmid   owner    perms   bytes nattch status
0x620035c1 4554752  imunify360 600    22020096   4
0x00000000 32769    root       644    80         2
The first column must not have zeros (like in the second row), the third column (owner) is expected to be ‘imunify360-webshield’, and size must correspond to values set in the config files (22020096 in our case).
15. How to check "ModSecurity scan" works?
- To verify, if ModSecurity scan works, you can use the following command:
curl -v -s -o /dev/null -F 'data=@<path-to-malware-sample>' http://<domain>/
You can get a malware sample file on the eicar.org: eicar.org.
For instance:
wget https://secure.eicar.org/eicar.com.txt -O /tmp/eicar.com.txt
curl -v -s -o /dev/null -F 'data=@/tmp/eicar.com.txt' http://mycoolwebsite.net/
You can find the results of this attempt in the Incidents tab
- Also, you can perform the following request which triggers a test rule
curl -v http://example.com//?i360test=88ff0adf94a190b9d1311c8b50fe2891c85af732
Replace example.com with the domain from the test server. And check the Imunify360 console log
grep 'IM360 WAF: Testing the IM360 ModSecurity ruleset' /var/log/imunify360/console.log
16. How to check "automatically scan all modified files" works?
To check "automatically scan all modified files" (the realtime scanner), upload a malware sample to some account's webroot via SSH and check if it will appear in the Malicious tab shortly.
You can get a malware sample file on the eicar.org.
Make sure the option is enabled.
wget https://secure.eicar.org/eicar.com.txt -O /tmp/eicar.com.txt
scp /tmp/eicar.com.txt  mycooluser@X.Y.Z.A:/var/www/mycooluser/mycoolwebsite_docroot
Or if you proceed under the root, use su:
cd /var/www/mycooluser/mycoolwebsite_docroot
sudo su mycooluser -s /bin/bash -c "curl -o eicar.com.txt https://secure.eicar.org/eicar.com.txt"
where X.Y.Z.A - your server IP address
You can find the results in the Malware scanner > Files tab.
17. Malware file reasons
You can see the advanced reason why a file was detected as malicious.
Go to Imunify → Malware Scanner → Malicious tab → Reason. See Malware Scanner → Malicious tab.
A reason pattern looks like the following:
<type>-<detected>-<ID>-<filetype>.<mlwcategory>.<mlwclassification>
<type> | SMW – server malware, CMW – client malware |
<detected> | SA- stand-alone (file is completely malicious), INJ – injections (malware is injected to some legitimate file) |
<ID> | a signature identifier. It can be either a numeric signature ID or CLOUDAV for a hybrid-method detections performed by the CloudAV feature. |
<filetype> | a file type; see Table 1. File types and their code |
<mlwcategory> | a malware category, see Table 2. Malware categories |
<mlwclassification> | malware classification; it varies based on scenario/actions of a malicious artifact (see Table 3. Malware classification) |
Table 1. File types and their codes
filetype
| File types | File extensions |
| Markup language files | htm, html, shtml ,phtml |
| Server config files | htaccess |
| JavaScript files | js |
| Perl files | pl |
| Python files | py |
| Ruby files | rb |
| Shell scripts | shells in common: sh |
| Cron files | cron |
| ELF files | elf |
| Other server pages | Jsp (asp,aspx), vb |
| Files with no extension/fake extension | These files can be named based on the type of malicious code used inside the file - the above other filetype classification can be used based on code. |
Table 2. Malware categories
mlwcategory
| Category | Explanation |
bkdr | Artifacts that help attackers with partial or complete access to victims. Example: web shells |
tool | Scripts that are uploaded to victim's servers and can be used to perform certain specific actions like file upload, database access, downloaders/droppers, mailers, brute-force scripts, proxy scripts, etc. |
exploit | Scripts that are uploaded to victim's servers and meant to exploit certain other vulnerabilities or bugs. Example: WordPress/Joomla exploits |
spam | Files that deliver spam or point end-users towards spammy content. Example: doorway pages, other SEO spam, spam advertisement, injections, etc. |
phish | Phishing related malware artifacts |
miner | All sorts of miners go under this category |
redi | Malware artifacts causing redirects for any sort of malicious reason can be covered under this category |
deface | Any sort of artifacts that are meant to show off attacker's intentions or to spread a certain message. Example: Defacements, banners, etc. |
url | Malicious URLs embedded in content |
Table 3. Malware classification
mlwclassification
The mlwclassification field is not fixed and may vary depending on the purposes of the malware.
The following table shows the mlwclassification field examples.
- Sometimes we include a file extension as a part of the malware classification (like
php.tool.htaccessorphp.tool.cronorphp.tool.js). It means that malware artifact involves manipulation of file types mentioned in the classification. For example, thephp.tool.htaccessexample can be explained as a PHP based malware involved in modifying/dropping content related to htaccess. - Sometimes you may see signature categories beginning with
elf.troj. Thetrojclassification is mainly associated with ELF file types where we classify trojans astroj.
| Classification | Explanation |
ad/adware | Malware that drops spammy advertisements in some way falls under this classification. |
wshll | Webshells of any sort fall under this classification. |
google/yahoo/fb/apple/msoft/nflix/msn | This involves expandable classification in which malware involves any sort of incident/attacks regarding big corporates such as Google, Yahoo, Facebook, Microsoft, Netflix, etc. |
link/links | Covers malware involving/spreading/dropping spammy links. |
bank/edu/ecom/pharma/ent | Covers different varieties of phishing or malware based on the corporate sector they are targeting. bank stands for banking, edu for education, ecom for e-commerce, pharma for pharmaceuticals, ent for entertainment. |
red/redi | Usually covers malware involving redirects of any sort. Some may redirect you to spam pages, some works as a part of SMM panels to send traffic, etc. |
drpr/dwnldr | Covers malware that opens the door to drop more complex malware from a remote location. |
upldr/upld | Malware that acts as a simple uploader tool that can be used to upload more backdoors/webshells. |
inc/incl | Covers malware that abuses include/require functions in PHP to execute code hidden in files with non PHP extensions. For example, image file extensions with PHP code hidden inside. |
mobi/mob | Covers malware scripts that activate/work based on detection of mobile device. One such example can be a few JavaScripts redirects to spammy domains based on detecting the presence of mobile based user agents. |
drwy | Covers spammy doorway pages. |
deface | Deface covers any sort of artifacts that are meant to show off attackers intentions or to spread a certain message. When we use deface in the classification instead of the category it’s because the artifact can be a tool that aids in defacing websites. Something like php.tool.deface explains this scenario. |
wp/joom/mage/presta | Covers malicious artifacts targeting major CMS/applications such as WordPress (wp), Joomla (joom), Magento (mage), PrestaShop (presta). |
gen | gen stands for generic. We use it when the signature is generic in nature covering artifacts of different origins but falls under the same category. |
mail/mailer | It covers tools that are used for malicious purposes such as mailers. |
db/wpdb | Usually covers malware infections that affect databases in some way or trying to extract some information from the databases. |
exec/eva/eval/cmd | Covers malware injections that assists attackers execute code via attacker controlled parameters in HTTP requests. |
seo | Covers malware campaigns that involve in some sort of SEO specific malicious actions. |
gif/img/ico/jpg... | An identified artifact/malicious file has PHP code hidden inside file extensions that mimic that of images. |
paste/pastebin/pbin/pasteb | Covers malware utilising pastebin to further drop more malicious content. |
create/crtfunc/cf/createfunction | Covers backdoors that relies on using PHP function createfunction to execute code on a victim's server. |
stealer/steal/cred | To classify malware that steals credentials of any sort. |
fakeplugin | Some malware authors utilise technique of mimicking legit WordPress plugins to conceal the presence of malware. Such fake plugins are covered under this classification. |
glob/globals | Covers malware that utilises PHP superglobals based obfuscation to avoid detection. |
btrx/bitrix | Covers malware that works based on hiding itself inside Bitrix installations. |
dos/ddos/flood/booter | Covers any typical malware that involves denial of service attacks. |
exfil | Covers malware that involves in data exfiltration. |
filemanager/fileman/fm | For malwares with capabilities of a file manager. |
crypto/chive/cimp | For malware that involves stealing cryptocurrencies or mining of cryptocurrencies. |
goto | Covers malware that utilises PHP goto feature for obfuscation and to avoid detection. |
wpvcd/wpcd | For malware that are involved in the WPVCD malware campaign. |
oneliner/oneline | Sometimes malware authors try to make a backdoor injection as short as possible to accommodate in a single line and deploy various tactics to achieve it. Such malware is covered under this classification. |
tmp | Sometimes we create temporary signatures that will either be deleted/changed to something else after sometime. These are marked with tmp. |
wpnull24 | Malware injections that are part of nulled plugins/themes from the wpnull24 website. |
iframe | Malware injections that deliver iframe. |
sym/symlink/symlnk | Covers malware workings related to symbolic links. |
cpanel/whm/cp/resetpass | Malware/tools that involve stealing/cracking credentials related to cPanel/WHM. |
tele/tgram | Covers malware involving exfiltration of information using the Telegram API. |
conf/confgrab/grabber | Malware that involves activities such as grabbing configurations, configuration files, etc. |
brute/bruter/wpbrute/bruteforce | Covers malware artifacts involving brute force attacks of any sort. |
bninja/bloodninja | Covers malware authored by a malware author dubbed bloodninja. |
obf/enc | Obfuscated/encrypted malware artifact is somehow obfuscated/encrypted to conceal the malware code. |
indo/indoxploit/indox | Covers various versions of IndoXploit webshell. |
cracker/crack | Covers malware artifacts involving cracking credentials of any sort. |
klg/rms | Covers backdoors or webshells related to malware campaigns dubbed klg and rms. |
array | Malware that utilises arrays and array based functions to hide/ make legit looking backdoor code. |
skim/skimmer | Covers malware artifacts that involve web skimming. |
bot/botnet | Malicious code that resembles activities of a bot/botnet. |
irc/ircbot | Covers malicious IRC artifacts. |
url | Covers malicious URLs. |
Example
| Reason | Explanation |
SMW-SA-05155-sh.bkdr.wshll | type: server malware (SMW)detected: stand-alone (file is completely malicious) ( SA)signature ID: 05155file type: shell scripts ( sh)mlwcategory: artifacts that help attackers with partial or complete access to victims ( bkdr)mlwclassification: web shells ( wshll) |
18. Can Imunify360 firewall block traffic by domain name?
Unfortunately, Imunify360 does not have such ability.
19. What ports are used by WebShield?
The following ports are reserved:
- 52223
- 52224
- 52227-52235
You can find additional information in the following config files:
/etc/imunify360-webshield/ports.conf
/etc/imunify360-webshield/ssl_ports.conf
/etc/imunify360-webshield/webshield.conf
20. How to check that Anti-bot Challenge works?
First, remove an IP from the White list:
# imunify360-agent whitelist ip delete YOUR_IP
After that, run the following loop which triggers ModSecurity test rule 5 times in a row that leads to graylisting of the IP due to the sequence of 406 HTTP errors:
# for i in {1..5} ; do curl -s http://SERVER_IP/?i360test=88ff0adf94a190b9d1311c8b50fe2891c85af732 > /dev/null; echo $i; done
Where SERVER_IP is the server's IP address where Imunify360 is installed and where you want to check Anti-bot Challenge.
Also, it is possible to use a domain name of a website which DNS A record is pointed to the server. In other words, which is located on the server, like shown here
21. How to edit watched and excluded patterns for Malware Scanner?
There are two files:
/etc/sysconfig/imunify360/malware-filters-admin-conf/watched.txtdefines which paths are watched by Imunify360/etc/sysconfig/imunify360/malware-filters-admin-conf/ignored.txtdefines which paths are excluded by Imunify360
Note
This exclude list is intended for things like logs, tmp files, etc. Things that are not worth scanning in real-time and should not be allowed to execute. Proactive Defense will prevent include/require of PHP files that are excluded by realtime-scan. There is a separate ignore list for false-positive hits: see Ignore List
The watched.txt file contains additional shell-like glob patterns specifying what file system directories should be monitored by the realtime scanner.
Patterns can be absolute:
/another/folder
or relative to basedirs supplied by hosting control panels, if they start with a "+" sign:"
+*/www
This relative pattern will expand to the /home/*/www for cPanel, for example.
All patterns listed here have higher priority than stock watched and excluded lists supplied with Imunify360.
IMPORTANT
After making changes to this file, run the imunify360-agent malware rebuild patterns command.
The ignored.txt file contains additional regular expression patterns specifying what filesystem paths should not be monitored by the realtime scanner.
Patterns can be absolute:
/another/folder
or relative to basedirs supplied by hosting control panels, if they start with a "+" sign:"
+[^/]+/www/\.cache
This relative pattern may expand to the ^/home/[^/]+/www/\.cache for cPanel, for example. The + sign at the beginning is substituted with all base directories for user homes. Imunify360 picks up those directories from hosting panel configuration.
All patterns listed here have higher priority than stock watched and excluded lists supplied with Imunify360.
Custom exclude patterns have higher priority than custom watched patterns.
IMPORTANT
After making changes to this file, perform the imunify360-agent malware rebuild patterns command.
Note
Starting from v. 6.8, the support for mount namespaces was added. It allows us to collect file events coming from processes running in a separate mount namespace which improves security.
22. How to test rules based on ModSecurity tags?
You can use the following URIs to check what was activated.
curl -k 'https://example.org/?tag_test=joomla_core'
It will produce 403 only for sites with Joomla!.
curl -k 'https://example.org/?tag_test=wp_core'
It will produce 403 only for sites with WordPress.
23. "Imunify agent is not running" troubleshooting
Having the Imunify service installed, you may come across the situation when the message "Imunify agent is not running" is displayed when you try to access the Dashboard:
First of all, try to check the status of the service via the command line using the following command:
# service imunify360 status
In case you see the agent is inactive:
[root@host ~]# service imunify360 status


Redirecting to /bin/systemctl status imunify360.service
● imunify360.service - Imunify360 agent
Loaded: loaded (/usr/lib/systemd/system/imunify360.service; disabled; vendor preset: disabled)
Active: inactive (dead)
try to start it via the following command:
# service imunify360 start
It may also occur that despite the Imunify’s Dashboard showing the "agent is not running", the service itself is loaded and active.
You can check it with the following command:
# service imunify360 status -l
Example output:
[root@host ~]# service imunify360 status -l

Redirecting to /bin/systemctl status -l imunify360.service
● imunify360.service - Imunify360 agent
Loaded: loaded (/usr/lib/systemd/system/imunify360.service; enabled; vendor preset: disabled)
Active: active (running) since Mon 2020-05-13 02:58:43 WIB; 3min 54s ago
Main PID: 1234567 (python3)
Status: "Demonized"
CGroup: /system.slice/imunify360.service
├─1234567 /opt/alt/python35/bin/python3 -m im360.run --daemon --pidfile /var/run/imunify360.pid
├─1234568 /usr/bin/tail --follow=name -n0 --retry /usr/local/cpanel/logs/cphulkd.log
├─1234569 /usr/bin/tail --follow=name -n0 --retry /etc/apache2/logs/modsec_audit.log
├─1234570 /usr/bin/tail --follow=name -n0 --retry /var/ossec/logs/alerts/alerts.json
└─1234571 /opt/alt/python27/bin/python2.7 -s /usr/sbin/cagefsctl --wait-lock --force-update-etc
May 13 02:58:39 host.domain.com systemd[1]: Starting Imunify360 agent…
May 13 02:58:43 host.domain.com systemd[1]: Started Imunify360 agent.
May 13 02:58:43 host.domain.com imunify-service[4072717]: Starting migrations
May 13 02:58:43 host.domain.com imunify-service[4072717]: There is nothing to migrate
Most often, such circumstances attest that the Imunify service has been recently installed on the server. Sometimes, a desynchronization between the agent and the web interface may occur in such cases, and it can take a bit of time for the database to be integrated completely.
In case the issue is still the same after 60 minutes, you can try creating the backup of the Imunify files and do the service restart to force the sync process:
# service imunify360 stop
# mv /var/imunify360/files /var/imunify360/files_backup
# service imunify360 start
After these actions, wait until the files downloading and the migration process are complete – the agent will synchronize with the web interface and start working normally. You can monitor this process via
# tail -f /var/log/imunify360/console.log
Another similar workaround may be handy in case you locate some database-related error inside the /var/log/imunify360/error.log – by renaming the database file and restarting the service. There may be errors like
"Imunify360 database is corrupt. Application cannot run with corrupt database."
"sqlite3.DatabaseError"
"peewee.DatabaseError"
Imunify360 relies on several sqlite3 database files: imunify360.db, imunify360-resident.db, and imunify360-ipsetlists.db. They contain incidents, malware hits/lists, settings, etc. In case any of the databases are missing, they will be recreated upon service start:
# systemctl stop imunify360-agent
# systemctl restart imunify360
# systemctl start imunify360-agent
Alternatively, if imunify360-resident.db and imunify360-ipsetlists.db are missing, they can be recreated using the following command:
# systemctl stop imunify360-agent imunify360
# imunify360-agent checkdb --recreate-schema
# systemctl start imunify360 imunify360-agent
To force database recreation:
# systemctl stop imunify360-agent imunify360
# mv /var/imunify360/imunify360.db /var/imunify360/imunify360.db_backup
# mv /var/imunify360/imunify360-resident.db /var/imunify360/imunify360-resident.db_backup
# mv /var/imunify360/imunify360-ipsetlists.db /var/imunify360/imunify360-ipsetlists.db_backup
# systemctl start imunify360 imunify360-agent
If you face any difficulties during the progress or simply cannot make the agent start, please run
# imunify360-agent doctor
and provide the output to our Support Team at https://cloudlinux.zendesk.com/hc/requests/new.
You can find the ImunifyAV(+) instructions here.
24. "ssh_exchange_identification: Connection closed by remote host" troubleshooting
If you see the "ssh_exchange_identification: Connection closed by remote host" few times in a row, then this might be an evidence that SSH is under bruteforce attack and some of concurrent unauthenticated connections are dropped due to the /etc/ssh/ssh_config MaxStartups ... parameter default value. Thus, we would advise you to increase the MaxStartups ... from the default (e.g. 10:30:60) to 100:30:200 or something that is proportional to your SSH server bruteforce intensity (100:30:200 is for 25 attempts per second bruteforce intensity rate).
25. Where can I find the files backup location?
You can find the files backup location in the following directory: /var/imunify360/cleanup_storage/.
26. Ipset max elements error "Hash is full, cannot add more elements"
We would like to describe a possible situation you may come across while adding some IP(s) into the Black/White List. In case you are experiencing difficulties with the procedure and get the following error message within the Imunify360 Dashboard or the CLI:
Command ['/usr/sbin/ipset', 'add', 'i360.ipv4.blacklist', '11.22.33.44/32', 'timeout', '0', '-exist'] returned non-zero code 1,
Stdout: None,
Stderr: ipset v7.1: Hash is full, cannot add more elements
This means the ipset elements limit is exceeded.
The ipset size is hardcoded in the Imunify360 source code and currently, it is equal to a 100K IPs limit. You can confirm it with the following commands:
# ipset -t list i360.ipv4.blacklist
Name: i360.ipv4.blacklist
Type: hash:net
Revision: 3
Header: family inet hashsize 1024 maxelem 100000 timeout 0
Size in memory: 17040
References: 1
or
# ipset list "i360.ipv4.blacklist" | grep -oP '(?<=maxelem )[^ ]*'
100000
In case you wish to expand the lists to add more elements to a Black/White list, you can use the external one by creating a separate file with the list of the IPs you would like to whitelist/blacklist and placing it inside:
/etc/imunify360/whitelist/*.txt
or
/etc/imunify360/blacklist/*.txt
Please mind that apart from single IP addresses, subnets can be also added to blacklists to block more addresses.
Such lists support up to 500K elements. More details about configuring external lists can be found here.
Note
We also would like to clarify the decision of keeping the ipset size as it is – it's not reasonable to further increase the ipset size because it can lead to the degradation of network performance. There is no reason to keep IPs in the blacklist forever because IP addresses used by hackers are often changed. Please be informed that Imunify360 analytics do their best to provide optimal TTL for the graylist to ensure the best protection with a low false positives rate.
You may also want to add a whole region (or certain regions) to the blacklist, which can contain quite an impressive number of IPs. We believe the entire country cannot be malicious and crawlers can be operating from different locations. Still, if you wish to block the whole country/countries and to allow access to your server for specific IPs/subnets, we would recommend that you use the option to "block all except specified" for blocking the majority of common ports and whitelist the necessary IPs/subnets you wish to allow access to your server.
27. How to enable scan for end-users?
An administrator can enable the “scan” action for end-users in the config file via the CLI.
End-user scans are disabled by default. To enable it, run the followint command:
imunify360-agent config update '{"PERMISSIONS": {"allow_malware_scan": true}}'
All user scans are scheduled using a single queue. Thus, multiple scans requested by users will not affect server performance.
28. How can I disable RBL-based WAF protection?
In some cases, one might need to disable the RBL protection for some IPs, and it is not enough to just add the IP address to the Imunify360 whitelist. Because even the IP address is whitelisted but it is listed in our RBL, the request from this IP will be dropped on the WAF level (403 error). So, if you need to whitelist it on RBL, please follow these steps:
- Make sure that IP address is already whitelisted in firewall, you can check it via UI or CLI, see more details here:
- https://docs.imunify360.com/command_line_interface/#whitelist
- https://docs.imunify360.com/dashboard/#white-list
- Run the following command:
imunify360-agent create-rbl-whitelist
After these steps, the Imunify360 firewall whitelist will be synced with the WAF whitelist.
In case if you need to remove it from there, just remove it from the firewall whitelist and run the following command again:
imunify360-agent create-rbl-whitelist
Note
This will not remove the IP from our RBL lists, it just allows passing requests from the abuser's IP to your WEB server ignoring RBL, locally, only on the server where it was whitelisted.
Corner cases
IP whitelisting/port blocking precedence
Imunify360 has a corner case related to the following behavior of the Imunify360 firewall: when some IP is whitelisted and at the same time a certain port is blocked, the access to the port for the whitelisted IP is blocked (the port setting takes precedence).
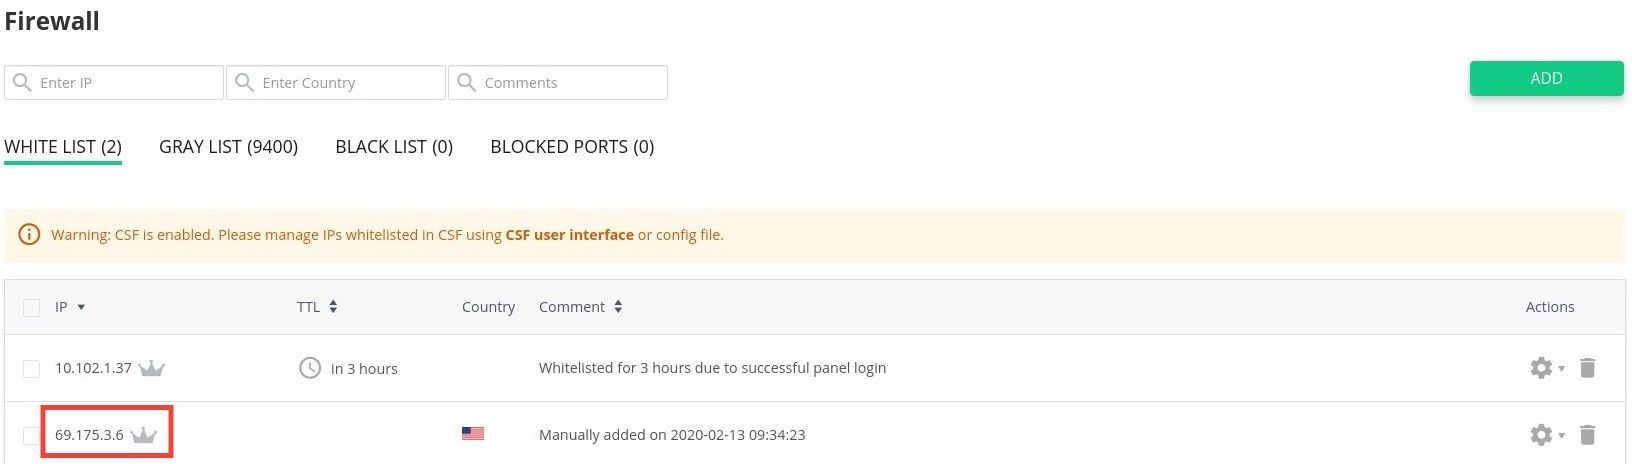

As a workaround, you may add the IP address to "Whitelisted IP" list for the blocked port:
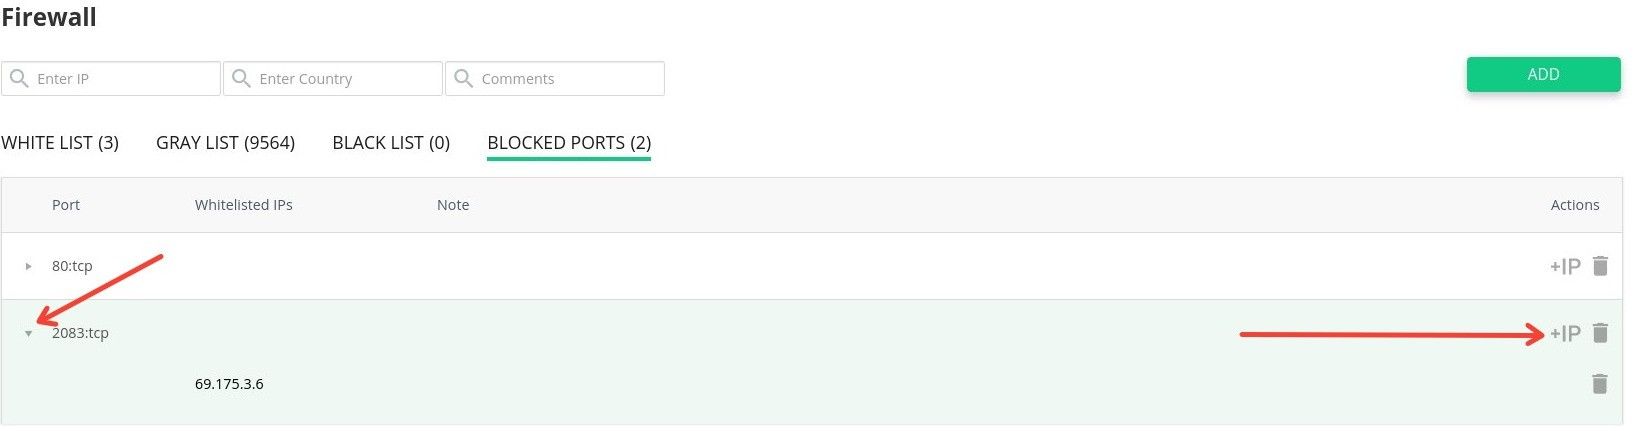
If you wish to use CLI - you may remove the blocked port for all IPs and add a new record with the list of whitelisted IPs. Here's an example for TCP port 2083:
imunify360-agent blocked-port delete 2083:tcp
imunify360-agent blocked-port add  2083:tcp --ips 69.175.3.6  10.102.1.37
Plesk related
How to get an Imunify activation key from the extended Plesk license
Often our clients purchase Imunify licenses through Plesk/Odin and in such cases, they get a universal key which includes the Imunify license and other additional keys for Plesk plugins. Such a key has the following syntax – A00B00-0CDE00-F0G000-HIGK00-LM0N00, – and initially, it is installed through Plesk automatically and the license gets activated successfully.
However, if it is required to re-register the agent for some reason or simply get the Imunify activation key separately, it would be impossible to apply the above-mentioned one – we would need to deal with the Imunify service separately.
To get the Imunify360 activation key from the extended Plesk license key, you will need to proceed with the following.
- Navigate to Tools & Settings >> Plesk >> License Management >> Additional License Keys
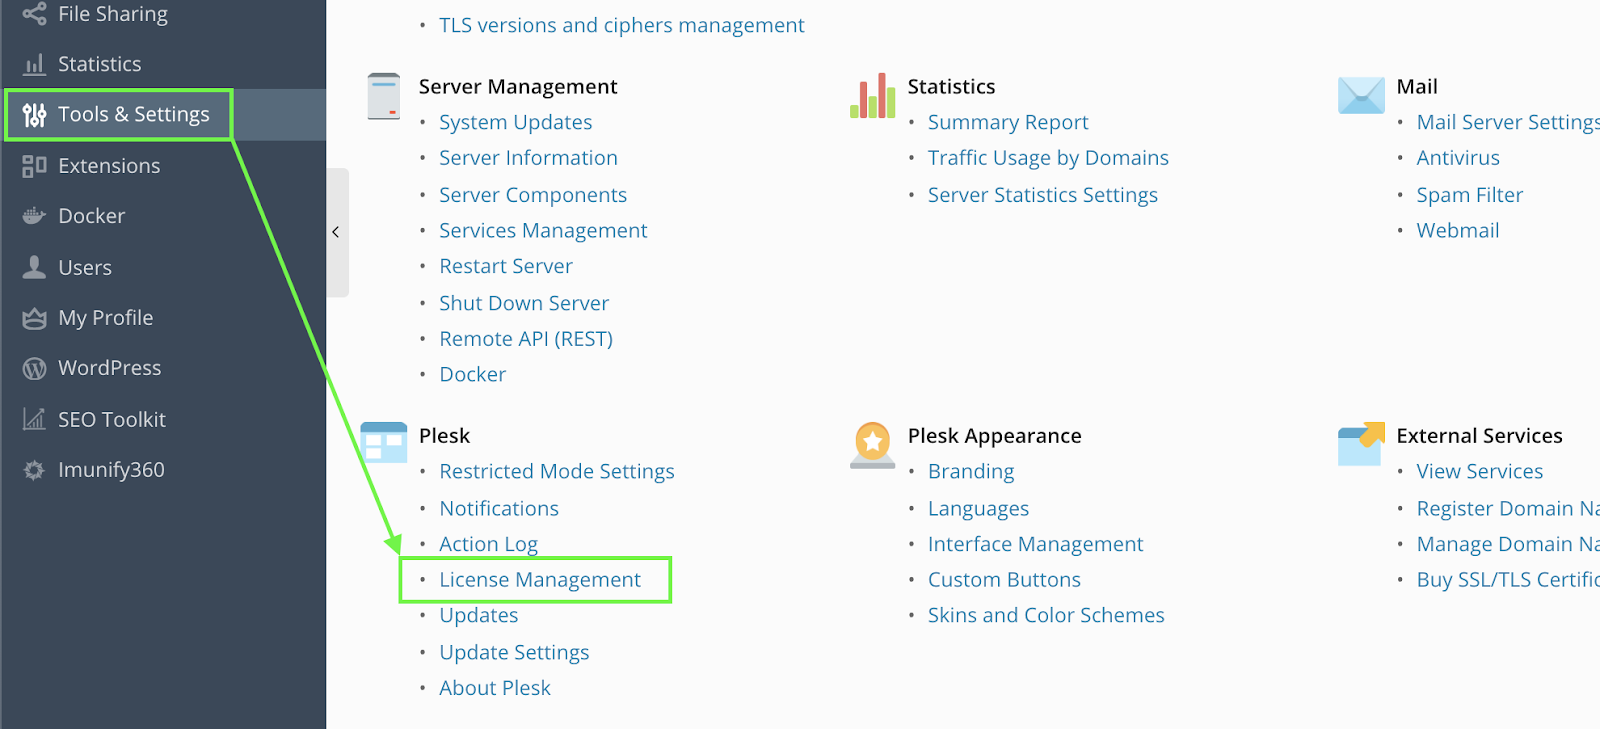
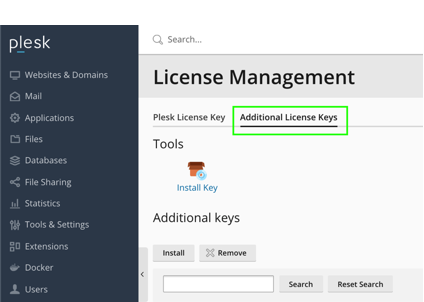
Click Download key next to the Imunify license listed on the page and open the file downloaded in some text editor
Find the following abstract:
<!--Key body-->
<aps-3:key-body core:encoding="base64" core:type="binary">YOUR_BASE64_ENCODED_LICENSE_KEY==</aps-3:key-body>
<!--Information about additional key-->
This is your base64-encoded key, and it should be decoded using a CLI utility or an online base64 decoder into UTF-8, e.g. https://www.base64decode.org. The new license key should have the following format:
IMxxxxxxxxxxxxxxx.Use the new key decoded to activate the service:
# imunify360-agent register DECODED_KEY_HERE
This is it!