Command-line Interface (CLI)
Description
Imunify360 command-line interface (CLI) makes working with Imunify360 basics and features from your terminal even simpler.
Usage
For access to Imunify360 agent features from command-line interface (CLI), use the following command:
imunify360-agent
Basic usage:
imunify360-agent [command] [--option1] [--option2]...
Options
The following options are available for all commands.
--console-log-level [ERROR,WARNING,INFO,DEBUG] | Level of logging input to the console |
-h, --help | Returns the help message |
--json | Returns data in JSON format |
-v, --verbose | Allows to return data in good-looking view if the--json option is used. |
Examples
This command returns help message for the
3rdpartycommand:imunify360-agent 3rdparty -hThis command returns data in JSON format in a good-looking view for the
getcommand:imunify360-agent get --period 1h --by-country-code UA --by-list black --json --verbose
Available commands:
3rdparty | Make Imunify360 the primary IDS |
backup-systems | Allows to manage backup systems integrated to Imunify360 |
blocked-port | Return/Edit list of blocked ports |
blocked-port-ip | Allows to change the list of IPs that are excluded (allowed) for a certain blocked port |
checkdb | Check database integrity |
check-domains | Send domain list check |
check modsec directives | Allows to check whether the global ModSecurity directives have values recommended by Imunify360 |
clean | Clean the incidents |
completions | Generate shell auto-completion scripts (bash/zsh/fish) |
config | Allows to update and show configuration file via CLI |
doctor | Collect info about system and send it to the Imunify support team |
eula | Allows to show and accept the end-user license agreement to automate installation |
features | Manage available features for Imunify360 |
feature-management | Manage Imunify360 features available for users |
fix modsec directives | Fixes the non-recommended values (sets them to ones recommended by Imunify360) |
get | Returns list of incidents |
hooks | Hooks-related commands |
import | Import data |
infected-domains | Returns infected domain list |
ip-list | To view or manage actual IPs within the local firewall lists (white/gray/blacklist) |
login | Allows to get a token which can be used for authentication in stand-alone Imunify UI. |
malware | Allows to manage malware options |
notifications-config | Allows to show and update notifications in the configuration file via CLI |
proactive | Allows to manage Proactive Defense feature |
register | Agent registration |
reload-lists | Allows to use external files with the list of Black/White-listed IPs. More details. |
remote-proxy | Allows to add an additional proxy subnet |
rstatus | Query the server to check if the license is valid |
rules | Allows user to manage disabled rules |
submit false-positive/false-negative | Allows to submit a file as false positive/false negative |
unregister | Unregister the agent |
vendors | Command for manipulating Imunify360 vendors |
version | Show version |
whitelisted-crawlers | Allows do operate with search engine domains |
Optional arguments for the commands:
--by-country-code [country_code] | Filters output by country code. Requires valid country code as argument. Find valid country codes here in column ISO ALPHA-2 CODE. |
--by-ip [ip_address] | Filters output by abuser's IP or by subnet in CIDR notation. Example: --by-ip 1.2.3.0/24. |
--by-list | Can be:
Example: --by-list black. |
--by-comment | Filters output by comment. |
--limit | limits the output with specified number of incidents. Must be a number greater than zero. By default, equals 100. |
--offset | Offset for pagination. By default, equals 0. |
--to | Allows to set the end of the period for filter. Format is a timestamp. |
--manual | Show only items that have been added manually. |
--order-by | List of fields to sort the results by. |
3rdparty
The 3rdparty command allows users to view information about 3rd-party intrusion detection systems (IDS) and their potential conflicts with Imunify360.
Usage:
imunify360-agent 3rdparty
command is a positional argument and can be:
conflicts | Show conflicts with other software |
list | List other IDS that might be running concurrently with Imunify360 |
Examples:
- The following command shows if there are any conflicts with other software:
imunify360-agent 3rdparty conflicts
- The following command lists other IDS that might be running concurrently with Imunify360. Here is the example of the command and the output on the server with Fail2ban enabled:
imunify360-agent 3rdparty list
fail2ban
Backup systems
Allows to manage backup systems integrated to Imunify360.
Usage:
imunify360-agent backup-systems [command] <value>
command is a positional argument and can be:
list | List of all available backup systems. |
status | Returns backup system status including a current backup system and enabling status. |
extended-status | Returns extended status including log file path, error on executing, current backup system, enabling status, current state, and current backup progress bar. |
init | <value> must be in the list of available backup systems. Initializes <value> backup system. |
disable | Disables backup system. |
The status command returns {'<key>': <value>} (JSON formatted):
| Key | Value |
|---|---|
backup_system | Str with the name of the currently enabled backup system. |
enabled | If backups are enabled — True, else — False. |
The extended-status command returns {'<key>': <value>} (JSON formatted):
| Key | Value |
|---|---|
log_path | Str with the path to the log file. |
error | Str with a human-friendly error message. |
backup_system | Str with the name of the currently enabled backup system. |
enabled | If backups are enabled — True, else — False. |
state | Str with the current running condition. Statuses: not_running, init, backup, done, unpaid. |
progress | This key is optional. It represents the progress of backup if it is running. |
Examples:
- The following command prints a list of all available backup systems:
imunify360-agent backup-systems list
cpanel
- The following command initializes cPanel backup system:
imunify360-agent backup-systems init cpanel
Backup initialization process is in progress
- The following command checks if the cPanel backup system is connected:
imunify360-agent backup-systems status
{'backup_system': 'cpanel', 'enabled': True}
Blocked ports
This command allows to view or edit ports, IPs, and protocols in the list of blocked ports.
Note
Imunify360 can block particular ports using the blocked-port command, yet it doesn't support a paradigm to "block everything but the selected ports". That could be achieved via legacy Linux iptables.
Usage:
imunify360-agent blocked-port [command] <value> [--option]
command is a first positional argument and can be:
add | add item(-s) to blocked ports |
delete | remove item(-s) from blocked ports |
edit | edit comment on item in the blocked ports |
list | list items(-s) in blocked ports |
value is an item to manipulate with. value is : separated pair of port number and protocol: 5432:tcp, 28:udp
option can be one or few of the optional arguments specified above and some more:
--comment | allows to add comment to the item |
--ips | block port for all IP addresses except the specified |
Example:
The following command blocks port 5555 for tcp connections with a comment "Some comment":
imunify360-agent blocked-port add 5555:tcp --comment "Some comment"
This one includes the list of example IPs and ports blocked:
# imunify360-agent blocked-port list

COMMENT       ID  IPS                                                                                   PORT  PROTO
              1   []                                                                                    3306  tcp
Some comment  2   [{'comment': None, 'ip': '111.111.111.111'}, {'comment': None, 'ip': '22.22.22.22'}]  5555  tcp
Blocked Port IP
This command blocks traffic for the specified IP addresses on a given port. Use it when you want to restrict access to a port only for certain IPs, rather than blocking the port for everyone, as done by blocked-port.
Usage:
imunify360-agent blocked-port-ip [command] <value> [--option]
command is a first positional argument and can be:
add | add IPs to blocked port |
delete | remove IPs from blocked port |
edit | edit comment on item in the blocked ports |
value is an IP address and blocked port.
option can be one or few of the optional arguments for all commands specified above and one more:
--comment | allows to add comment to the IP |
--ip | one or more IP addresses to block on the given port (comma-separated list supported) |
Example:
The following command blocks port tcp 5555 to all IPs except 12.34.56.78 with a comment 'Some comment':
imunify360-agent blocked-port-ip add 5555:tcp --ips 12.34.56.78 --comment 'Some comment'
OK
Checkdb
Checks database integrity. In case database is corrupt, then this command saves backup copy of the database at the /var/imunify360 and tries to restore integrity of the original database. Note that if this command cannot restore database integrity, then it will destroy the original broken database.
Usage:
imunify360-agent checkdb
The checkdb command includes the following options:
| Option | Description |
|---|---|
--recreate-schema | Recreates schemas for linked databases. Use this option if schema corruption or migration issues occur in attached (linked) DBs. It does not remove or recreate the main database. |
--no-recreate-schema | Runs a standard consistency check and repair without recreating schemas. |
--json | Returns output in JSON format. |
--verbose, -v | Enables verbose mode for detailed output. |
-h, --help | Shows help message and exits. |
Example:
The following command checks the database integrity:
imunify360-agent checkdb
Check-domains
Allows to send domains list for a check to the Imunify360 central server. After domains checked, the results is available via command infected-domains.
Note
check-domains command may take a few minutes to complete.
Usage:
imunify360-agent check-domains [--optional arguments]
Example:
The following command sends the domains list for a check to the Imunify360 central server:
imunify360-agent check-domains
OK
Check modsec directives
Allows to check whether the global ModSecurity directives have values recommended by Imunify360.
Usage:
imunify360-agent check modsec directives [--optional arguments]
Example:
The following command checks whether the global ModSecurity directives have values recommended by Imunify360.
imunify360-agent check modsec directives
WARNING: {'ignored': False, 'id': '1000', 'fix': 'Run `imunify360-agent fix modsec directives` command', 'title': "Wrong value for SecConnEngine ModSecurity directive. Expected: 'Off' Got: None", 'url': 'https://docs.imunify360.com/'}
WARNING: {'ignored': False, 'id': '1000', 'fix': 'Run `imunify360-agent fix modsec directives` command', 'title': "Wrong value for SecAuditEngine ModSecurity directive. Expected: 'RelevantOnly' Got: None", 'url': 'https://docs.imunify360.com/'}
WARNING: {'ignored': False, 'id': '1000', 'fix': 'Run `imunify360-agent fix modsec directives` command', 'title': "Wrong value for SecRuleEngine ModSecurity directive. Expected: 'On' Got: None", 'url': 'https://docs.imunify360.com/'}
Clean
Clean the incident list.
Usage:
imunify360-agent clean [--optional arguments]
Optional arguments:
--days | cleanups incidents from database, if there are more than specified days quantity Example: --days 5.this option will cause deletion of all incidents that are older than 5 days from today |
--limit | leaves only limited number of the incidents in the database and deletes the others Example: --limit 5000.this option will leave only 5000 new incidents and delete the others |
Example:
The following command deletes all incidents that are older than 5 days from today and leave only 5000 new incidents. The output identifies the number of the incidents cleaned.
# imunify360-agent clean --days 5 --limit 5000
2521
Completions
Prints a shell auto-completion script for imunify360-agent to stdout. Once installed, it enables tab-completion for all subcommands and flags.
Supported shells: bash, zsh, fish.
Note
The command runs locally and does not require the Imunify360 agent service to be running.
Usage:
imunify360-agent completions <shell>
shell is a positional argument and can be:
bash | Generate completion script for Bash |
zsh | Generate completion script for Zsh |
fish | Generate completion script for Fish |
Installation examples:
- Install for Bash (system-wide):
imunify360-agent completions bash | sudo tee /etc/bash_completion.d/imunify360-agent > /dev/null
Start a new shell session afterwards for completions to take effect.
- Install for Zsh (per-user):
mkdir -p ~/.zsh/completions
imunify360-agent completions zsh > ~/.zsh/completions/_imunify360-agent
Ensure ~/.zsh/completions is on your fpath and compinit is loaded in your ~/.zshrc.
- Install for Fish (per-user):
imunify360-agent completions fish > ~/.config/fish/completions/imunify360-agent.fish
Config
Allows to update and show configuration file via CLI.
Usage:
imunify360-agent config [command] [configuration options]
command can be:
show | show configuration file |
update | update configuration file |
You can find all configuration options here and instructions on how to apply configuration changes from CLI here.
Example:
Set MALWARE_SCAN_INTENSITY.cpu = 5 configuration option from a command line:
imunify360-agent config update '{"MALWARE_SCAN_INTENSITY": {"cpu": 5}}'
The successful output should display the configuration file content.
Per-user configuration
You can view and update configuration for a specific system user. Only the options allowed to end users are available (e.g., MALWARE_SCAN_SCHEDULE). Missing user options inherit values from the admin/global config.
# Show effective configuration for a user
imunify360-agent config show --user <username> --json

# Set per-user background malware scan schedule: weekly at 03:00 on Monday
imunify360-agent config update '{"MALWARE_SCAN_SCHEDULE": {"interval": "week", "hour": 3, "day_of_week": 1}}' --user <username>

# Disable scheduled background scans for a user
imunify360-agent config update '{"MALWARE_SCAN_SCHEDULE": {"interval": "none"}}' --user <username>
Note
Daily/Weekly schedules are available on Imunify360 and ImunifyAV+. On ImunifyAV, only none and month intervals are available.
Doctor
Collecting information about Imunify360 state, generating the report and sending it to Imunify360 Support Team. This command can be used in case of any troubles or issues with Imunify360. This command will generate a key to be sent to Imunify360 Support Team. With that key Imunify360 Support Team can help with any problem as fast as possible.
Usage:
imunify360-agent doctor
Please, provide this key:
SSXX11xXXXxxxxXX.1a1bcd1e-222f-33g3-hi44-5551k5lmn555
to Imunify360 Support Team
Eula
Allows to show and accept the end-user license agreement to automate installation.
Usage:
imunify360-agent eula [command]
command can be one of the following:
accept | accept end-user license agreement |
show | show end-user license agreement |
Example:
Show the end-user license agreement:
imunify360-agent eula show
Features
Allows to enable or disable additional CloudLinux software included in Imunify360 for free. The following software is available:
- KernelCare – use
kernelcarefeature name - HardenedPHP – use
hardened-phpfeature name
Note
You cannot install arbitrary 3rd party components or anything besides the features listed above. Please, use legacy linux package installation process for that
Usage:
imunify360-agent features [command] <feature name>
command is a positional arguments and can be :
install | allows to enable software |
remove | allows to disable software |
status | allows to check the status of the software |
list | allows to list all available software |
Examples:
- The following command checks if KernelCare is installed:
imunify360-agent features status kernelcare
{'status': 'not_installed', 'message': 'KernelCare is not installed'}
- The following command installs KernelCare:
imunify360-agent features install kernelcare
- The following command uninstalls KernelCare:
imunify360-agent features remove kernelcare
Feature-management
Allows to manage Imunify360 features available for users.
Usage:
imunify360-agent feature-management [command] [--optional argument]...
Command can be one of the following:
defaults | show the default value for each feature that is applied for newly created user |
disable | disable a feature for some or all users |
enable | enable a feature for some or all users |
get | obtains the status of all available features for a USER |
list | list all available features |
native | allows to enable/disable the Native Features Management using WHM/cPanel package extensions |
show | allows to show enabled features |
Optional argument for the enable/disable commands can be one of the following:
[--feature av] | enable/disable Malware Cleanup |
[--feature proactive] | enable/disable Proactive Defense |
[--users [USERS [USERS ...]]] | specifies the list of users which will be affected, otherwise the default value will be changed |
The mandatory argument for the get command:
[--user USER] | specifies a user name to obtain the status of features for |
The mandatory argument for the native command:
disable | disable the Native Features Management using WHM/cPanel package extensions and return the original Imunify360 Features Management back |
enable | enable the Native Features Management using WHM/cPanel package extensions |
Example:
- The following command enables Malware Cleanup feature for the
user1:
imunify360-agent feature-management enable --feature av --users user1
- The following command disables the Native Features Management
imunify360-agent feature-management native disable
Once the command executed:
- The Native Features Management will be deactivated
- The Imunify360 Package Extensions will be removed from all packages
- The original Imunify360 Features Management will be activated
Note
Imunify360 will keep applying users Features Management settings stored in their data bases after switching to the original Imunify360 Features Management.
Warning
feature-management enable/disable --feature av and feature-management enable/disable --feature proactive commands will start functioning.
- The following command enables the Native Features Management
imunify360-agent feature-management native enable
OK
Once the command executed, the following default Imunify360 Package Extension settings will be applied to all Packages:
- Malware Scanner - View Reports Only
- Proactive Defense - Available
Imunify360 Package Extensions will be auto-enabled for all packages disregarding the fact they have Imunify360 plugin enabled or not.
All existing Features Management settings will be overridden with the Imunify360 Package Extensions ones for all users.
Note
Features Management tab will be hidden on the User Interface.
Warning
feature-management enable/disable --feature av and feature-management enable/disable --feature proactive commands will stop functioning.
Fix modsec directives
Fixes the non-recommended values (sets them to ones recommended by Imunify360)
Usage:
imunify360-agent fix modsec directives [--optional arguments]
Example:
The following command sets the ModSecurity directives values to ones recommended by Imunify360:
imunify360-agent fix modsec directives
OK
If the execution was unsuccessful, the actual error message will be displayed if there are any issues with that.
Get
The command returns the lists of incidents.
Usage:
imunify360-agent get [--required argument] [--optional argument]...
Option can be one or few of the optional arguments listed above and one more.
--order-by [ORDER_BY [ORDER_BY ...]] | Sorting order. |
--limit | Limits the output with specified number of IPs. Must be a number greater than zero. By default, equals 50. |
--by-country-code [country_code] | Filters output by country code. Requires valid country code as argument. Find valid country codes in CIDR notation in column ISO ALPHA-2 CODE. |
--period [period] | Timeframe. Allows to specify the amount of time starting from the current day. Should be greater than (or equal to) 1 minute. Can be specified in format:
--period 5d will return a list of incidents for 5 days. |
--since [timestamp] | allows to set start time to filter the list of incidents by period |
--to [timestamp] | allows to set finish time to filter the list of incidents by period |
--severity | allows to set severity to filter the list of incidents |
--offset OFFSET | offset for pagination. By default, equals 0 |
--by-abuser-ip [BY_ABUSER_IP] | selection based on abuser IP address |
--json | return data in JSON format |
--search | string to search incidents by |
--by-list | Can be:
Example: --by-list black. |
Example:
The following command shows the incidents (in JSON format) for recent one hour, filtered by country code UA and filtered by Black List IPs:
imunify360-agent get --period 1h --by-country-code UA --by-list black --json
This one will show the incidents with the severity level 5 of triggered rules, e.g.:
# imunify360-agent get --period 20d --severity 5

TIMESTAMP   ABUSER        COUNTRY  TIMES    NAME                         SEVERITY
1600162404  11.22.33.44    CN        1      SSHD authentication failed.  5
1600154599  11.22.33.44    CN        1      SSHD authentication failed.  5
1600138163  11.22.33.44    CN        1      Process exiting (killed).    5
To get more detailed output to check the plugin or the rule ID these incidents belong to, use the --json argument.
Hooks
You can find more about hooks here.
This command allows managing hooks.
Usage:
imunify360-agent hook [command] --event [event_name|all] [--path </path/to/hook_script>]
command can be one of the following:
add | register a new event handler |
delete | unregister existing event handler |
list | show existing event handlers |
add-native | register a new native event handler |
--event [event_name|all] | defines a particular event that invokes a registered handler as opposed to all keyword |
--path </path/to/hook_script> | shall contain a valid path to a handler of the event, it shall be any executable or Python Native event handlers that agent will run upon a registered event |
Example:
The following command shows existing event handlers. If you have any hooks configured, the output will include something similar to this:
imunify360-agent hook list --event all
Event: malware-detected, Path: /root/directory/im360mwscannereventhooks/get_user.py
Import
This command allows to import Black List and White List from the other 3rd party IDS (only CSF supported at the moment) to Imunify360 database. Note. If CSF is enabled, then it is not necessary to run the command because Imunify360 is integrated with CSF.
Usage:
imunify360-agent import {blocked-ports, wblist} ...
Positional arguments:
blocked-ports | Import blocked-ports from other IDS |
wblist | Import White/Black List from other IDS |
Example:
The following command will import Black List and White List from the 3rd party IDS:
imunify360-agent import wblist
Infected-domains
Allows to retrieve infected domains list.
Usage:
imunify360-agent infected-domains [--optional arguments]
Optional arguments:
--limit | Limits the output with the specified number of domains. Must be a number greater than zero. By default, equals 100. |
--offset | Offset for pagination. By default, equals 0. |
Example:
The following command displays the results of the check-domains command. In case there are no infected domains located on the server, you will see no output. If there are any, you will get the following output:
imunify360-agent infected-domains
'domain1.com'
'domain2.com'
IP-List
This CLI tool allows you to view or manage actual IPs within the local firewall lists.
Usage:
imunify360-agent ip-list local [command] <value> [--option]
command is a positional argument and can be:
add | Add item(-s) from local ip-list |
delete | Remove item(-s) from local ip-list |
list | List item(-s) in local ip-list |
option:
-h, --help | Show this help message and exit |
value is an item to manipulate with. It must be a valid IP address.
List
Usage:
imunify360-agent ip-list local list [--options] <value>
options:
--by-ip BY_IP | Filters output by abuser's IP or by subnet in CIDR notation. |
--purpose [PURPOSE ...] | IP List purpose can be:white - do not block these IPs. drop - deny access on the network level (DROP packets via iptables, and respond with 403 on web ports even when the request comes through a proxy). captcha - deny access on the network level for all non-web ports, show a Splash Screen challenge page on web ports. splashscreen - check the visitor's browser before allowing access to websites. |
-by-country-code BY_COUNTRY_CODE | Filters output by country code. Requires valid country code as argument. Find valid country codes here in column ISO ALPHA-2 CODE. |
--by-comment BY_COMMENT | Filters output by comment |
--limit LIMIT | Limits the output with specified number of incidents |
--offset OFFSET | Offset for pagination |
--order-by [ORDER_BY ...] | List of fields to sort the results by. Each field must be followed by "+" for descending order or "-" for ascending order (e.g., --order-by ip+ or --order-by purpose-) |
--by-type {ip,country} | Filters output by item tipe [country|ip] |
--json | Returns data in JSON format |
Note that by default list command outputs only first 100 items in the list as if it was run as imunify360-agent ip-list local list --limit 100.
Blacklist
This command allows you to view or edit actual IPs in the Black List.
Usage:
imunify360-agent ip-list local [command] --purpose drop <value> [--options]
command is a positional argument and can be:
add | Add item(-s) from local ip-list |
delete | Remove item(-s) from local ip-list |
list | List item(-s) in local ip-list |
options is a second positional argument and can be:
--purpose {white,drop,captcha} | IP List purpose can be white - do not block these IPs.drop - deny access on the network level (DROP packets via iptables, and respond with 403 on web ports even when the request comes through a proxy).captcha - deny access on the network level for all non-web ports, show a Splash Screen challenge page on web ports.splashscreen - check the visitor's browser before allowing access to websites. |
--expiration EXPIRATION | Allows specifying expiration time for the listed IP (in seconds since epoch) |
-comment COMMENT | Allows to add comment to the item |
--scope {local,group} | Allows to set the scope to Global/Local. Accepts two values local (a default value, means "add IP on this server only") and group (means "add IP for the whole group in which this server is"). |
--json | Returns data in JSON format |
Examples:
- The following command lists IP addresses added to the Black List:
imunify360-agent ip-list local list --purpose drop
- The following command adds IP 1.2.3.4 to the Black List with a comment “one bad IP”:
imunify360-agent ip-list local add --purpose drop 1.2.3.4 --comment "one bad IP"
OK
- To check whether specific IP address is in the list, you can run the following command (where 12.34.56.78 is that specific IP address):
imunify360-agent ip-list local list --by-ip 12.34.56.78
- The following command returns a list of IPs in the Black List which are from Bolivia (visit here for other country codes):
imunify360-agent ip-list local list --by-country-code BO
- The following command adds an IP 1.2.3.4 to the Black List and sets the scope to group:
imunify360-agent ip-list local add --purpose drop 1.2.3.4 --scope group
OK
- To blacklist multiple IP addresses, put them into a file and add to the black list as follows:
cat list.txt | xargs -n 1 imunify360-agent ip-list local add --purpose drop
The alternative would be using the external white/black list feature.
- For the following example, the old blacklist command syntax is used. This command adds Bolivia to the Black List (available commands
blacklist country add/delete/edit/list):
imunify360-agent blacklist country add BO
OK
Note
If an IP address has been added to the blacklist on a group of servers, it is enough to remove it from the blacklist on one of the servers, and it will be removed from the blacklist on all servers in the group.
Warning
For now, ipset supports only IPv6/64 networks. In most cases, it is enough to specify the mask /64. An example of a proper IPv6 address with the subnet mask: 2001:db8:abcd:0012::0/64.
Graylist
This command allows to view or edit IP Gray List.
Usage:
imunify360-agent ip-list local [command] --purpose captcha <value> [--options]
command is a positional argument and can be:
add | Add item(-s) to local ip-list |
delete | Remove item(-s) from local ip-list |
list | List item(-s) in local ip-list |
options is a second positional argument and can be:
--purpose {white,drop,captcha} | IP List purpose can be white - do not block these IPs.drop - deny access on the network level (DROP packets via iptables, and respond with 403 on web ports even when the request comes through a proxy).captcha - deny access on the network level for all non-web ports, show a Splash Screen challenge page on web ports.splashscreen - check the visitor's browser before allowing access to websites. |
--expiration EXPIRATION | Allows specifying expiration time for the listed IP (in seconds since epoch) |
-comment COMMENT | Allows to add comment to the item |
--scope {local,group} | Allows to set the scope to Global/Local. Accepts two values local (a default value, means "add IP on this server only") and group (means "add IP for the whole group in which this server is"). |
--json | Returns data in JSON format |
Note that by default list command outputs only first 100 items in the list as if it was run as
imunify360-agent ip-list local list --purpose captcha --limit 100
or
imunify360-agent ip-list local list --purpose splashscreen –limit 100
Example:
- To check whether specific IP address is in the list, you can run the following command:
imunify360-agent ip-list local list --purpose captcha --by-ip 12.34.56.78
- The following command will remove IP
1.2.3.4from the Gray List:
imunify360-agent ip-list local delete --purpose captcha 12.34.56.78
Whitelist
This command allows to view or edit actual IPs and domains in the White List.
Usage:
imunify360-agent ip-list local [command] --purpose white <value> [--options]
command is a positional argument and can be:
add | Add item(-s) from local ip-list |
delete | Remove item(-s) from local ip-list |
list | List item(-s) in local ip-list |
options is a second positional argument and can be:
--purpose {white,drop,captcha} | IP List purpose can be white - do not block these IPs.drop - deny access on the network level (DROP packets via iptables, and respond with 403 on web ports even when the request comes through a proxy).captcha - deny access on the network level for all non-web ports, show a Splash Screen challenge page on web ports.splashscreen - check the visitor's browser before allowing access to websites. |
--expiration EXPIRATION | Allows specifying expiration time for the listed IP (in seconds since epoch) |
-comment COMMENT | Allows to add comment to the item |
--scope {local,group} | Allows to set the scope to Global/Local. Accepts two values local (a default value, means "add IP on this server only") and group (means "add IP for the whole group in which this server is"). |
--full-access | Only for the add command. Allows to grant full access to the IP or subnet ignoring the rules in Blocked ports. |
--no-full-access | Only for the add command. Allows to remove full access of the IP or subnet. |
--json | Returns data in JSON format |
Examples:
- The following commands adds IP 1.2.3.4 to the White List with a comment “one good ip”:
imunify360-agent ip-list local add --purpose white 11.22.33.44 --comment "one good IP"
OK
- To check whether specific IP address is in the list, you can run the following command (where 11.22.33.44 is that specific IP address):
imunify360-agent ip-list local list --purpose white --by-ip 11.22.33.44
AUTO_WHITELISTED  COMMENT       COUNTRY  CTIME       DEEP  EXPIRATION  FULL_ACCESS  IMPORTED_FROM  IP           MANUAL  NETMASK     NETWORK_ADDRESS  PURPOSE  SCOPE  VERSION
False             one good IP  US       1715940270  None  0           None         None           11.22.33.44  True    4294967295  185999660        white    local  4
- The following command returns a list of IPs in the White List which are from United States:
imunify360-agent ip-list local list --by-country-code US
- The following command adds an IP 1.2.3.4 to the White List and sets the scope to group:
imunify360-agent ip-list local add --purpose white 1.2.3.4 --scope group
OK
- To whitelist multiple IP addresses, put them into a file and add to the white list as follows:
cat list.txt | xargs -n 1 imunify360-agent ip-list local add --purpose white
The alternative would be using the external white/black list feature.
- For the following example, the old whitelist command syntax is used:
- The following command adds Bolivia to the White List (available commands
whitelist country add/delete/edit/list):
- The following command adds Bolivia to the White List (available commands
imunify360-agent whitelist country add BO
OK
- The following command adds domain with a name example.com to the White List (available commands:
add/delete/list/reset-to):
imunify360-agent whitelist domain add example.com
OK
Wildcard Domain Support:
Use wildcards to efficiently whitelist all subdomains, with the option to also include the main domain itself.
Whitelisting all subdomains (but not the parent domain itself):
To whitelist all subdomains like
foo.example.comorbar.example.com(e.g., anything before.example.com), but notexample.comitself, use the *. prefix:
imunify360-agent whitelist domain add "*.example.com"
OK
Whitelisting a domain and all its subdomains:
To whitelist both the main domain (e.g.,
example.com) AND all its potential subdomains (e.g.,foo.example.com,blog.example.com), use the . prefix:
imunify360-agent whitelist domain add .example.com
OK
This is a convenient shorthand and is equivalent to adding example.com and *.example.com separately.
Whitelisting all domains on the server (Global Whitelist):
To whitelist every domain and subdomain hosted on the server, use a single asterisk wildcard (
"*").
imunify360-agent whitelist domain add "*"
OK
Login
Allows to get a token which can be used for authentication in stand-alone Imunify UI.
Usage:
imunify360-agent login [command] [--optional arguments]
command can be one of the following:
get | returns a token for USERNAME (must be executed by root) |
pam | uses PAM to check the provided credential and returns a token for USERNAME if PASSWORD is correct |
Optional arguments for get:
--username USERNAME |
Optional arguments for pam:
--username USERNAME |
--password PASSWORD |
Example:
- You can use the
login getcommand to implement your own authorization mechanism for stand-alone Imunify. For example, you can generate tokens for users which are already authorized in your system/panel, and redirect to stand-alone Imunify UI withhttps://example.com/#/login?token=<TOKEN>orhttps://example.com/#?token=<TOKEN>in URL. (You can also set it in localStorage:localStorage.setItem('I360_AUTH_TOKEN', '<TOKEN>');). The output will display similar to the following:
imunify360-agent login get --username my-user1
eyJ0eXAiOiJKV1QiLCJhbGciOiJIUzI1NiJ9.eyJleHAiOjE2MDAyNDQwMTAuMDk5MzE5LCJ1c2VyX3R5cGUiOiJjbGllbnQiLCJ1c2VybmFtZSI6ImNsdGVzdCJ9.V_Q03hYw4dNLX5cewEb_h46hOw96KWBWP0E0ChbP3dA
- This command is used internally by stand-alone Imunify UI as the default authorization method.
imunify360-agent login pam --username my-user1 --password ********
Malware
Allows to manage malware options.
Usage:
imunify360-agent malware [command] [--optional arguments]
Available commands:
ignore | malware Ignore List operations |
malicious | malware Malicious List operations |
on-demand | on-demand Scanner operations |
suspicious | malware Suspicious List operations |
cleanup status | show the status of the cleanup process |
history list | lists the complete history of all malware-related incidents/actions (optional arguments available) |
rebuild patterns | allows to save changes after editing watched and excluded patterns for Malware Scanner. See details here. |
user | allows to perform Malware Scanner operations for a user |
Optional arguments:
--limit LIMIT | Limits the output with the specified number of domains. Must be a number greater than zero. By default, equals 100. |
--offset OFFSET | Offset for pagination. By default, equals 0. |
--since SINCE | Start date. |
--to TO | End date. |
--user USER | Returns results for a chosen user. |
--order-by [ORDER_BY [ORDER_BY ...]] | Sorting order. |
--by-status [BY_STATUS [BY_STATUS ...]] | Return items with selected status. |
--by-scan-id BY_SCAN_ID | Return items with selected ID. |
--items ITEMS | Return selected items. |
--search SEARCH | Search query. |
action is the second positional argument for ignore and can be one of the following:
add | add file PATHS to the Ignore List |
delete | delete file PATHS from the Ignore List |
list | shows Ignore List entries (optional arguments apply) |
where PATHS are the absolute paths to files or folders divided by a whitespace.
command2 is the second positional argument for the malicious command and can be one of the following:
cleanup | clean up infected ITEMS for a USER |
cleanup-all | clean up all files that have been detected as infected for all users |
restore-original | restore the original (malicious/infected) file to its original location |
diff | get difference between infected and cleaned file |
list | list malicious/infected files |
move-to-ignore | move a Malicious List entry to the (malware) Ignore List |
remove-from-list | remove malicious/infected files from the Malicious List |
restore-from-backup | restore a clean version of infected file from backup |
restore-from-quarantine | deprecated in ver. 5.9. Restore a quarantined file. The file will be automatically re-scanned |
The optional arguments for malicious diff are:
--id ID | specific file by ID. IDs be obtained via malware malicious list |
--user USER | admins can filter results by user. Users can only see their own files |
--json | return data in JSON format. |
--verbose, -v |
action is the second positional argument for on-demand and can be one of the following:
list | list all on-demand scans performed |
start --path PATH | starts an on-demand scan for a specified PATH |
status | show the on-demand malware scanner status |
stop | stop on-demand malware scanner process |
queue put | put file PATHS to the queue for on-demand scan |
queue remove | remove scans from the queue for on-demand scan |
The optional arguments for on-demand start and on-demand queue put are:
--ignore-mask IGNORE_MASK |
--follow-symlinks |
--no-follow-symlinks |
--file-mask FILE_MASK |
--intensity-cpu {1 to 7} 1 means the lowest intensity, 7 means the highest intensity |
--intensity-io {1 to 7} 1 means the lowest intensity, 7 means the highest intensity |
--prioritize |
action is the second positional argument for suspicious and can be one of:
list | obtain the list of Suspicious List entries |
move-to-ignore | move a Suspicious List entry to the (malware) Ignore List |
action is the second positional argument for user and can be one of the following:
cleanup USER | clean all infected files for a user |
restore-original USER | restore all original files for a user |
list | list all users and their current infection status |
scan | scan all users |
Examples
- The following command starts on-demand scanner for the path specified after the
startcommand:
imunify360-agent malware on-demand start --path /home/<username>/public_html/
- The following command shows the example of the
ignore-maskusage when you have to scan alld*folders except for thedixon77w.comanddunnrrr.com:
imunify360-agent malware on-demand start --path='/var/www/vhosts/d*' --ignore-mask='/var/www/vhosts/dixon77w.com/*,/var/www/vhosts/dunnrrr.com/*'
- The following command adds on-demand scans for the selected path(s) to the scan queue
imunify360-agent malware on-demand queue put "/home/user1/some folder" "/home/user2" --file-mask="*.php"
- The following command removes the selected scans from the scan queue
imunify360-agent malware on-demand list	# get scan_ids for the selected scans from the malicious list
imunify360-agent malware on-demand queue remove 84f043211dc045ae8e6d641f3b9fdb0a 8c4ee39d4d8f43e296e893940c8e791a
- The following command stops the on-demand Malware Scanner process
imunify360-agent malware on-demand stop
- The following command stops the on-demand Malware Scanner process and clears the scan queue
imunify360-agent malware on-demand stop --all
- The following command shows how to get an extended list of malicious files for a particular user. By default, a limit value equals to 50
imunify360-agent malware malicious list --user cltest --limit 500
The list of the infected files found will be looking in the following way:
CLEANED_AT  CREATED     EXTRA_DATA  FILE  HASH  ID  MALICIOUS  SCAN_ID  SCAN_TYPE  SIZE  STATUS  TYPE  USERNAME
None        1599955297  {}          /home/cltest/public_html/test/TsMeJD.php        275a021bbfb6489e54d471899f7db9d1663fc695ec2fe2a2c4538aabf651fd0f  1627  True       1996cd86e6b14b12a1c165e79e3540d9  background  68    found   SMW-SA-05057-eicar.tst-4  cltest
None        1599955297  {}          /home/cltest/public_html/test/TZlfnU.php        275a021bbfb6489e54d471899f7db9d1663fc695ec2fe2a2c4538aabf651fd0f  1628  True       1996cd86e6b14b12a1c165e79e3540d9  background  68    found   SMW-SA-05057-eicar.tst-4  cltest
None        1599955297  {}          /home/cltest/public_html/test/Ke7V8n.php        275a021bbfb6489e54d471899f7db9d1663fc695ec2fe2a2c4538aabf651fd0f  1629  True       1996cd86e6b14b12a1c165e79e3540d9  background  68    found   SMW-SA-05057-eicar.tst-4  cltest
None        1599955297  {}          /home/cltest/public_html/yoUq0L.php             275a021bbfb6489e54d471899f7db9d1663fc695ec2fe2a2c4538aabf651fd0f  1630  True       1996cd86e6b14b12a1c165e79e3540d9  background  68    found   SMW-SA-05057-eicar.tst-4  cltest
None        1599955297  {}          /home/cltest/public_html/test/PKiuhY.php        275a021bbfb6489e54d471899f7db9d1663fc695ec2fe2a2c4538aabf651fd0f  1631  True       1996cd86e6b14b12a1c165e79e3540d9  background  68    found   SMW-SA-05057-eicar.tst-4  cltest
None        1599955297  {}          /home/cltest/public_html/public_html/Zqrsvh.php  275a021bbfb6489e54d471899f7db9d1663fc695
- The following command adds the specified path to the Ignore List
imunify360-agent malware ignore add /home/user1/public_html/ "/home/some user/public_html/index.php"
- The following command saves changes after editing watched and excluded patterns for Malware Scanner.
imunify360-agent malware rebuild patterns
- The following command lists all users and their current infection status
imunify360-agent malware user list
The successful initiation/stopping of a scanning process or adding of ignore directories/files should give you OK in the output.
Notifications config
Allows administrators to do the following:
- configure email addresses to submit reports on events execution
- execute custom scripts on events execution
Usage:
imunify360-agent notifications-config [command] [configuration options]
command can be:
show | returns the full config as a JSON |
update | updates the config (partial update is supported) and returns the full updated config as a JSON |
We advise administrators to use the notifications-config show to get the full config, pick what they want to edit, and feed it to the notifications-config update.
The general structure of the imunify360-agent notifications-config show command output:
{
   "rules": {
      "SCRIPT_BLOCKED": {
         "SCRIPT": {
            "scripts": [],
            "period": 1,
            "enabled": False
         },
         "ADMIN": {
            "period": 1,
            "admin_emails": [],
            "enabled": False
         }
      },
      "USER_SCAN_FINISHED": {
         "SCRIPT": {
            "scripts": [],
            "enabled": False
         }
      },
      "USER_SCAN_MALWARE_FOUND": {
         "SCRIPT": {
            "scripts": [],
            "enabled": False
         },
         "ADMIN": {
         "admin_emails": [],
         "enabled": False
         }
      },
      "USER_SCAN_STARTED": {
         "SCRIPT": {
            "scripts": [],
            "enabled": False
         }
      },
      "CUSTOM_SCAN_STARTED": {
         "SCRIPT": {
            "scripts": [],
            "enabled": False
         }
      },
      "REALTIME_MALWARE_FOUND": {
         "SCRIPT": {
            "scripts": [],
            "period": 1,
            "enabled": False
         },
         "ADMIN": {
            "period": 1,
            "admin_emails": [],
            "enabled": False
         }
      },
      "CUSTOM_SCAN_FINISHED": {
         "SCRIPT": {
            "scripts": [],
            "enabled": False
         }
      },
      "CUSTOM_SCAN_MALWARE_FOUND": {
         "SCRIPT": {
            "scripts": [],
            "enabled": False
         },
         "ADMIN": {
            "admin_emails": [],
            "enabled": False
         }
      }
   },
   "admin": {
      "notify_from_email": None,
      "default_emails": []
   }
}
Let's review all the options.
Rules:
- SCRIPT_BLOCKED – occurs when the Proactive Defense has blocked malicious script.
- USER_SCAN_FINISHED – occurs immediately after the user scanning has finished, regardless the malware has found or not.
- USER_SCAN_MALWARE_FOUND – occurs when the malware scanning process of a user account has finished and malware found.
- USER_SCAN_STARTED – occurs immediately after the user scanning has started.
- CUSTOM_SCAN_STARTED – occurs immediately after on-demand (manual) scanning has started.
- REALTIME_MALWARE_FOUND – occurs when malware is detected during the real-time scanning.
- CUSTOM_SCAN_FINISHED – occurs immediately after on-demand (manual) scanning has finished, regardless the malware has found or not.
- CUSTOM_SCAN_MALWARE_FOUND – occurs when the on-demand scanning process has finished and malware found.
Admin:
- default_emails – specify the default list of emails used for all enabled admin email notifications.
- notify_from_email – specify a sender of all emails sent by the Hooks.
Let's review all options for a specific event on the REALTIME_MALWARE_FOUND example:
   "REALTIME_MALWARE_FOUND": {
      "SCRIPT": {
         "scripts": [],
         "period": 1,
         "enabled": False
      },
      "ADMIN": {
         "period": 1,
         "admin_emails": [],
         "enabled": False
      }
SCRIPT
- scripts – specify the full path to the script(s) or any other Linux executable to be launched on event occurrence. Make sure that the script has an executable bit (+x) on. A line-separated list of scripts is supported.
- period – set a notification interval in seconds. The data for all events that happened within the interval will be accumulated and sent altogether.
- enabled – run (
True) a script (event handler) upon event occurrence.
ADMIN:
- period – set a notification interval in minutes. The data for all events that happened within the interval will be accumulated and sent altogether.
- admin_emails – set
defaultto use the default administrator emails and/or specify your emails for notifications. - enabled – notify (
True) the administrator and a custom user list via email upon event occurrence.
Examples:
- Update admin default emails:
imunify360-agent notifications-config update '{"admin": {"default_emails": ["email1@email.com", "email2@email.com"]}}'
- Enable and configure email notifications for ADMIN for the REALTIME_MALWARE_FOUND event:
imunify360-agent notifications-config update '{"rules": {"REALTIME_MALWARE_FOUND": {"ADMIN": {"enabled": true, "period": 3600, "admin_emails": ["email3@email.com", "email4@email.com", "default"]}}}}'
After the successful execution, the imunify360-agent notifications-config update command returns the full config with changes.
The imunify360-agent notifications-config show command output after applying the examples 1 and 2:
{
   "rules": {
      "SCRIPT_BLOCKED": {
         "ADMIN": {
            "admin_emails": [],
            "period": 1,
            "enabled": False
         },
         "SCRIPT": {
            "scripts": [],
            "period": 1,
            "enabled": False
         }
      },
      "USER_SCAN_FINISHED": {
         "SCRIPT": {
            "scripts": [],
            "enabled": False
         }
      },
      "USER_SCAN_MALWARE_FOUND": {
         "ADMIN": {
            "admin_emails": [],
            "enabled": False
         },
         "SCRIPT": {
            "scripts": [],
            "enabled": False
         }
      },
      "CUSTOM_SCAN_STARTED": {
         "SCRIPT": {
            "scripts": [],
            "enabled": False
         }
      },
      "REALTIME_MALWARE_FOUND": {
         "ADMIN": {
            "admin_emails": ['email3@email.com', 'email4@email.com', 'default'],
            "period": 3600,
            "enabled": True
         },
         "SCRIPT": {
            "scripts": [],
            "period": 1,
            "enabled": False
         }
      },
      "USER_SCAN_STARTED": {
         "SCRIPT": {
            "scripts": [],
            "enabled": False
         }
      },
      "CUSTOM_SCAN_FINISHED": {
         "SCRIPT": {
            "scripts": [],
            "enabled": False
         }
      },
      "CUSTOM_SCAN_MALWARE_FOUND": {
         "ADMIN": {
            "admin_emails": [],
            "enabled": False
         },
         "SCRIPT": {
            "scripts": [],
            "enabled": False
         }
      }
   },
   "admin": {
      "notify_from_email": None,
      "default_emails": ["email1@email.com", "email2@email.com"]
   }
}
More examples:
- Run the custom script on the USER_SCAN_FINISHED event occurrence:
imunify360-agent notifications-config update '{"rules": {"USER_SCAN_FINISHED": {"SCRIPT": {"scripts": ["/script/my-handler.py"], "enabled": true}}}}'
- Change the period for the SCRIPT hook for the REALTIME_MALWARE_FOUND event to 1 minute:
imunify360-agent notifications-config update '{"rules": {"REALTIME_MALWARE_FOUND": {"SCRIPT": {"period": 60}}}}'
After the successful execution, the imunify360-agent notifications-config update command returns the full config with changes.
The imunify360-agent notifications-config show command output after applying the examples 3 and 4:
{
   "rules": {
      "CUSTOM_SCAN_MALWARE_FOUND": {
         "SCRIPT": {
            "scripts": [],
            "enabled": False
         },
         "ADMIN": {
            "enabled": False,
            "admin_emails": []
         }
      },
      "USER_SCAN_STARTED": {
         "SCRIPT": {
            "scripts": [],
            "enabled": False
         }
      },
      "CUSTOM_SCAN_FINISHED": {
         "SCRIPT": {
            "scripts": [],
            "enabled": False
         }
      },
      "SCRIPT_BLOCKED": {
         "SCRIPT": {
            "period": 1,
            "scripts": [],
            "enabled": False
         },
         "ADMIN": {
            "period": 1,
            "enabled": False,
            "admin_emails": []
         }
      },
      "CUSTOM_SCAN_STARTED": {
         "SCRIPT": {
            "scripts": [],
            "enabled": False
         }
      },
      "USER_SCAN_MALWARE_FOUND": {
         "SCRIPT": {
            "scripts": [],
            "enabled": False
         },
         "ADMIN": {
            "enabled": False,
            "admin_emails": []
         }
      },
      "REALTIME_MALWARE_FOUND": {
         "SCRIPT": {
            "period": 60,
            "scripts": [],
            "enabled": False
         },
         "ADMIN": {
            "period": 3600,
            "enabled": True,
            "admin_emails": ['email3@email.com', 'email4@email.com', 'default']
         }
      },
      "USER_SCAN_FINISHED": {
         "SCRIPT": {
            "scripts": ['/script/my-handler.py'],
            "enabled": True
         }
      }
   },
   "admin": {
      "notify_from_email": None,
      "default_emails": ["email1@email.com", "email2@email.com"]
   }
}
Example of scripts to create custom notifications
Simple and generic scripts aiming to be a reference/template to create custom scripts to use with imunify-notifier.
For notifications subsystem:
For hooks subsystem:
You can use these scripts as a reference and customize them.
Note
Set the +x bits to your script file to make it executable. Your script also has to be readable by the special _imunify user, so make sure of setting group's permission accordingly:
chown root:_imunify hook_script.sh
Python script description
The agent generates messages of different types on hook events. The ‘if chain’ in the script calls the particular method corresponding to type of the event that came from the agent.
For example, if you'd like to block sites for all users, that were detected as infected by realtime scan you can use the handle_realtime_malware_found method.
To unblock user sites which were scanned as clean, you can use the handle_user_scan_finished method.
Add your path to the related hook (or multiple hooks) and implement the custom logic of blocking and unblocking sites.
Also in this script you could find the way to parse JSON that come from Imunify360 and description of this JSON schema in every possible case. Such descriptions are provided by docstring of the handle methods.
Adding custom email template
Imunify Notifications Engine supports adding custom email messages either the header or body. It may be useful for adding warnings or any message.
To add a custom email template, follow these steps:
- Enable notification for the
CUSTOM_SCAN_MALWARE_FOUNDevent. It is triggered by a malware caught by on-demand scan:
imunify360-agent notifications-config update '{"rules": {"CUSTOM_SCAN_MALWARE_FOUND": {"ADMIN": {"enabled": true, "admin_emails": ["your-email@example.domain"]}}}}'
- Create template directory:
mkdir -p /etc/imunify360/emails/custom_scan_malware_found
- Add a "Hello World" template:
cat <<EOF > /etc/imunify360/emails/custom_scan_malware_found/en.json
[
    {
        "id": "subject",
        "other": "TESTING templates on {{serverName}}"
    },
    {
        "id": "scan_description_section",
        "other": "Hello World, from custom template test"
    }
]
EOF

cat <<EOF > /etc/imunify360/emails/custom_scan_malware_found/t.tmpl
From: {{.mail_from}}
To: {{.mail_to}}
Subject: {{.messages.subject}}

{{.messages.scan_description_section}}
EOF
More examples are available at: /usr/share/imunify-notifier/templates/
Proactive
These commands allow to manage Proactive Defense feature.
Usage:
imunify360-agent proactive [command] [--option] <value>
Available commands:
ignore delete path | allows to remove a file from Proactive Defense Ignore List. |
ignore delete rule | allows to remove a rule for a file from Proactive Defense Ignore List. |
list | allows to list Proactive Defense events. |
details | allows to show details for the event. |
ignore list | allows to list files included to Proactive Defense Ignore List. |
ignore add | allows to add a file to Proactive Defense Ignore List. |
option can be one or few of the optional arguments listed above and one more.
--path | for ignore add, ignore delete path, ignore delete rule commands.Allows to specify a path to the file. |
--id | for details, ignore delete rule commands.Allows to specify rule id. |
--rule-id | only for ignore add command.Allows to specify rule id. |
--rule-name | only for ignore add command.Allows to specify rule name. |
--since [timestamp] | allows to set start time to filter the list of incidents by period. |
--to [timestamp] | allows to set finish time to filter the list of incidents by period. |
--user | show events for a specific user. |
--search | string to search Proactive events by. |
Examples:
- This command adds a file located at
/home/user/index.phpto Proactive Defense Ignore List for the rule id 12 and nameSuspicious detection rule. It means that Proactive Defense will not analyze this file according to this rule:
imunify360-agent proactive ignore add --path /home/user/index.php --rule-id 12 --rule-name 'Suspicious detection rule'
OK
- This command removes files located at
<path to file 1>and<path to file 2>from Proactive Defense Ignore List:
imunify360-agent proactive ignore delete path <path to file 1> <path to file 2>
OK
Register
Allows to register and activate Imunify360. You can use it in case if Imunify360 was not activated during installation process or in case if activation key of the Imunify360 was changed for any reason. If you do not know what is an activation key or have any problem with it then, please, read Installation guide or contact our support team.
Usage:
imunify360-agent register [--optional arguments] [KEY]
KEY is a positional argument:
KEY | Register with activation key (use IPL to register by IP). |
If you will use this command without the KEY argument, then it will try to register and activate current activation key.
In case when the number of users on the server changes and one license is replaced by another, it is necessary to run the following command to update the license:
imunify360-agent update-license
OK
Example 1:
The following command will register and activate Imunify360 with the provided activation key:
imunify360-agent register IM250sdfkKK245kJHIL
OK
Example 2:
If you have an IP-based license, you can use IPL argument to register and activate Imunify360:
imunify360-agent register IPL
OK
Reload lists
Allows to use external files with the list of Black/White-listed IPs.
Usage:
imunify360-agent reload-lists
Example:
To use external files with the list of Black/White-listed IPs, you should place this list into one of the following directories: /etc/imunify360/whitelist/*.txt for the White list and /etc/imunify360/blacklist/*.txt for the Black list. Then in order to apply the IP lists, you should run the following command:
imunify360-agent reload-lists
OK
Remote-proxy
Allows to add an additional proxy subnet.
Usage:
imunify360-agent remote-proxy [commands] [--optional arguments]
Positional arguments:
add | Add proxy subnet in CIDR notation |
delete | Delete proxy subnet in CIDR notation |
list | List of manually added proxies |
group | Manage proxies by name |
Positional arguments for add:
NETWORKS | Subnet in CIDR notation |
Optional arguments for add:
--name NAME | Name of an added proxy |
Positional arguments for delete:
NETWORKS | Subnet in CIDR notation |
Optional arguments for list:
--by-group BY_GROUP | Sort by GROUP |
--by-source BY_SOURCE | Sort by SOURCE |
Positional arguments for group:
enable | Enable group |
disable | Disable group |
Positional arguments for enable/disable:
name | Name of your proxy subnet |
Optional arguments for enable/disable:
--source SOURCE | Enable/disable a group by SOURCE |
Examples
The following command adds proxy subnet 1.1.2.0/24 with name my_own_proxy
imunify360-agent remote-proxy add 1.1.2.0/24 --name "my_own_proxy"
OK
Rstatus
Allows to check if Imunify360 server license is valid.
Usage:
imunify360-agent rstatus [--optional arguments]
An extended variation (otherwise, you receive OK if everything is fine with the license registered):
imunify360-agent rstatus --json -v

{
  "expiration": null,
  "id": "SSXX11xXXXxxxxXX",
  "license": {
    "expiration": null,
    "id": "SSXX11xXXXxxxxXX",
    "license_type": "imunify360",
    "message": "",
    "redirect_url": " ",
    "status": true,
    "user_count": 100,
    "user_limit": 2147483647
  },
  "license_type": "imunify360",
  "message": "",
  "redirect_url": " ",
  "status": true,
  "strategy": "PRIMARY_IDS",
  "user_count": 100,
  "user_limit": 2147483647,
  "version": "5.1.2-1"
}
Rules
This command allows user to manage rules disabled for firewall plugins Imunify360 uses.
Usage:
imunify360-agent rules [command] [--option] <value> [--option] <value>
command is a positional argument and can be:
disable | add a new rule to the disabled rules list |
enable | remove a rule from the disabled rules list |
list-disabled | display the list of the disabled rules |
update-app-specific-rules | allows to update WAF ruleset configurator immediately (generally, executed by cron) |
Option can be:
--id | ID number of the rule provided by the firewall plugin. |
--plugin | Firewall plugin name. Can be one of the following:
|
--name | Name of the added rule or details of the rule from ModSecurity or OSSEC. |
--domains | List of domains to disable a rule for. Can only be used with modsec type. |
Examples
- The following command adds a rule with id 42 and name ‘Rule name’ for the ModSecurity rules to the disabled rules list:
imunify360-agent rules disable --id 42 --plugin modsec --name 'Rule name'
OK
- The following command removes a rule with id 42 for the ModSecurity rules from the disabled rules list:
imunify360-agent rules enable --id 42 --plugin modsec
OK
- The following command displays the list of disabled rules:
imunify360-agent rules list-disabled
The list is displayed as follows:
{'plugin': 'modsec', 'id': '214920', 'domains': ['captchatest.com'], 'name': 'Imported from config'}

{'plugin': 'modsec', 'id': '42', 'domains': None, 'name': 'Rule name'}

{'plugin': 'ossec', 'id': '1003', 'domains': None, 'name': 'Imported from config'}

{'plugin': 'ossec', 'id': '2502', 'domains': None, 'name': 'User missed the password more than one time'}
Where
- plugin — is a firewall plugin name (modsec for ModSecurity and ossec for OSSEC)
- id — is id number of the rule provided by the firewall plugin
- domains — the list of the domains for which the rule is disabled (None means all domains)*
- name — rule description or details of the rule from ModSecurity or OSSEC
Note
Domains are specified only for ModSecurity rules. For OSSEC rules it is always applies to all domains.
4. The following command updates the WAF ruleset configurator immediately:
imunify360-agent rules update-app-specific-rules
OK
Submit false-positive/false-negative
To submit file as false positive (if Imunify360 considers file as a malicious but it actually isn't) you can use the following command. Make sure to specify the file name. Relative paths are also supported as well as full paths.
imunify360-agent submit false-positive --reason your-reason-text /full/path/to/file
Note
--scanner argument is deprecated and will be ignored, because there is only one vendor now: ai-bolit
To submit file as false negative (if Imunify360 considers file as a non-malicious but it actually does) you can use the following command (please make sure to specify the file name along with full path):
imunify360-agent submit false-negative /full/path/to/file
OK
Optional arguments:
--to | Email to send. |
--sender | User email. |
False-positive/False-negative File Submission Tool
This section describes how to use Imunify false positive/false negative submission tool. This tool allows you to submit files for analysis, review the list of your submissions, and monitor their statuses
Preparation
The configuration phase consists of two steps:
- Get an API token. For the first run, a new API key should be created. Navigate to cm.imunify.com/#/tokens. Use Imunify/CLN account credentials to log in. Get a new key by clicking on the button "Create API key"

The API key can be used as many times as needed across all servers for the individual Imunify customer.
- Get the script and set permissions. Run the script shown below. Please note that the script has to be executed with root privileges since it requires access to Imunify license file.
# curl -o fpfn-submission.sh https://files.imunify360.com/static/cm/fpfn-submission.sh
# chmod 700 fpfn-submission.sh
Requirements
For this process to work properly you need the following prerequisites:
- JSON Processor. Jq is required to run the tool. If it is not installed please run the script below.
# yum install jq -y
- Imunify360 v6.7.3+ is required. Follow the update instructions if the version you use is the earlier one.
- Submission script. The submission tool that can be downloaded from https://files.imunify360.com/static/cm/fpfn-submission.sh.
Usage
We designed the submission script to accept arguments through the use of the environment variables. Here is the output of the --help page.
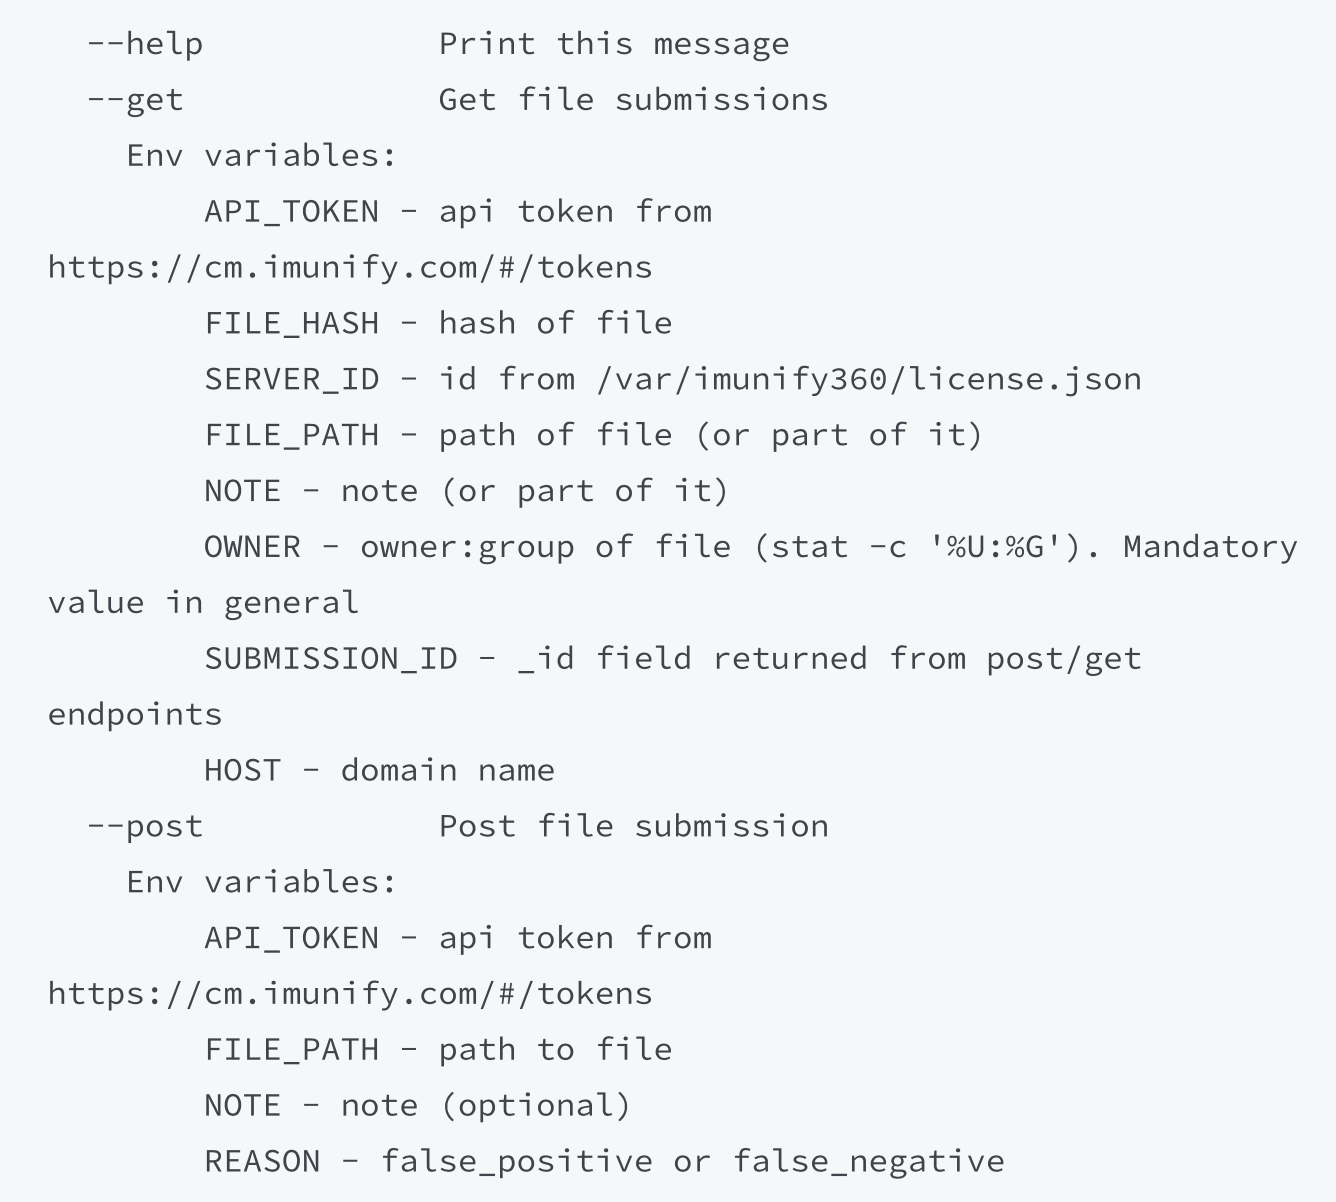
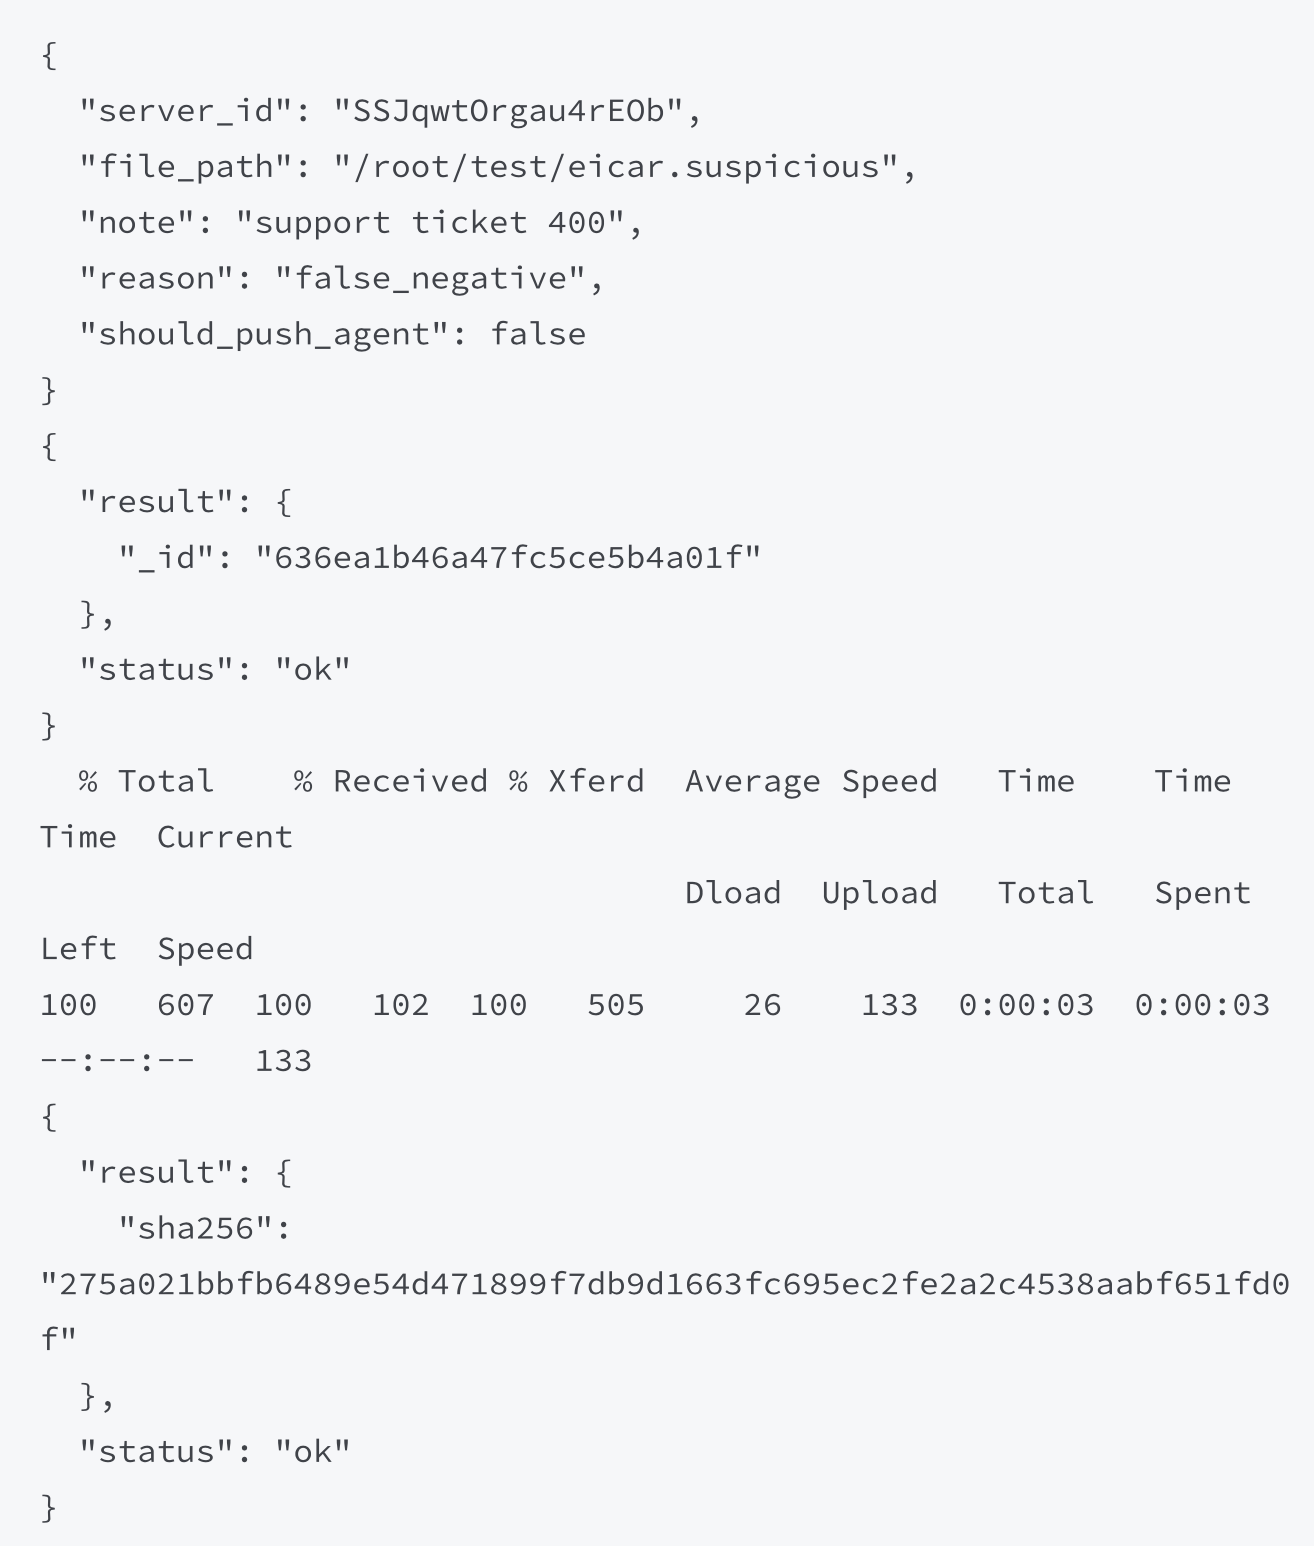
File submission
The following code snippets can be used to submit the false_negative file for analysis:
# FILE_PATH=./eicar.suspicious REASON=false_negative NOTE='support ticket 400' API_TOKEN=<YOUR_API_KEY> ./fpfn submission.sh -p
The response is made to be transparent. The _id field represents a unique submission ID.
Fetching results
The results of submission processing can be viewed in 1-3 business days using a set of various filters (see --help). The following code uses NOTE to fetch results:
# NOTE="400" API_TOKEN=<YOUR_API_KEY> ./fpfn-submission.sh -g
Here is the response:
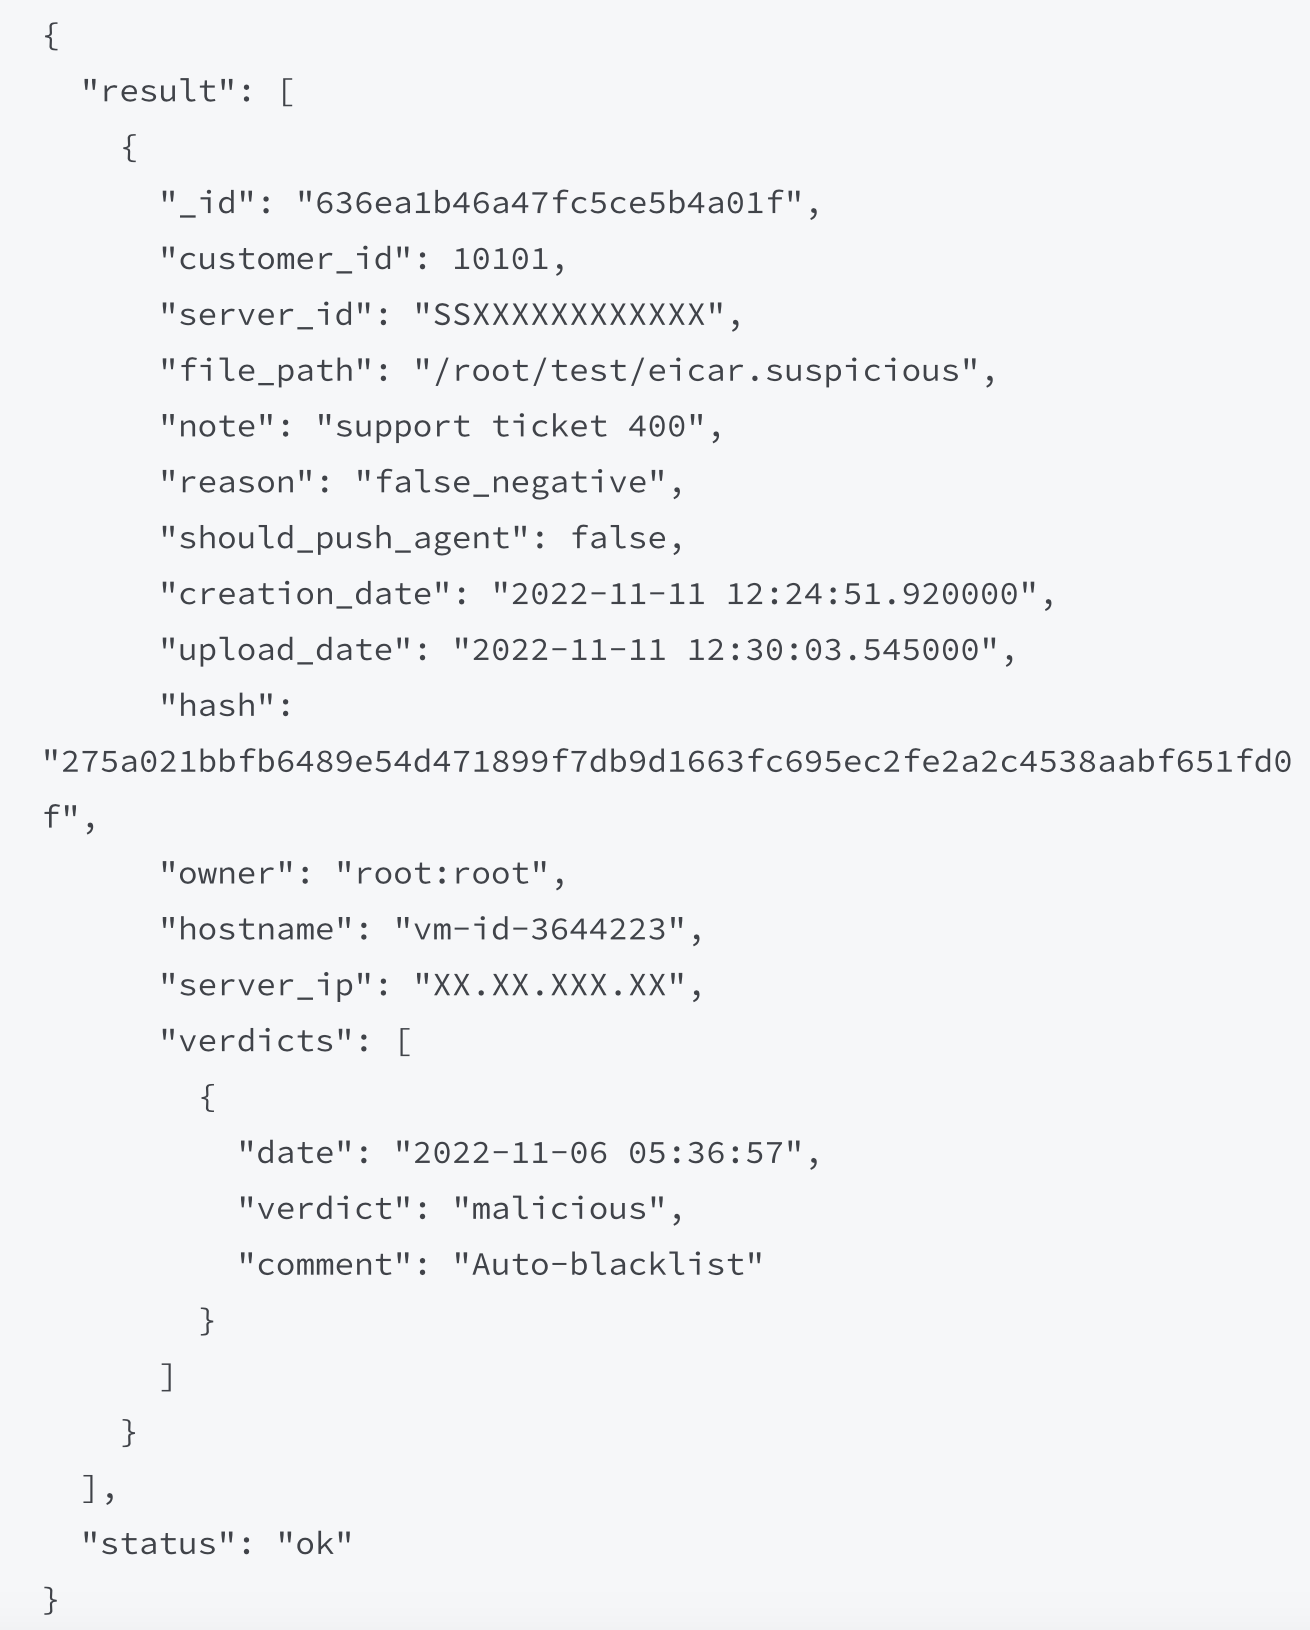
The response contains the section verdicts that describes the processing results. For recent verdicts, it may contain a signature base build id, e.g.
   {
      "date": "2022-11-11 20:14:40",
      "verdict": "malicious",
      "comment": "Added after scan with build 9231"
   }
If the verdicts section is empty, it means that the file is in process.
Feedback
Please reach out to us should you have any concerns, questions, and/or feedback. We appreciate all the communication from you.
Unregister
Allows to unregister and disable Imunify360 on the server.
Note
To remove Imunify360 from the server it needs to be uninstalled.
Usage:
imunify360-agent unregister [--optional arguments]
OK
Vendors
Command for manipulating Imunify360 vendors.
Usage:
imunify360-agent [command]
command is a positional argument and can be:
install-vendors | Install ModSecurity vendors. This command will install the Imunify360 vendor if there are no conflicts with other installed vendors. |
uninstall-vendors | uninstall ModSecurity vendors. |
Example:
The following command uninstalls the ModSecurity vendors:
imunify360-agent uninstall-vendors
OK
Version
Allows to view the actual Imunify360 version installed on the server.
Usage:
imunify360-agent version [--json]
4.9.5-3
WebShield feature availability
The WebShield protection features available on a server depend on its environment. Use the imunify360-wsctl filters command to find out which features (filters / checks) are available on the current installation.
Two features are covered:
- GreyList / Anti-bot Challenge (Verdict) — IP-based access control (blacklist / graylist / splash screen) served from kernel ipsets via an
IPSET lookup. Available on all WebShield installations. - Under Attack Mode (UAM) — a server-admin tool that challenges every visitor to a protected domain with a JavaScript splash screen. It is available whenever any of our dynamic modules (for nginx or apache) are loaded into the web server. It is not available when WebShield inspects the traffic itself as a reverse proxy (for example on Plesk), where only the GreyList / Anti-bot Challenge applies.
Usage:
imunify360-wsctl filters [--json]
By default the command prints a table listing each filter and whether it is available on this installation:
imunify360-wsctl filters
FILTER   AVAILABLE  DESCRIPTION
verdict  yes        IPSET lookup
uam      yes        Under Attack Mode
Examples:
- List the available checks on this server:
imunify360-wsctl filters
FILTER   AVAILABLE  DESCRIPTION
verdict  yes        IPSET lookup
uam      no         Under Attack Mode
In this example only the GreyList / Anti-bot Challenge (verdict) is available; Under Attack Mode (uam) is not.
- Get the feature map as JSON:
imunify360-wsctl filters --json
{
  "filters": [
    {
      "name": "verdict",
      "available": true,
      "description": "IPSET lookup"
    },
    {
      "name": "uam",
      "available": true,
      "description": "Under Attack Mode"
    }
  ]
}
Whitelisted crawlers
Allows do operate with search engine domains.
Usage:
imunify360-agent whitelisted-crawlers [command]
command can be one of the following:
add NAME | add a search engine to the list of whitelisted crawlers |
delete NAME | delete a search engine to the list of whitelisted crawlers |
list | list all added whitelisted crawlers |
Examples:
This command adds two search engines to the list of whitelisted crawlers:
imunify360-agent whitelisted-crawlers add yandex.com google.com
OK
This command deletes a search engine to the list of whitelisted crawlers
imunify360-agent whitelisted-crawlers delete yandex.com
OK
This command lists all added whitelisted crawlers
imunify360-agent whitelisted-crawlers list
DESCRIPTION  DOMAINS                                       ID
Google       ['.google.com', '.googlebot.com']             1
Yandex       ['.yandex.ru', '.yandex.com', '.yandex.net']  2
WordPress plugin
This command manages the Imunify Security WordPress plugin and its Web Application Firewall (WAF). It is available in both Imunify360 (using imunify360-agent) and ImunifyAV/AV+ (using imunify-antivirus).
Usage:
imunify360-agent wordpress-plugin [command] [subcommand] [--option] <value>
Enable or disable the WAF for accounts
Use waf set to enable or disable the WordPress WAF for hosting accounts in bulk. The plugin must be installed first (see security_plugin_enabled below); otherwise the command reports WordPress Security Plugin is disabled. Enable it before changing WAF settings.
--status | enabled or disabled. |
--all-users | apply to all hosting accounts. |
--users | apply to a space-separated list of accounts. Use either --all-users or --users, not both. |
Examples
- Enable the WAF for all hosting accounts:
imunify360-agent wordpress-plugin waf set --status enabled --all-users
- Disable the WAF for specific accounts:
imunify360-agent wordpress-plugin waf set --status disabled --users user1 user2
The command reports how many accounts succeeded, were skipped (for example, when a name is not a hosting user), or failed.
To change the WAF for a single account, you can also update its configuration directly:
imunify360-agent config update --user user1 '{"WORDPRESS":{"waf_enabled": false}}'
Server-wide options — installing the plugin, the server-wide WAF switch, and the default for new accounts — are set without a user:
imunify360-agent config update '{"WORDPRESS":{"security_plugin_enabled": true}}'
imunify360-agent config update '{"WORDPRESS":{"waf_enabled": true}}'
imunify360-agent config update '{"WORDPRESS":{"waf_default": true}}'
Manage individual WAF rules
Use the rules subcommand to disable or re-enable a specific WAF rule — for example, one that interferes with legitimate traffic. The rule identifier is the one shown for the incident (typically a CVE ID).
disable | disable a rule, for all domains or for specific ones. |
enable | re-enable a previously disabled rule. |
list-disabled | list the currently disabled rules. |
--rule | the rule identifier (for example, CVE-2025-001). |
--domains | optional space-separated list of domains. If omitted, the rule is disabled or enabled for all domains. |
Examples
- Disable a rule for all domains:
imunify360-agent wordpress-plugin rules disable --rule CVE-2025-001
- Disable a rule for specific domains only:
imunify360-agent wordpress-plugin rules disable --rule CVE-2025-001 --domains example.com blog.example.com
- Re-enable a rule:
imunify360-agent wordpress-plugin rules enable --rule CVE-2025-001
- List disabled rules:
imunify360-agent wordpress-plugin rules list-disabled
AI Bot Management
AI Bot Management (bot classification and per-category rate limiting) is controlled through configuration keys rather than a dedicated subcommand. The plugin must be installed first (see security_plugin_enabled). Site owners can also manage it from the WordPress dashboard — see AI Bot Management.
Enable or disable it server-wide:
imunify360-agent config update '{"WORDPRESS":{"ai_bot_protection": true}}'
imunify360-agent config update '{"WORDPRESS":{"ai_bot_protection": false}}'
Enable it for a single hosting account:
imunify360-agent config update --user user1 '{"WORDPRESS":{"ai_bot_protection": true}}'
Set the default preset applied to sites that have not chosen their own — one of balanced, strict, or monitor:
imunify360-agent config update '{"WORDPRESS":{"ai_bot_protection_preset": "strict"}}'
A site owner can override the server default from the WordPress dashboard, and a define() in wp-config.php overrides both.