Admin Interface
Imunify360 is an all-in-one security solution with robust cloud protection against the newest attacks, and it is available directly within your control panel (cPanel, Plesk, and DirectAdmin).
When you log in to your control panel, Imunify360 asks you to enter your email address.
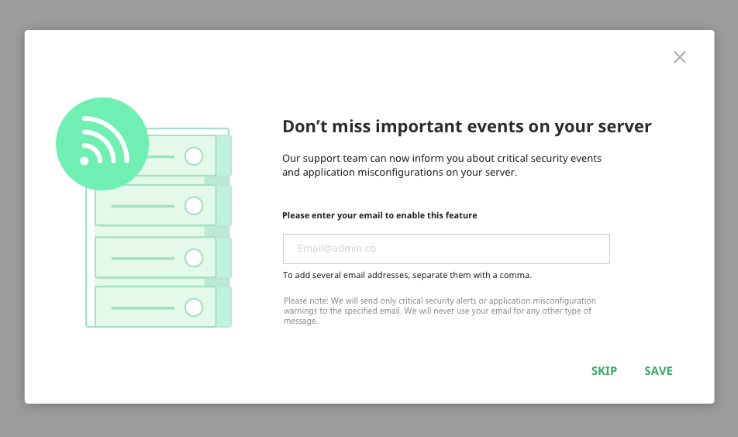
By entering your email address you agree to receive email reports about critical issues, security alerts or system misconfigurations detected on your servers.
Note
This email address is used ONLY for receiving server reports.
Or you can do it later in the Settings | General | Contact Details.
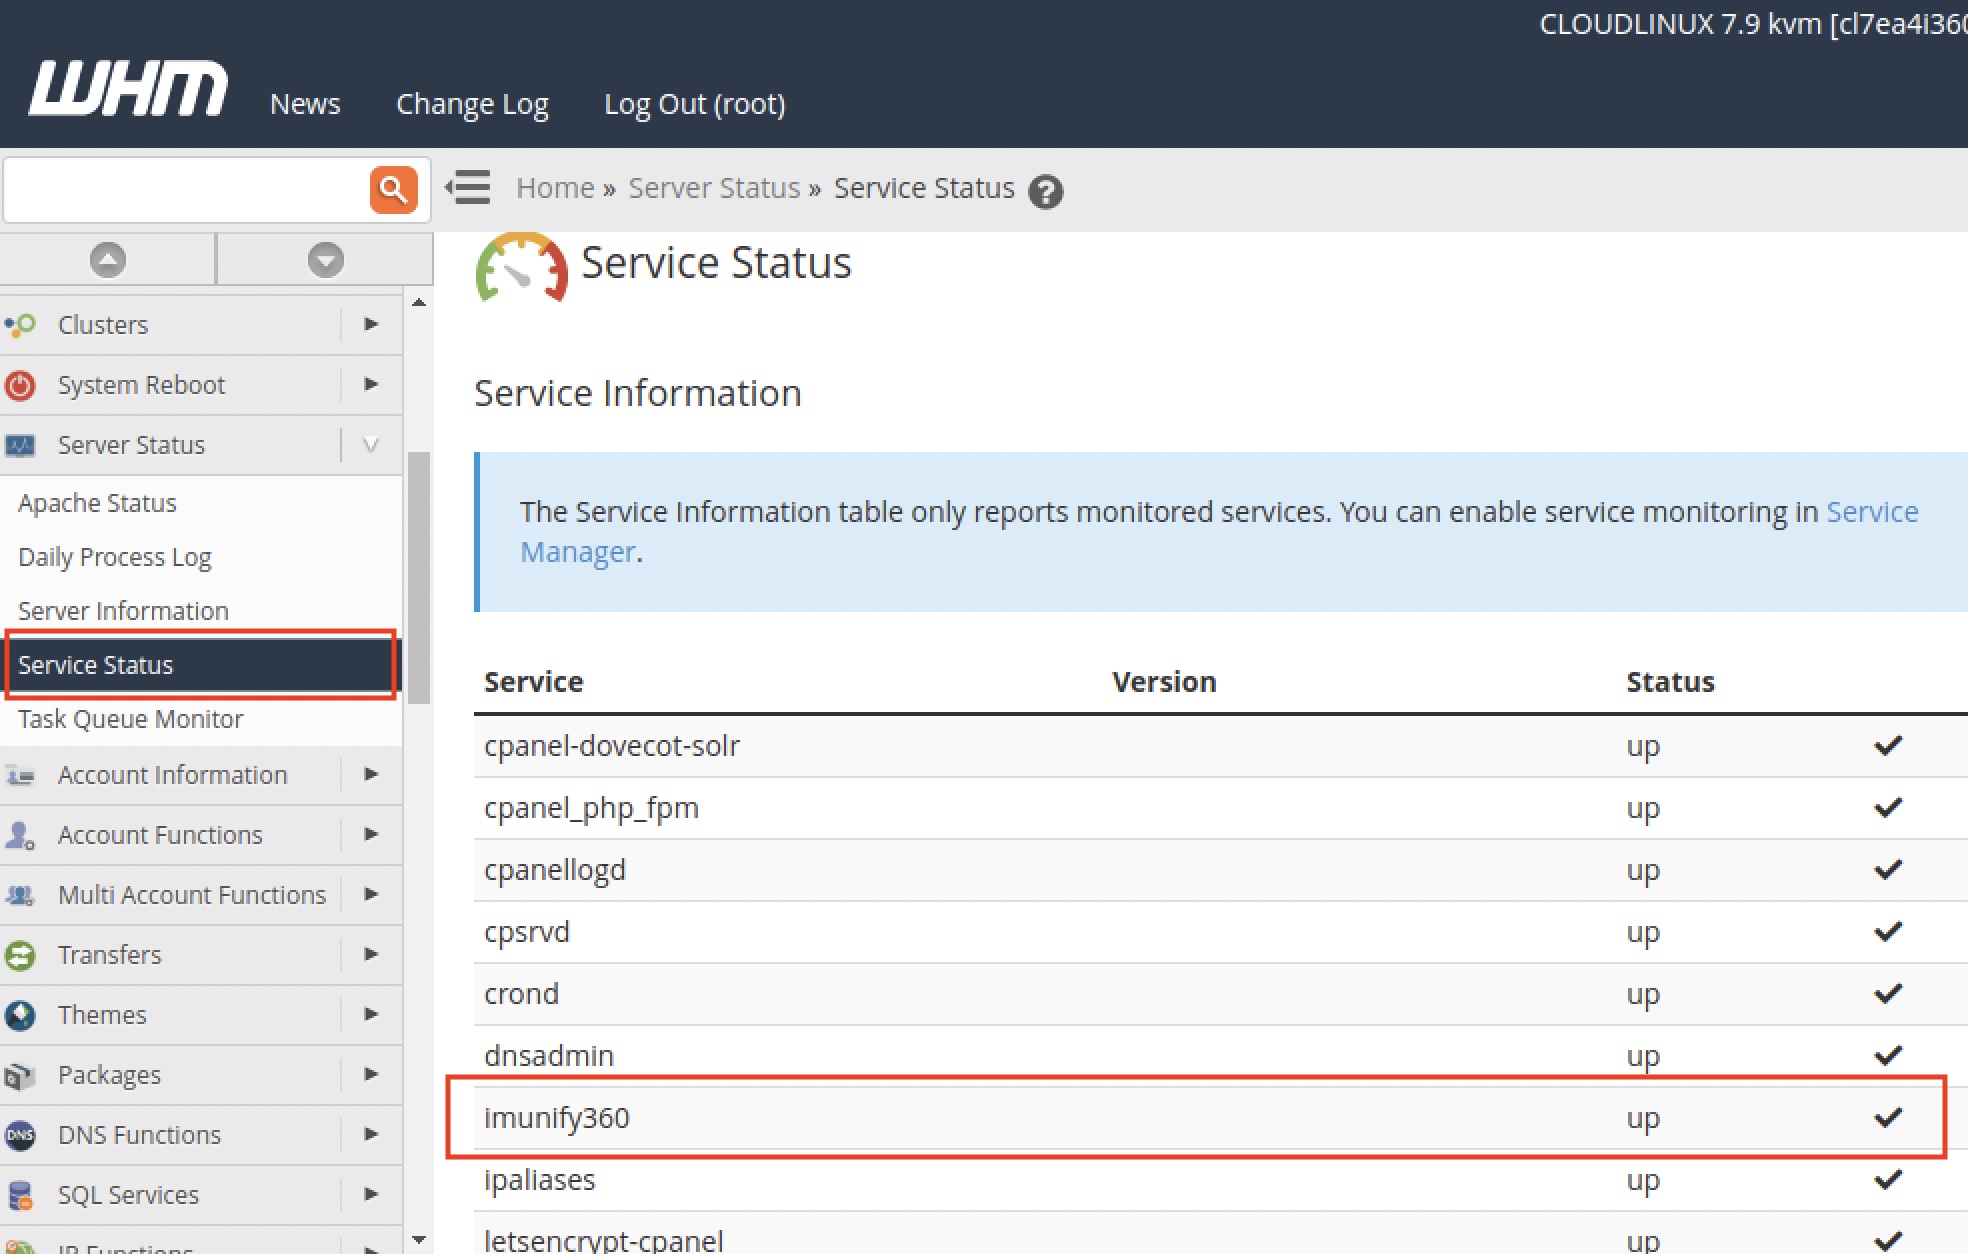
Log in to your control panel as an admin and go to Plugins, choose Imunify360 to get to the Imunify360 admin interface.
It allows to access:
AI Chatbot – provides quick answers from our Docs, Blog, and Help Center. For other questions you can use human support form.
Dashboard – allows you to see retrospective data in form of charts/heatmaps in your Imunify360 Admin Interface
Incidents – the list of all suspicious activity on the server.
Firewall – a dashboard of Black List, White List and Gray List, and Blocked Ports with the ability to manage them.
Malware Scanner – real-time file scanner.
Proactive Defense – a unique Imunify360 feature that can prevent malicious activity through PHP scripts
Reputation Management – analyzing and notifying tool intended to inform about websites blocking and blacklisting.
KernelCare – KernelCare current state.
Imunify360 Settings – configuring and controlling Imunify360 options.
AI Chatbot
Chatbot provides quick answers from our Docs, Blog, and Help Center. If you prefer human support, type "human" or ask to connect with our support team at any time. We will then open a brief request form, where you can describe your question, attach files and run doctor script (optional) to collect logs and server info for the upcoming ticket. A support ticket will be created and an email will be sent to a specified email address. When a status of your request will change you receive a notification to your email address. You will be able to track your request via https://cloudlinux.zendesk.com/hc/ and email.

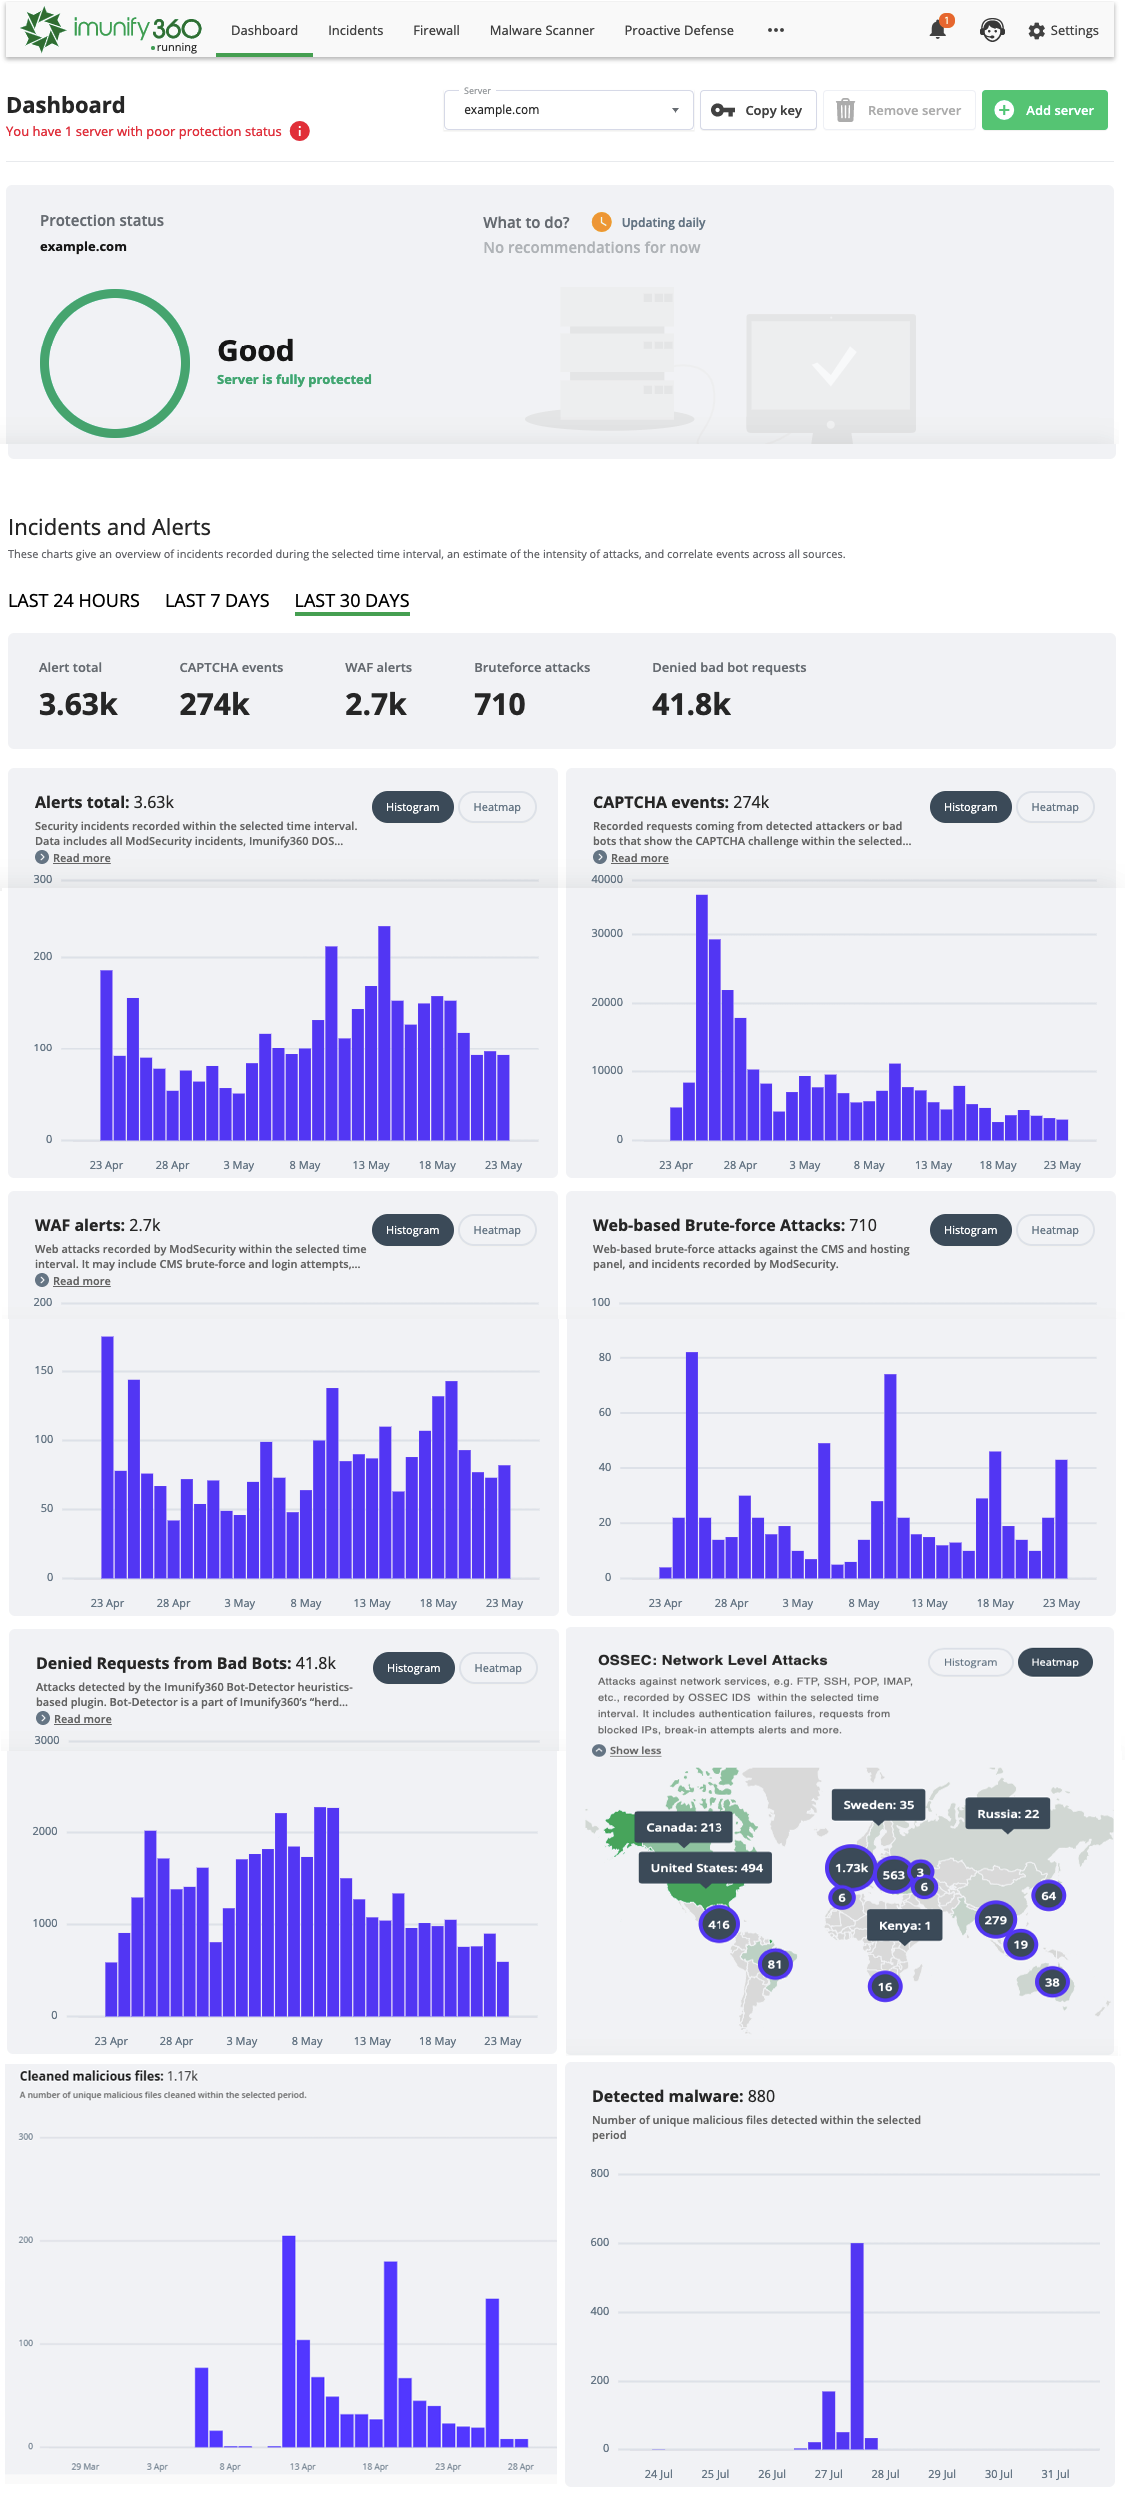
Dashboard
You can access the Imunify360 Dashboard from your control panel. It shows security events as charts and heat maps. It's a great way to analyze incidents that happened within the past day, week or month.
Click Dashboard tab to display an overview of incidents recorded during the selected time interval, an estimate of the intensity of attacks, and correlate events across all sources.
Here you can see notifications about server security and Imunify360 configuration, along with recommendations for making server security effective and proactive.
Imunify Advisor
The Imunify Advisor checks your server’s current settings, then provides a list of optimal settings for your individual server.
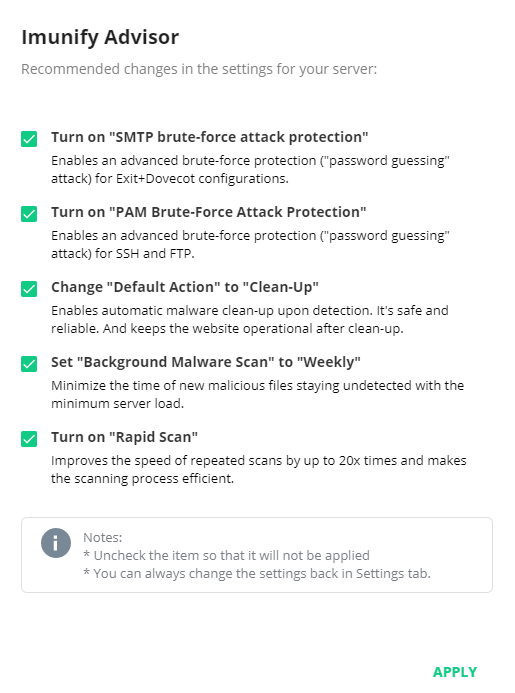
A dialog box pops up to display recommendations.
You can accept or reject them (by unchecking a corresponding checkbox) and apply settings by clicking Apply.
Rejected recommendations will not appear again for a while.
Note
If you do not want to use the recommendations you can disable Imunify Advisor via the config file.
Note
If your server's settings differ from the recommended, the Imunify Advisor will pop up again to display the settings.
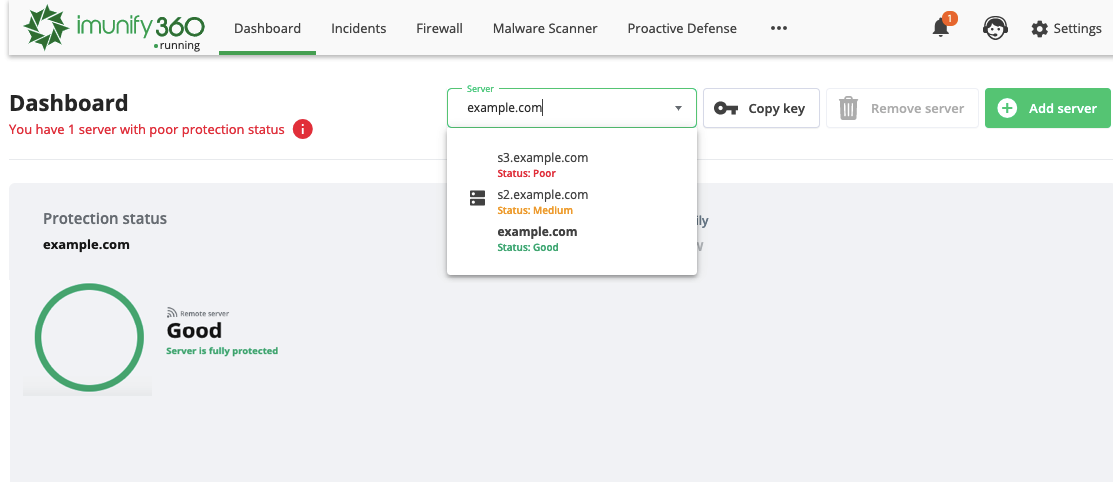
Multi-server Dashboard
Dashboard can display Imunify360 performance data for a number of specified servers.
You can add a specified server using its server key – a unique server id that identifies an installed Imunify360 instance.
Note
Server key is NOT a license key.
You can easily remove a server from the Dashboard.
You can use Server drop-down to show a list of all servers added into the Dashboard.
You can choose in the multi-server drop-down for which server the Dashboard would represent its data: a current server (where the Imunify360 is installed) or a remote one (it is indicated on the Dashboard).
How to get a server key
There are two ways to get a server key.
Click the key symbol
 to copy server key of the selected server to the clipboard.
Go to the
/var/imunify360/license.jsonfile and findidfield. Your server id looks like an alphanumeric stringSghjhgFESDh65CFLfvz.

How to add a server
If you'd like to display performance data for the server A on the Dashboard of the server B, please do the following:
- Go to the server A Dashboard and copy its server key (see How to get a server key)
- Go to the server B Dashboard and click the Add Server button
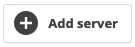
- The Add server key pop-up opens
- Paste the server key belonging to the server A to the Server key field
- Click Confirm to add the server A to the Dashboard of the server B. To stop adding the server and close the pop-up, click Cancel.
Go to the Server drop-down to check all added servers – it contains a list of hostnames of all added servers and/or a list of IPs (if a hostname is not found).
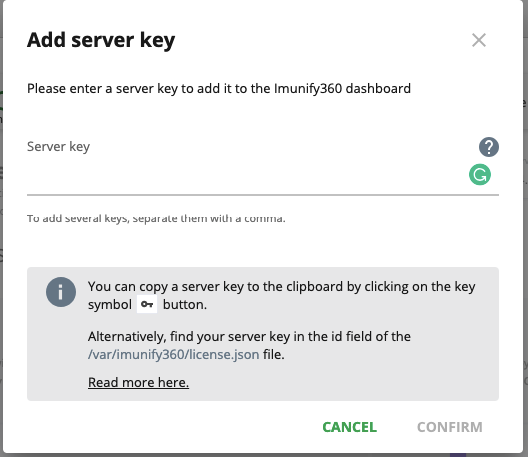
How to remove a server
To remove a server, click the Trash Can symbol  . The Remove Server pop-up opens.
 |
Click Confirm to remove the server. To stop removing the server and close the pop-up, click Cancel.
Note
You cannot remove a server from its Imunify360 Dashboard.
Charts and heat maps
The following time periods are available:
- Last 24 hours
- Last 7 days
- Last 30 days
The following representation forms are available:
- Heatmap visualizes the geographical distribution of incidents
- Histogram represents the numerical distribution of incidents
Hover mouse over the particular bar to check the accurate value.
Note
Charts may have gaps. This means that no incidents or alerts were recorded during that day/time period.
The following charts are available.
- Alerts total
Security incidents recorded within the selected time interval. Data includes all ModSecurity incidents, Imunify360 DOS plugin alerts, cPanel Login Failure Daemon (for cPanel only) and OSSEC alerts. This is a summary of all major alert sources.
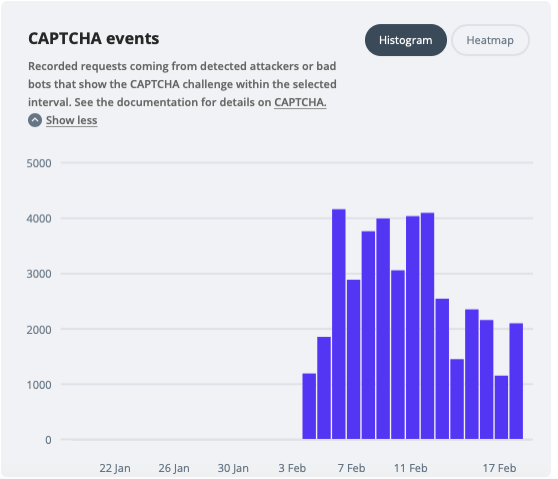
- Anti-Bot challenge events
Recorded requests coming from detected attackers or bad bots that show the Anti-Bot challenge within the selected interval.
- WAF alerts
Web attacks recorded by ModSecurity within the selected time interval. It may include CMS brute-force and login attempts, websites hacking attempts, attempts to access “sensitive” files or restricted areas, and other malicious requests.
- Web-based Brute-force Attacks
Web-based brute-force attacks against the CMS and hosting panel, and incidents recorded by ModSecurity.
- OSSEC: Network Level Attacks
Attacks against network services, e.g. FTP, SSH, POP, IMAP, etc., recorded by OSSEC IDS within the selected time interval. It includes authentication failures, requests from blocked IPs, break-in attempts alerts and more.
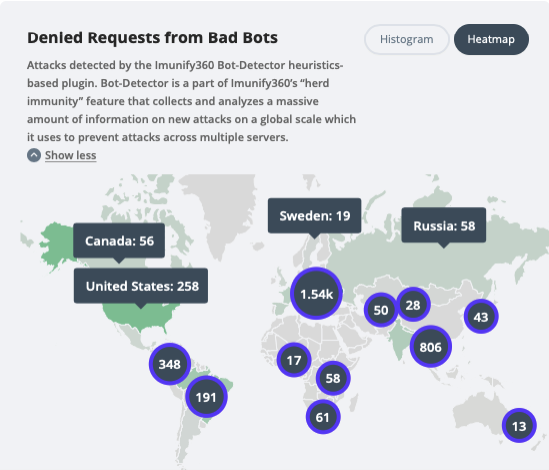
- Denied Requests from Bad Bots
Attacks detected by the Imunify360 Bot-Detector heuristics-based plugin. Bot-Detector is a part of Imunify360’s “cloud heuristics” feature that collects and analyzes a massive amount of information on new attacks on a global scale which it uses to prevent attacks across multiple servers.
- Cleaned malicious files
This chart lists the number of cleaned malicious files.
Note
Some charts may be hidden if no alerts of a particular type were recorded within the selected time interval.
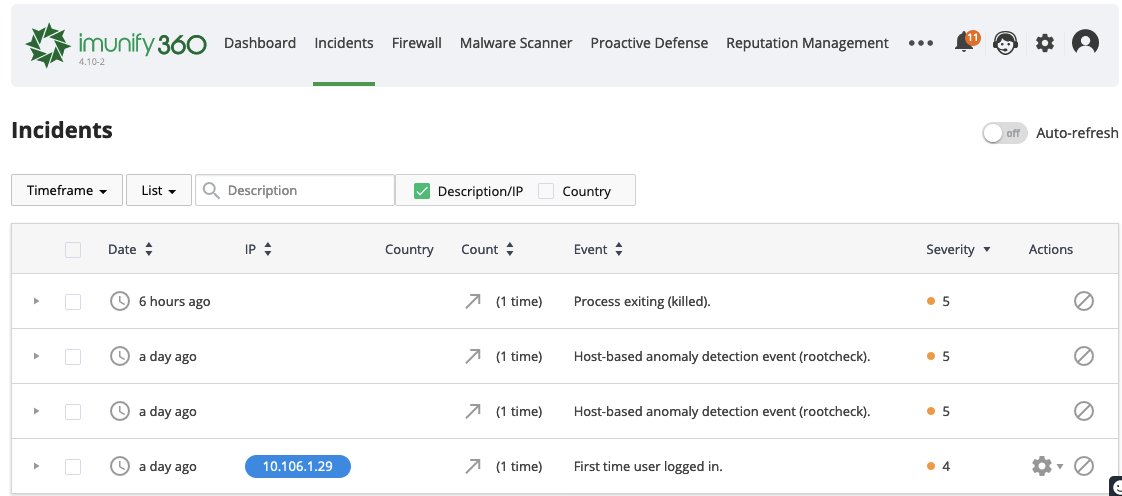
Incidents
Choose Incidents tab to view and manage the list of all the incidents. The table displays a list of detected incidents with all the information about the incidents reasons.
Use filters to show the exact list of incidents:
- Timeframe – allows filtering incidents by different time periods.
- List – allows filtering incidents by White List, Black List, or Gray List, or showing the incidents from all lists.
- Search field – allows showing all the incidents of a proper IP address, domain or description. Tick Description/IP checkbox to enable input field where you can enter a proper IP or a part of it, domain or description and filter the list.
- Country – allows filtering the incidents by abusers country. Tick Country checkbox to enable input field with auto-complete where you can enter a proper country and filter the incidents by clicking magnifier or Enter.
Move Auto-refresh to enable or disable automatic refresh of the incidents in the table without reloading the web page.
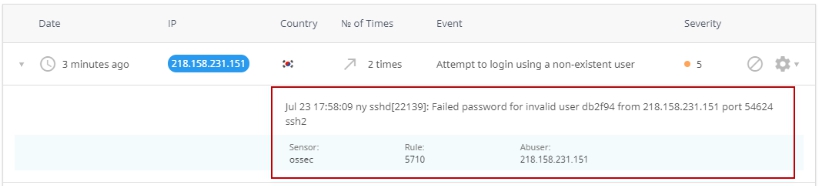
The list of incidents contains the following information:
Date – the time when the incident happened.
IP - the IP address of the abuser. There is a color indication for IP address.
- A gray bubble means that this IP address is currently in the Gray List (so, every connection from this IP address will redirect to the Anti-Bot Challenge).
- A blue bubble means that this IP address is currently in no one list (White/Gray/Black). IP is not blocked.
- A white bubble means that this IP address is currently in the White List. IP will never be blocked by Imunify360.
- A black bubble means that this IP address is currently in the Black List. And access from this IP is totally blocked without ability to unblock by the Anti-Bot Challenge.
- No bubble is shown when this incident doesn’t contain IP address.
Country– country origin of the abuser IP address.
Count – the number of times the abuser tried to repeat the action.
Event – description of the event or suspicious activity (as it is described by OSSEC and Mod_Security sensors).
Severity – severity level of the incidents (as it is estimated in OSSEC severity levels and Mod_Security severity levels). The color of severity means:
- Green – Mod_Security levels 7-5, OSSEC levels 00-03
- Orange – Mod_Security level 4, OSSEC levels 04-10
- Red – Mod_Security levels 3-0, OSSEC levels 11-15
Actions – actions available for the Incident.

Click an incident to expand the detailed information.
Starting from version 6.2 Imunify360 will scan zip archives by default. It will not be possible to disable this functionality through the UI, but it will be possible through the command line.
For Ubuntu, CentOS/CloudLinux >= 7
To disable scanning of archives, you will need to run the following command:
echo '' > /etc/sysconfig/aibolit-resident && systemctl daemon-reload && systemctl restart aibolit-resident.service
To switch the feature back on:
echo 'ARCHIVE_SCAN="--scan-archive"' > /etc/sysconfig/aibolit-resident && systemctl daemon-reload && systemctl restart aibolit-resident.service
For CentOS/CloudLinux 6
To disable scanning of archives, you will need to run the following command:
sed -i 's/--scan-archive//g' /etc/minidaemon/minidaemon-aibolit.cfg && /sbin/service minidaemon stop && /sbin/service minidaemon start
To switch the feature back on:
sed -ri "s/^(cmd=.*)$/\1--scan-archive/g" /etc/minidaemon/minidaemon-aibolit.cfg && /sbin/service minidaemon stop && /sbin/service
Actions available for the Incidents
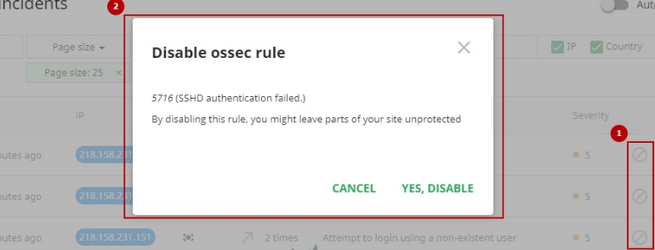
- Disabling the rule of the incident and add it to the list of Disabled rules. Click Ban icon in a proper incident row and confirm the action.
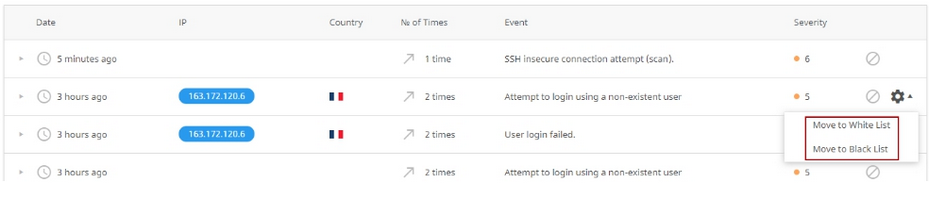
- Adding IP to the Black or White list. Click Cog icon and choose the action.
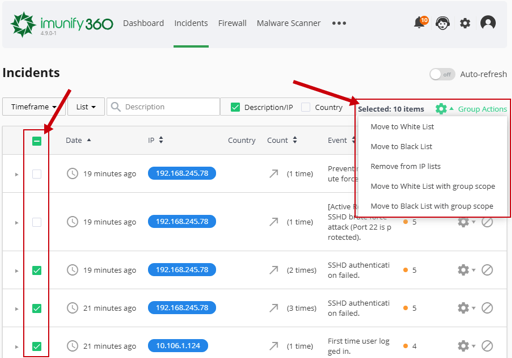
- Bulk actions on a list of IPs. The following actions are available:
- Move to the White list/Black list
- Delete from a list
- Move IPs to the group
Firewall
The All Lists tab allows viewing and managing the IP addresses in the following lists (listed by priority):
- White - the IP will not be blocked
- Drop/Black - the IP will be blocked everywhere, on all ports and services
- Greylist - the IP will be blocked completely on non-web ports (SSH, FTP, etc.), and will be shown Anti-Bot Challenge on web ports (80, 443, hosting panel ports)
- Anti-Bot Challenge - the IP will be shown Anti-Bot challenge on web ports, and will not be blocked on others
Note
Blocked ports restrictions are enforced separately from IP list decisions. If you need a whitelisted IP/subnet to access a restricted port, allow it explicitly in Firewall → Ports by adding it to the port’s allowlist, or grant Full Access.
The counters for the lists are presented at the top of the table, reflecting the number of records matching the category.
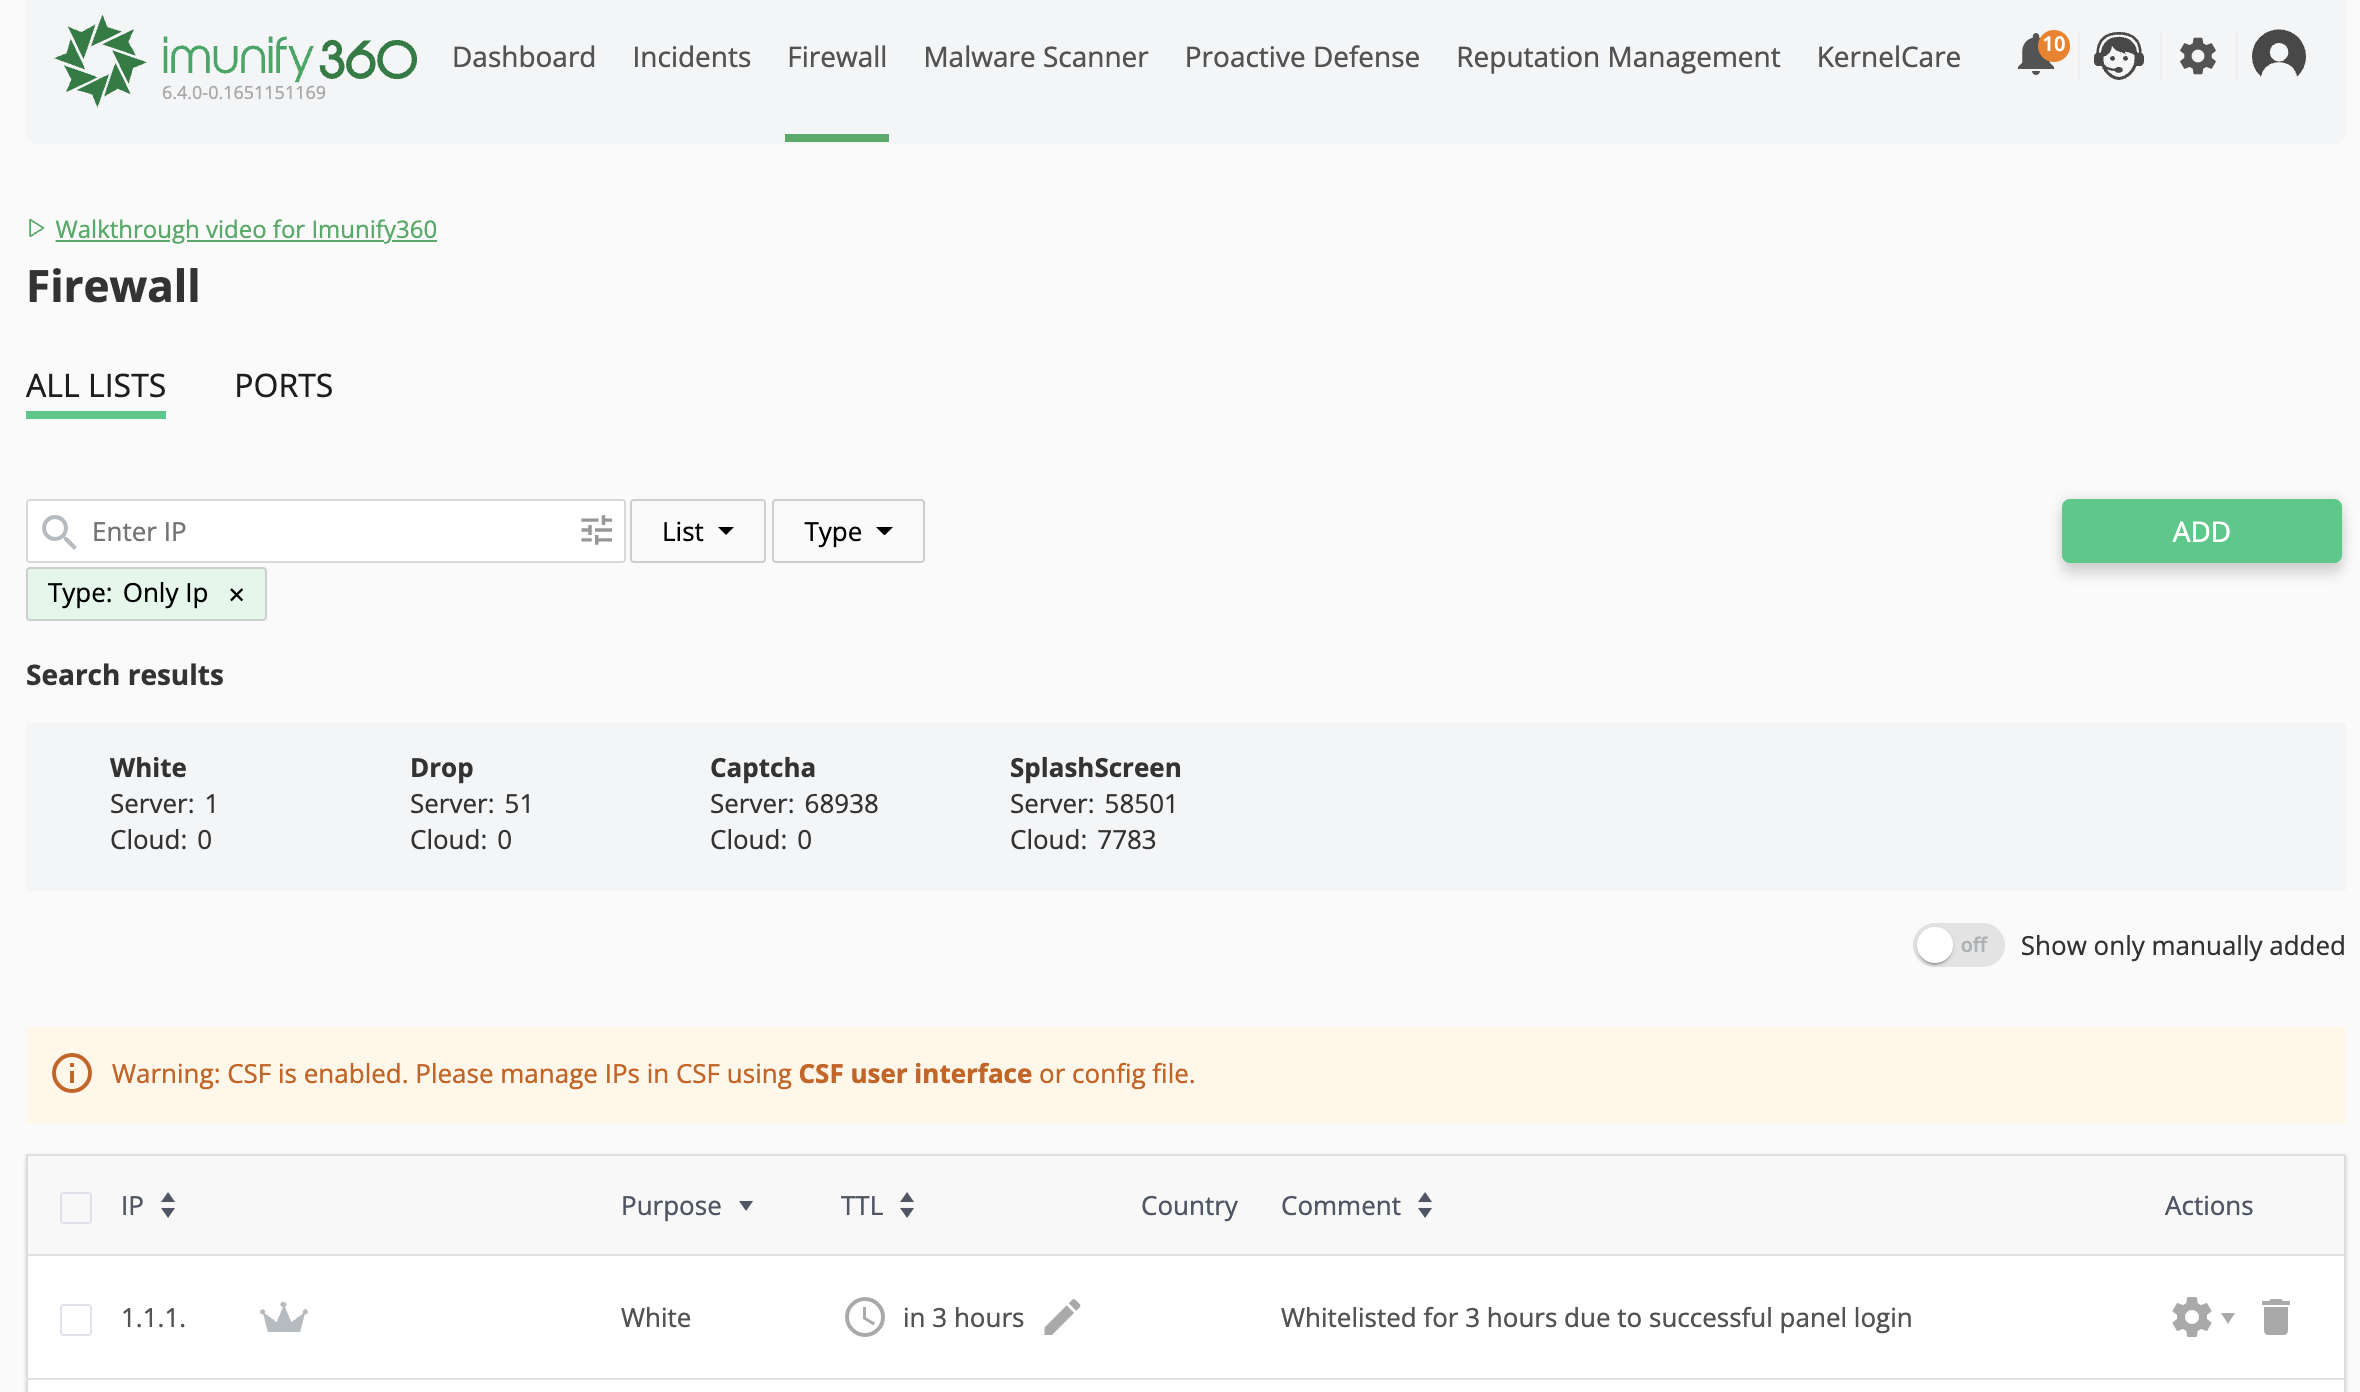
All the lists are available for search by the IP address as well as by the Country and Comment fields.
The IP address can be in several lists at the same time, and the highest in priority list decides how the IP will be treated.
Here, you can add or edit a comment to an IP, delete IP permanently or move it to the White/Black list. For an IP with full access you can also remove it here.
The Ports tab allows to manage the list of blocked ports.
How to add IP manually
To add an IP, click Add on the right side of the page. The following pop-up opens.
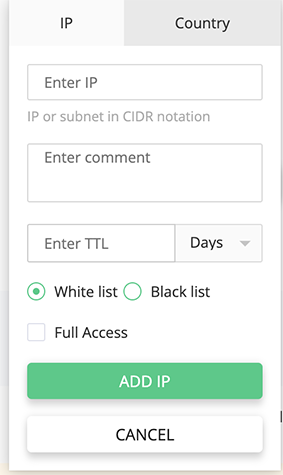
In the pop-up choose IP tab and fill out:
- Enter IP – IP or subnet in CIDR notation
- Enter a comment – type a comment to the IP or subnet (optional)
- Enter TTL in days or hours – time to live – for how long the IP will be in the White List.
- Choose White List or Black List
- For the White List it is possible to tick Full Access checkbox to make this IP or subnet ignore the rules in Blocked ports. The IPs with full access have a crown icon in the IP column.
Note
You can grant or remove full access afterwards in the table, just click Cog icon and choose Grant Full Access to grant or Remove Full Access to remove it.
When done, click Add IP to confirm your action or Cancel to hide pop-up.
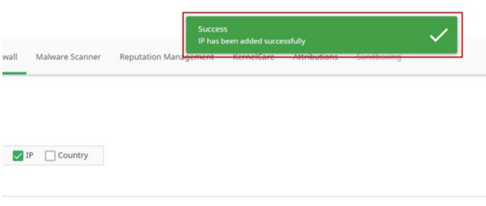
You will see a notification if an IP has been added successfully.
Starting with imunify360-firewall-8.2.0, manual addition can be disabled. To disable it, set PERMISSIONS.allow_local_ip_management = false configuration option from a command line:
imunify360-agent config update '{"PERMISSIONS": {"allow_local_ip_management": false}}'
After local IP management is disabled an attempt to add IP address results in error:

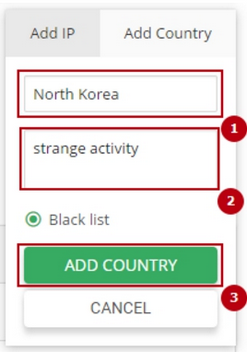
How to add a country manually
To add a country to the Black List, click Add on the right side of the page.
In the pop-up choose Country tab and fill out:
- Enter country – autocomplete field. Just start typing.
- Enter comment – type a comment to IP or subnet (optional).
When done, click Add Country to confirm or Cancel to close the pop-up.
Be aware of the possibility that blocking countries can cause unexpected issues, for example visitors from adjacent countries may not be able to connect if at BGP level the decision to send the traffic through the blocked IP was made, when using glued DNS records, or with some mirrors.
You will see a notification if a country has been added successfully.

How to add a comment to IP
In the proper IP row click ![]() in the Comment column, type a comment and click
in the Comment column, type a comment and click ![]() .
.
To remove a comment, click ![]() and remove the text. Then click
and remove the text. Then click ![]() .
.
How to move IP from the Black List to the White List
To move IP from the Black List to the White List, choose proper IPs in the list (use checkboxes), click Group Actions at the top of the table and choose Move to White List in the drop-down. Then confirm the action.
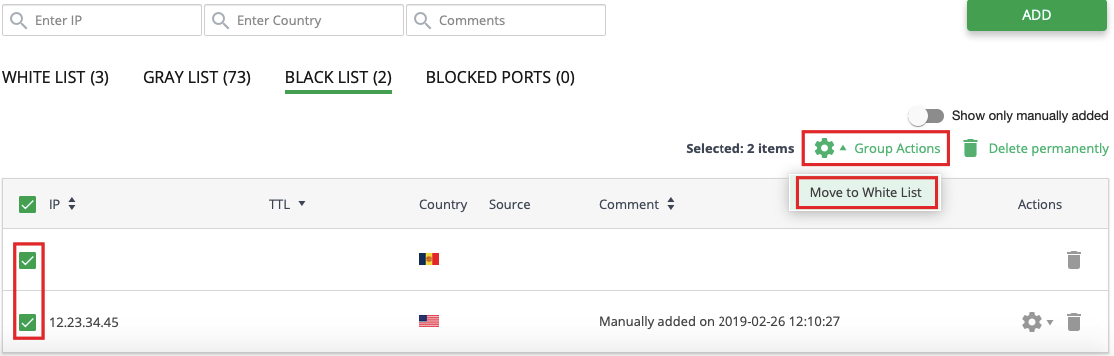
To move an exact IP, just click the Cog icon in a proper IP row and choose Move to White List in the drop-down. Then confirm the action.
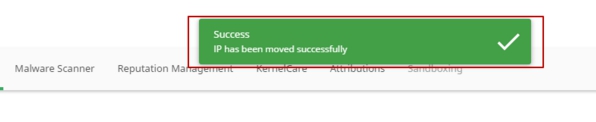
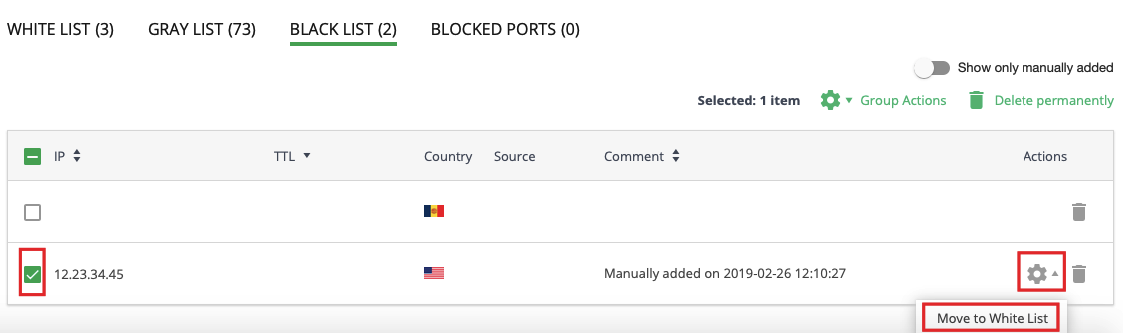 You will see a notification if an IP is moved to the White List successfully.
How to remove IP from the Black List
To remove IP from the Black List, choose proper IPs in the table (use checkboxes) and click Delete permanently. Then confirm the action.
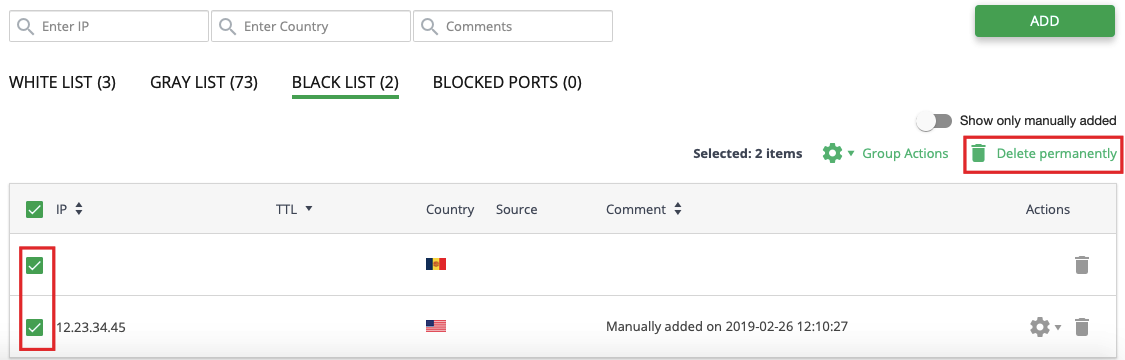 To remove an exact IP, just click Bin icon in the proper IP row. Then confirm the action.
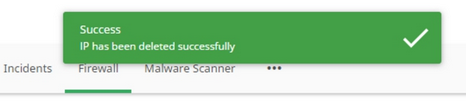
You will see a notification if an IP is successfully removed.
See also: How to use external files with the list of Black/White IPs
Global Black/White list IP management
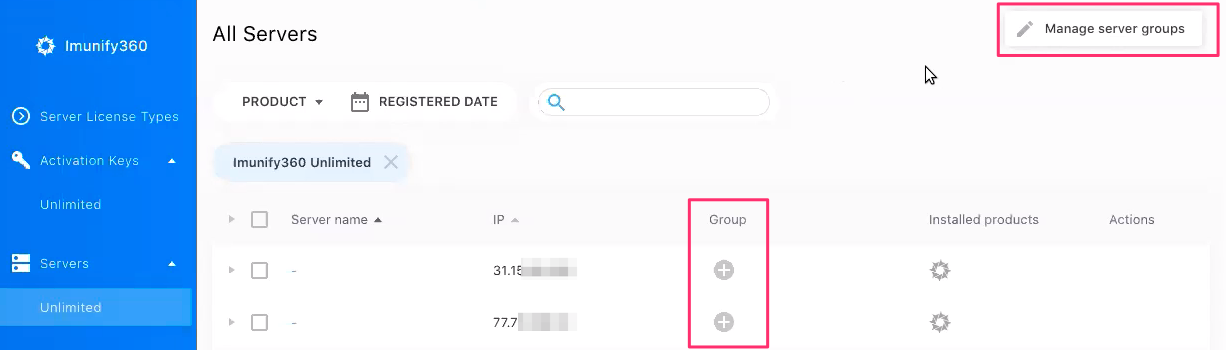
Administrator can manage IPs globally, this means that you can blacklist or whitelist an IP not only on one server but on a group of servers.
Prior to manage IPs globally, you should create a group and add servers into it. This can be done via CLN UI. You can find the complete documentation on how to create and manage servers’ groups here.
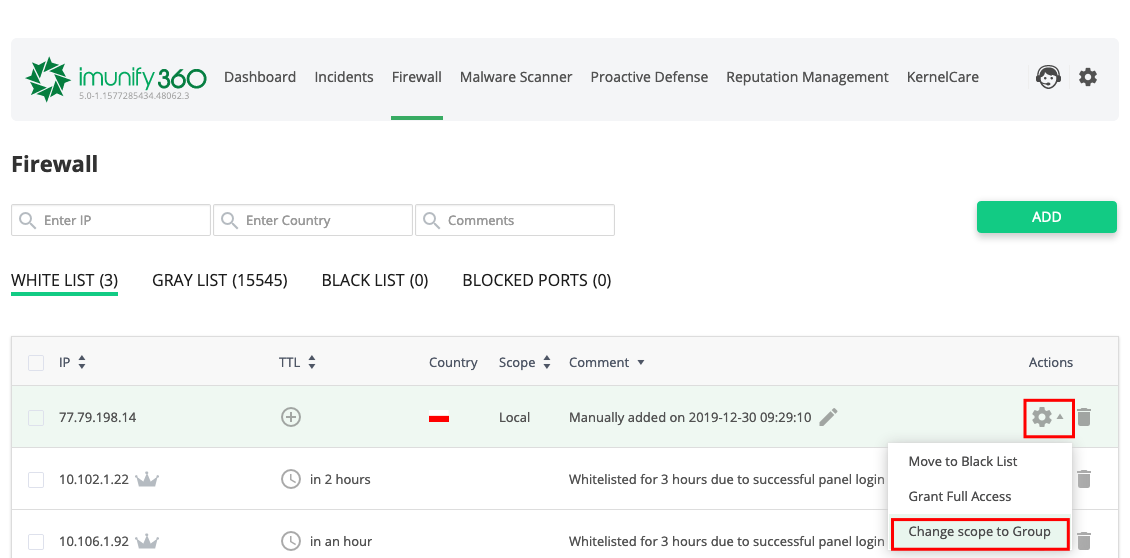
When you have created a group in CLN and added IPs into this group, go to Imunify360 > Firewall > White list or Black list. You will see the Scope column and controls (on clicking the Add button) to manage IP locally (on a current server) or globally (on a group of servers).

How to change Scope to Group/Local
To change the scope to Group/Local, first create your groups in the CLN.
After that, go to Firewall > White/Black list and select an IP.
- In the Actions column click
 .
. - Choose Change scope to Group/Local.
- In the opened popup click Yes, change scope to Group/Local or click Cancel to close the popup.
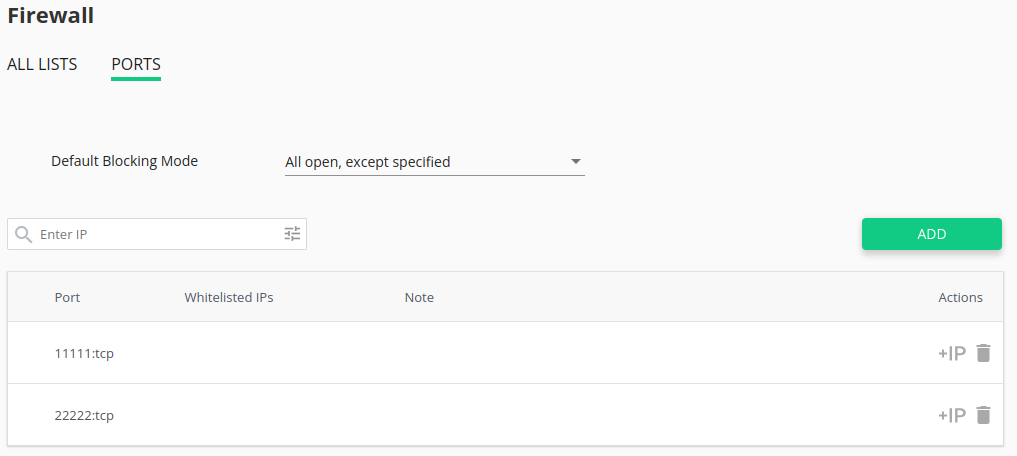
Ports
This feature allows to block specific ports for TCP/UDP connection. It is also possible to add specific IPs or subnet as a whitelisted so that the rule for the port will not work.
Click Firewall and choose Ports.
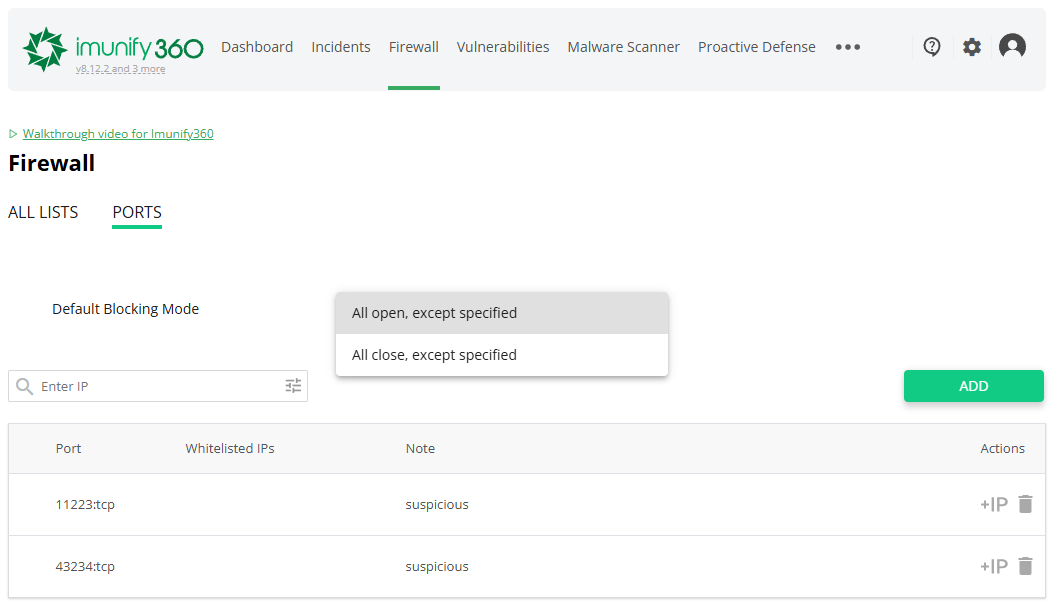
Choose the default blocking mode:
- All open, except specified
- All close, except specified
Or you can set the default blocking mode via CLI and config file.
Changes of config files will be applied automatically. You don’t need to restart the server or Imunify360.
Note
CSF needs to be disabled due to conflicts.
Note
If CSF integration enabled, then Blocked Ports will be disabled. Imunify360 imports Closed ports and their whitelisted IPs from CSF.
Use filters to show the exact list of the IPs:
- IP – allows filtering the list by IP. Enter an IP or a part of it into the input field.
- Country – allows filtering the list by country origin. Enter a country name into the input field with autocomplete. Imunify360 will show the list of IPs of the chosen country.
- Comments – allows filtering the list by comments. Enter a comment into the input field.
- Use Items per page at the page bottom right to set the number of the incidents to be shown on the page.
The following actions are available for the ports:
- add port to the list of blocked ports
- edit ports in the list of blocked ports
- add a comment
- delete permanently
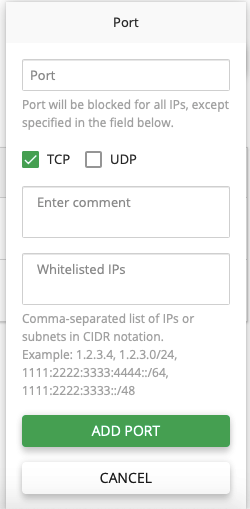
Add a port to the list of blocked ports
On the Lists page choose Blocked ports and click Add. In the pop-up specify the following:
- Port – the number of the port to be added to the list of blocked ports.
- TCP/UDP – tick the checkboxes of connection types for the port that should be blocked.
- Enter comment (optional) – a text to be added as a note for the port.
- Whitelisted IPs – add IPs separated by comma to the White List. They will be able to use the port.
Click Add Port to proceed or Cancel to close the pop-up.
Edit ports in the blocked ports list
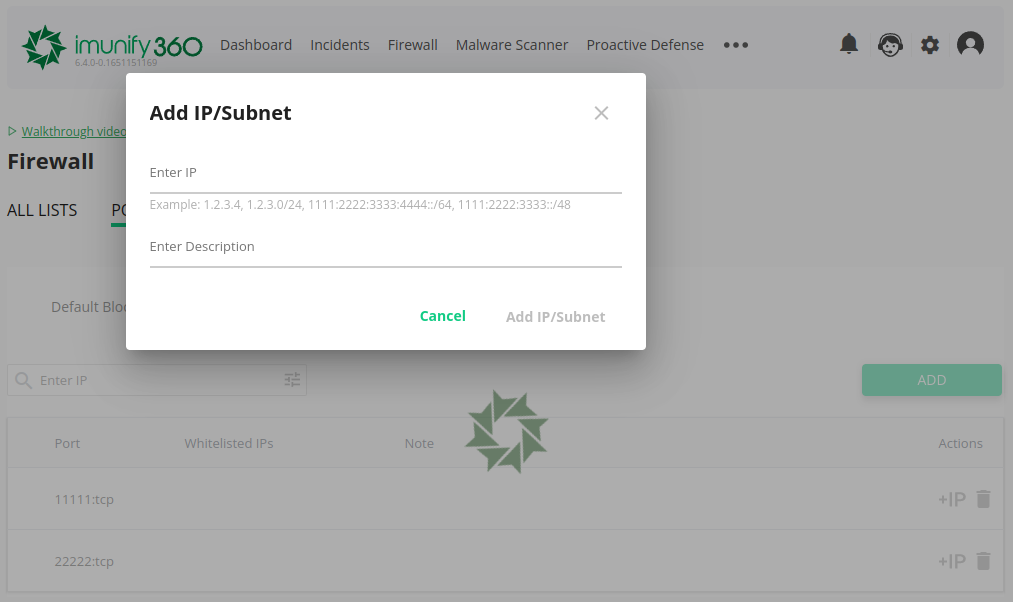
To add an IP or a subnet to the White List for the port, click +IP and in the Add IP/Subnet pop-up specify the following:
- Enter IP – IP or subnet that should be added to the whitelist
- Enter description – a description to be added as a note to the IP or subnet.
Delete permanently
To delete a port or separate IP/subnet, click Bin icon in the row of the element.
Blocking mode: All close, except specified
In this mode, all ports, except those specified, will be blocked. You can add or remove ports from the default list of allowed ports. This can be configured separately for IPv4 and IPv6.
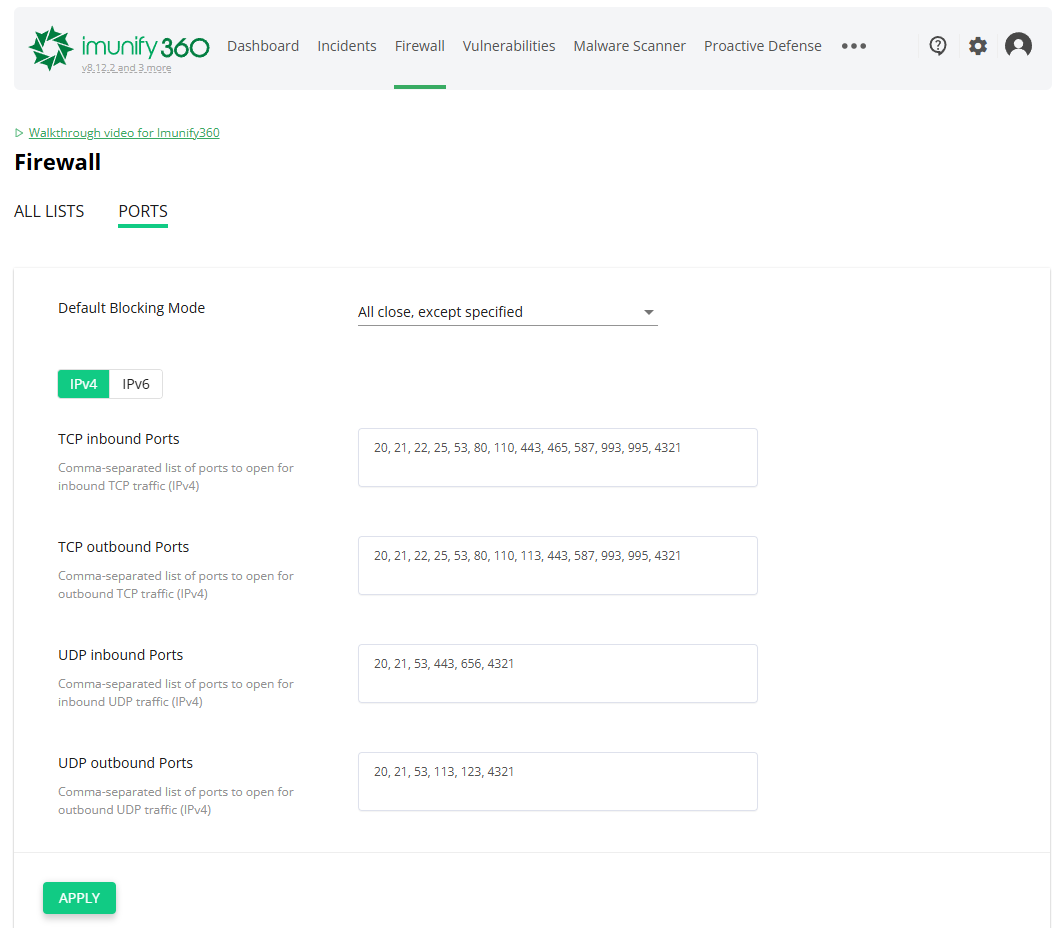
Exact ports and port-ranges to be allowed can be configured by the following fields in the config file:
- FIREWALL.TCP_IN_IPv4
- FIREWALL.TCP_OUT_IPv4
- FIREWALL.UDP_IN_IPv4
- FIREWALL.UDP_OUT_IPv4
- FIREWALL.TCP_IN_IPv6
- FIREWALL.TCP_OUT_IPv6
- FIREWALL.UDP_IN_IPv6
- FIREWALL.UDP_OUT_IPv6
Malware Scanner
Note
The functionality described here depends on Malware Scanner settings.
Imunify360 Malware Scanner can scan file systems for malware injection and clean up infected files.
This is also a real time file scanner for vulnerability and it can:
scan files uploaded via FTP (supporting Pure-FTPd)
scan files uploaded via HTTP/HTTPS
scan files for changes in real time (using fanotify with legacy inotify fallback)
scan on-demand (any folder needed)
Malware scanning allows you to:
- observe scanner activity
- start on-demand file scanner
- manage malicious and cleaned up files
- manage Ignore List
Click Malware Scanner in the main menu of the Imunify360 admin interface.
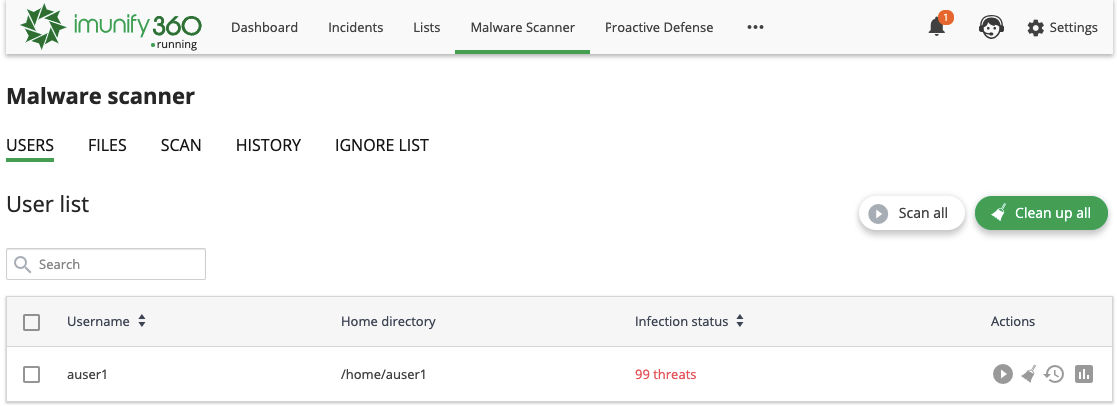
The following tabs are available:
Users
Go to Imunify360 → Malware Scanner → Users tab. Here, there is a table with a list of users on the server, except users with root privileges.
The badge in the History tab shows the number of missed events in the Malware Scanner’s History. You won’t miss any automatic actions applied to infected files, since they are listed in the History tab and shown in the badge.
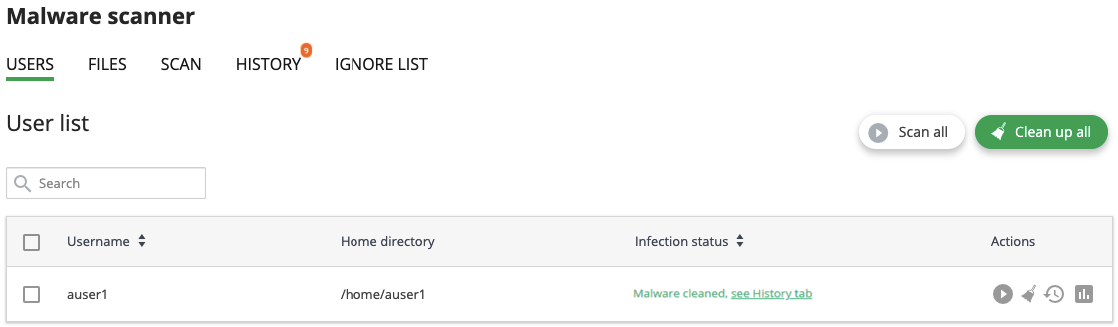
The table has the following columns:
- User name — displays the user name.
- Home directory — the path to the user home directory starting from the root.
- Infection status — the current status depending on the last action made:
- On-Demand scanning — scanning was initiated/made by an administrator;
- Scanning queued — user's files are queued for scanning;
- Background scanning — scheduled scanning is in progress;
- Scanning scheduled — user's files scanning is scheduled;
- Cleaning up — user's files are now cleaning up;
- Not yet scanned — user's files have not been scanned yet;
- No malware found — no malware was found during scanning.
- Actions:
- Scan for malware — click Scan
 to start scanning files for a particular user.
 - View report — click View Report
 to go to the Malicious tab and display the results of the last scan.
 - Cleanup — click Cleanup
 to start cleaning up infected files for the user.
 - Restore original — click Restore original
 to restore original file after cleaning up if backup is available. To perform a bulk action, tick required users and click the corresponding button above the table.
- Scan for malware — click Scan
To clean up all files of all users and scan all files, click Scan all or Cleanup all button above the table.
The following filters are available:
- Items per page displayed — click the number at the table bottom.
The table can be sorted by User name and Infection status (by the date of the last action).
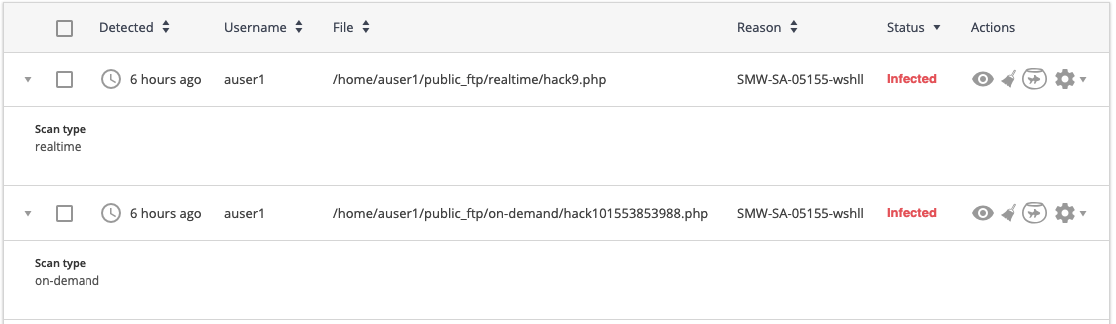
Malicious
Go to Imunify360 → Malware Scanner → Malicious tab. Here, there is a table with a list of infected files within all domains and user accounts.
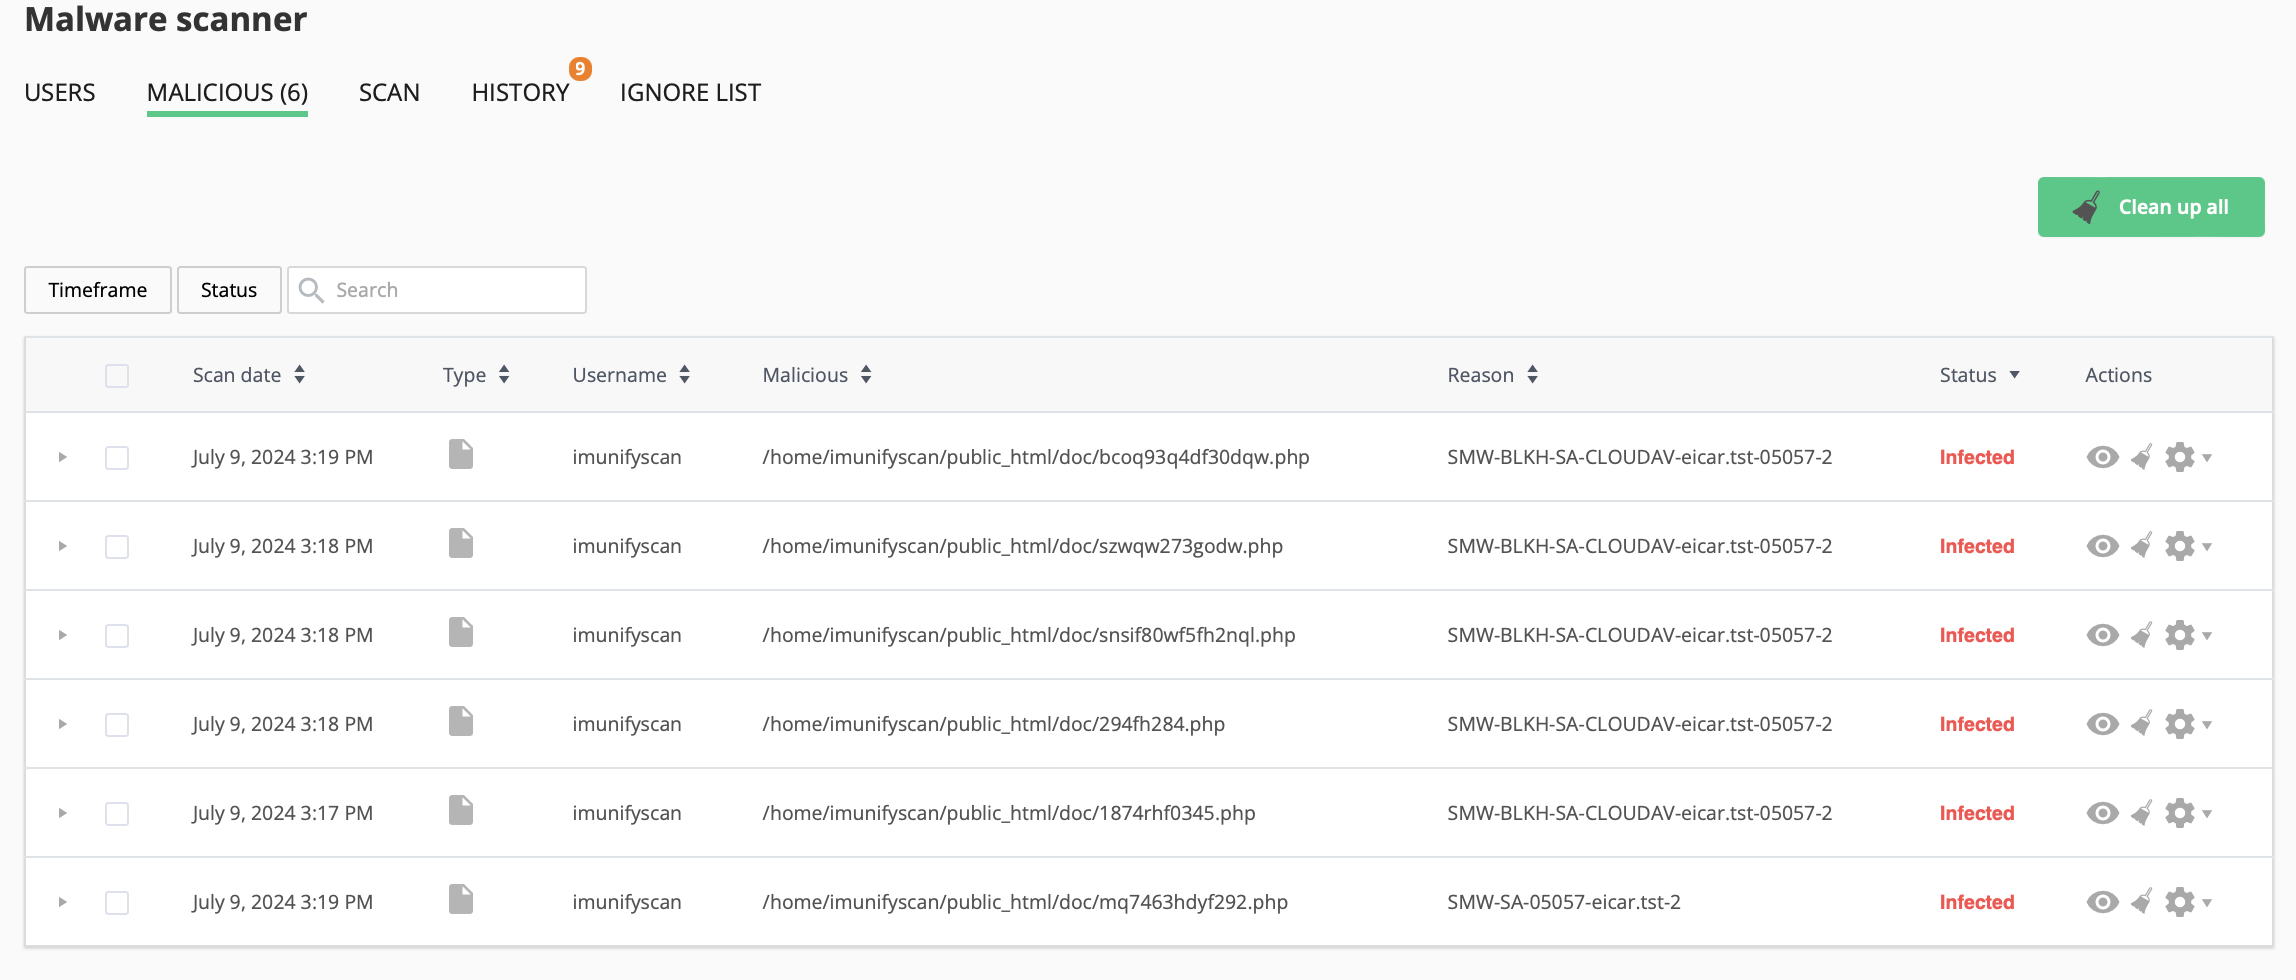
The table has the following columns:
- Scan date — displays the exact time when a file was detected as malicious.
- Type — Malware Database Scanner or Malware Scanner.
Note
To function properly Malware Database Scanner requires MariaDB/MySQL DB management system version 5.5. Recommended version is 5.6+. Note, that only WordPress, Joomla, and Magento databases are supported now.
- Username — displays file owner name.
- Malicious — the path where the file is located starting with root.
- Reason — describes the signature which was detected during the scanning process. Names in this column depend on the signature vendor. You can derive some information from the signature ID itself.
SMW-SA-05155-wshll– in this Signature ID:- The first section can be either
SMWorCMW.SMWstands for Server Malware andCMWstands for Client Malware - The second section of ID can be either
INJorSA.INJstands for Injection (means Malware is Injected to some legitimate file) andSAstands for StandAlone (means File is Completely Malicious) - The third section is
05155. This is simply an identification number for the signature. - The fourth section
wshll/mlw.wp/etcexplains the category and class of malware identified. Here,wshllstands for web shell (mlwstands for malware). - The fifth section is
0, which provides the version number of the signature.
- The first section can be either
- Status — displays the file status:
- Infected — threat was detected after scanning. If a file was not cleaned after cleanup, the info icon is displayed. Hover mouse over info icon to display the reason;
- Cleaned — infected file is cleaned up.
- Content removed — a file content was removed after cleanup.
- Cleanup in progress — infected file cleanup is in progress now.
- Actions:
- Add to Ignore List — add file to the Ignore List and remove it from the Malicious files list. Note that if a file is added to the Ignore List, Imunify360 will no longer scan this file. Click the Gear symbol and select Add to Ignore List.
- View file — click View file symbol
 in the file line and the file content will be displayed in the pop-up. Only the first 100Kb of the file content will be shown in case if a file has bigger size.
 - Cleanup file — click Clean up symbol to clean up all infected files within the account.
- Restore original file (before cleanup) — click Restore original symbol to restore the original content removed as infected.
- Restore from backup — click the Gear symbol and select Try to restore from backup to restore the original file before it got infected if it exists.
- Add to Ignore List — add file to the Ignore List and remove it from the Malicious files list. Note that if a file is added to the Ignore List, Imunify360 will no longer scan this file. Click the Gear symbol
Warning
Starting from ImunifyAV(+) v.6.2, the Quarantine and Delete actions were removed permanently from the UI as well as the CLI in Imunify360. Previously quarantined files are also subject to deletion. After this change is implemented, the restoration of the previously quarantined files will become impossible. For more information see this this blog post.
To perform a bulk action, tick required files and click the corresponding button above the table.
Click the desired string to display scan type.
To clean up all files of all users, click Clean up all button above the table.
The following filters are available:
- Timeframe — displays the results filtered by chosen period or date.
- Status — displays the results filtered by chosen status.
- Items per page displayed — click the number at the table bottom.
The table can be sorted by detection date (detected), user name, file path (file), reason, and status.
Scan
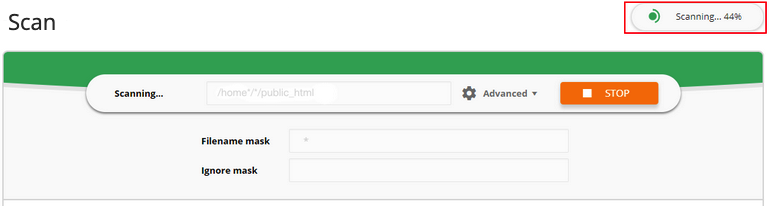
It is possible to scan a specific directory for malware. Go to Malware Scanner page and choose Scan tab. Then proceed the following steps:
Enter a folder name you need to scan in the Folder to scan field. Start typing with the slash
/.It is possible to use Advanced Settings:
- Filename mask. It allows to set file type for scanning (for example,
*.php– all the files with extension php). Default setting is*which means all files without restriction. - Ignore mask. It allows to set file type to ignore (for example,
*.html– will ignore all file with extension html). - CPU consumption. Defines the CPU consumption for scanning without decreasing efficiency: * from Low to High.
- I/O consumption. Defines the I/O consumption for scanning without decreasing efficiency: * from Low to High.
- Follow symlinks. Follow all symlinks within the folder to scan.
- Filename mask. It allows to set file type for scanning (for example,
Note
If Imunify360 is running on CloudLinux OS, LVE is used to manage scan intensity. If it is running on other operating systems, “nice” is used to control CPU and “ionice” is used when the I/O scheduler is CFQ.
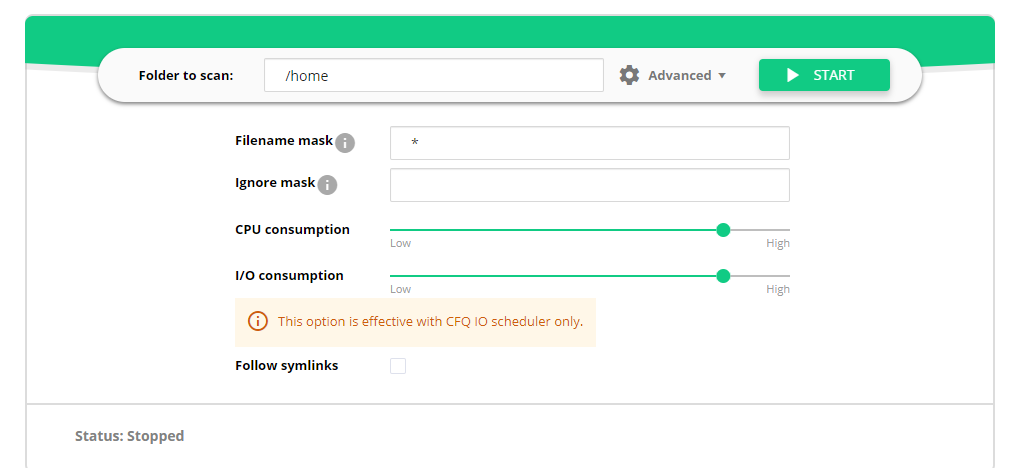
- Click Start.
At the top right corner Malware Scanner progress and status are displayed:
- Scanner is stopped – means that there is no scanning process running.
- Scanning…% – means that the scanner is working at the moment. A percentage displays the scanning progress. You can also see the scanning status beneath the Mask or Advanced options.
After Malware Scanner stops on-demand scanning you will see the results in the table below with the following information:
- Date – the date when the scanning process was started.
- Path – the name of the folder that was scanned.
- Total files – the total number of files scanned.
- Result – the result of scanning.
- Actions – click icon in this column to perform particular action.
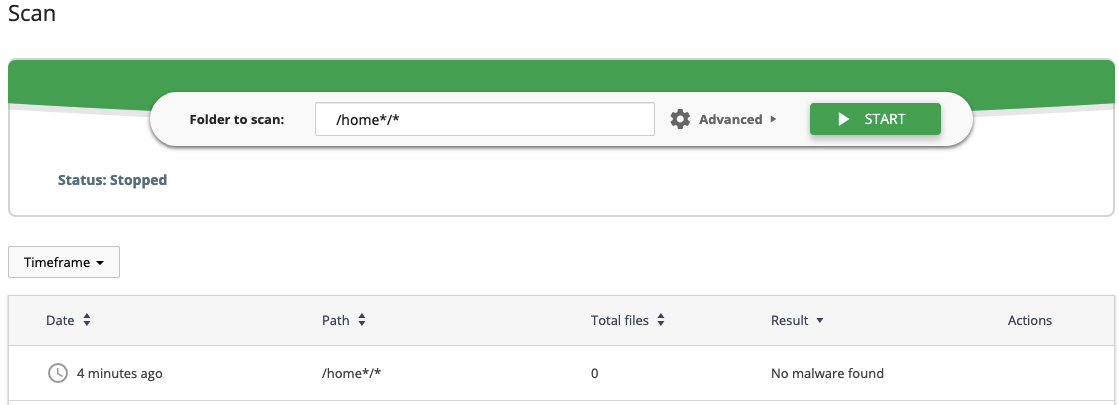
To review and manage malicious files go to the Malicious tab described below.
History
History tab contains data of all actions for all files. Go to the Imunify360 → History tab. Here, there is a table with a list of files within all domains.
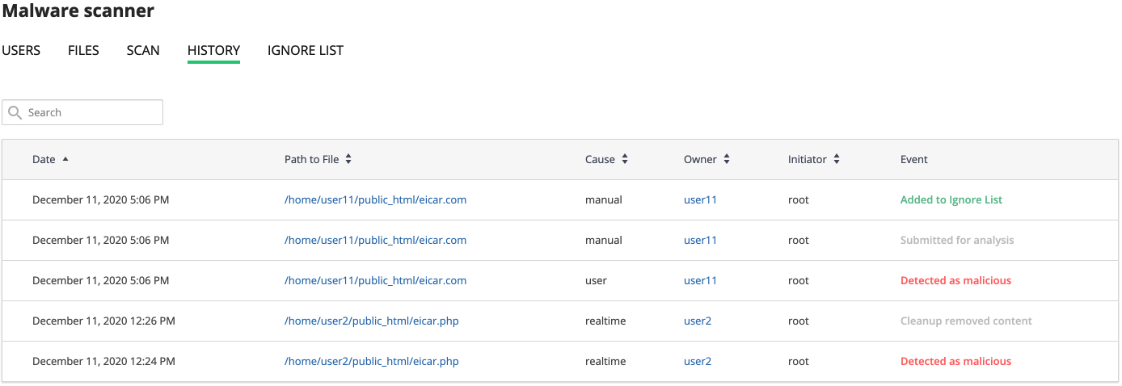
The table has the following columns:
- Date — action timestamp.
- Path to File — path to the file starting from the root.
- Cause — displays the way malicious file was found:
- Manual — scanning or cleaning was manually processed by a user.
- On-demand — scanning or cleaning was initiated/made by a user;
- Real time — scanning or cleaning was automatically processed by the system.
- Owner — displays a user name of file owner.
- Initiator — displays the name of a user who was initiated the action. For system actions the name is System.
- Event — displays the action with the file:
- Detected as malicious — after scanning the file was detected as infected.
- Cleaned — the file is cleaned up.
- Failed to clean up — there was a problem during cleanup. Hover mouse over the info icon to read more.
- Added to Ignore List — the file was added to the Ignore List. Imunify360 will not scan it.
- Restored original — file content was restored as not malicious.
- Cleanup removed content — file contend was removed after cleanup.
- Deleted from Ignore List — the file was removed from the Ignore List. Imunify360 will scan it.
- Submitted for analysis — the file was submitted to Imunify360 team for analysis.
- Failed to ignore — there was a problem during adding to the Ignore List. Hover mouse over the info icon to read more.
- Failed to delete from ignore — there was a problem during removal from the Ignore List. Hover mouse over the info icon to read more.
The table can be sorted by Date, Path to File, Cause, and Owner.
Ignore List
Ignore List tab contains the list of files, databases and directories that are excluded from Malware Scanner scanning. Go to the Imunify360 → Malware Scanner → Ignore List tab to see the table with a list of folders and files within all domains.

The table has the following columns:
Added — the date when the file was added to Ignore List.
Path — path to the file starting from the root.
Actions:
- Remove from Ignore List — click Bin symbol
 to remove the file from the Ignore List and start scanning.
 - Add new file, database or directory — click Plus symbol
 to add a new file or directory to the Ignore List. In the opened pop-up enter the path to be added and click Add.
Note
Databases can be added to the Ignore List via the regular procedure by choosing the DB type of the file:

In order to add a database, provide a path to the application root. For example, you have a website stored in the
public_htmldirectory that contains thewp-config.phpfile – then the "Application path" to add will be:/home/testuser/public_html- Remove from Ignore List — click Bin symbol
Note
Wildcards are not supported when adding paths to the Ignore List. For example, the following paths are not supported:
/home/*/mail//home/user/*.html/home/*
To perform a bulk action, tick required files and click the corresponding button above the table. The following filters are available:
- Timeframe — displays the results filtered by chosen period or date.
- Items per page — click the number at the table bottom.
The table can be sorted by Added and Path. By default, it is sorted from newest to oldest.
To search file or folder in the Ignore List use Search input field above the table.
See also: How to edit watched and excluded patterns for Malware Scanner?
Proactive Defense
Overview
Proactive Defense is a unique Imunify360 feature that can prevent malicious activity through PHP scripts. It is available as a PHP module for Apache and LiteSpeed web servers and analyzes script activity using known patterns like obfuscated command injection, malicious code planting, sending spam, SQL injection etc.
Note
Proactive Defense requires Hardened PHP (alt-php) to operate.
User Interface
Go to Imunify360 → Proactive Defense.

Here you can set a mode, view detected events and perform actions on them.

Mode Settings
The following Proactive Defense modes are available:
- Disabled — means that Proactive Defense feature is not working and a system is not protected enough
- Log Only — means that possible malicious activity is only logged, no actions are performed (default mode)
- Kill Mode — the highest level of protection — the script is terminated as soon as malicious activity is detected
To select a mode, tick the desired checkbox. When an action is completed, you will see a pop-up with the successful mode changing message. 
Note
- Data is logged in all modes except Disabled.
- A user can disable Proactive Defense anytime. Any mode that is not disabled (for user’s hosting account) by admin can be activated by user.
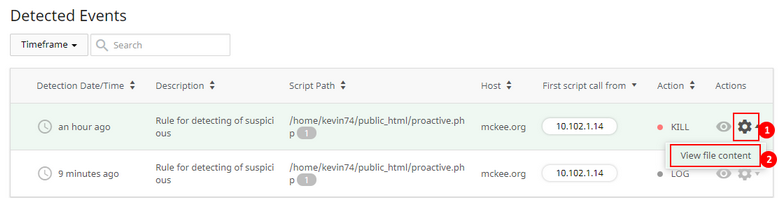
Detected Events
The Detected Events table displays all the necessary information about PHP scripts with malicious activity detected by Imunify360 Proactive Defense. 
You can filter items by time frame in a Timeframe dropdown and search a certain entity in a search field.
The items in the Detected Events table are displayed per 25 on a page. To change a number of items displayed, click the number at the bottom right corner Items per page and select a desired number in the dropdown.
To go to the next or the previous page click >> or << button or click a desired page number.
The Detected Events table includes the following columns:
- Group/individual action checkbox — allows to perform actions on one or several desired entities
- Detection Date/Time — displays the date and the exact time of event detected. To view the exact time click the clock icon in the desired event line. To order the events from the last to the first or vice versa click the ▲ icon in the Date/Time of detection column header
- Description — displays a special Proactive Defense rule according to which a suspicious activity was detected
- Script Path — displays the path to the suspicious script. A number near the path describes how many times this event has repeated
- Host — displays the host of the script
- First script call from — displays the IP in which the first call of the script was detected.
- White color means that this IP is whitelisted
- Black color means that this IP is blacklisted
- Gray color means that this IP is graylisted
- All the others IPs are blue colored
- Action — displays the current mode
- Actions — allows to view details and perform actions on the event
Actions
The following actions are available for the detected event:
- View file content
- Move IP to the Black List
- Move file to Ignore List (ignore detected rule) — allows a user to exclude a file from Proactive Defense analysis for a particular rule
- Move file to Ignore List (ignore all rules) — allows a user to exclude a file from Proactive Defense analysis for all rules
- Remove file from Ignore List — allows a user to include ignored file to Proactive Defense analysis again.
View file content
This action can be performed in two ways.
The first way
Click the View details icon in the row of the desired event. Here you can see the same information as in the table and plus all environment variables and their values. Then, click View file content button. The file content will be displayed in a new pop-up.
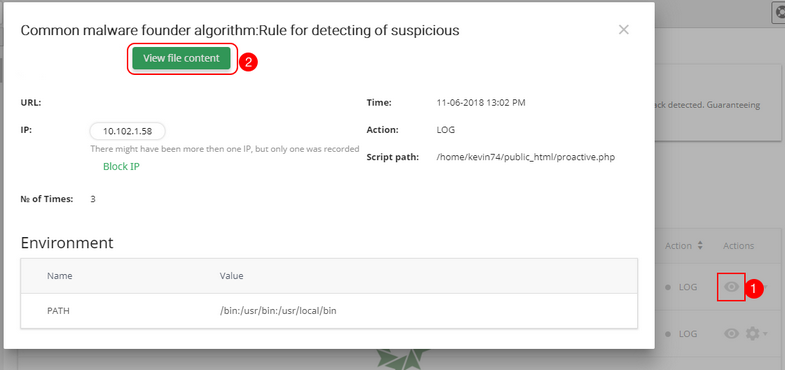
The second way Click Cog icon in the row of the desired event and choose View file content.
The file content will be displayed in a new pop-up. 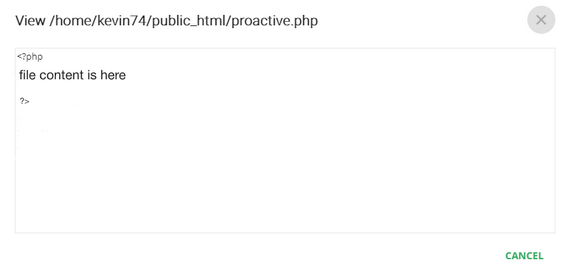 The group action is not available for this action.
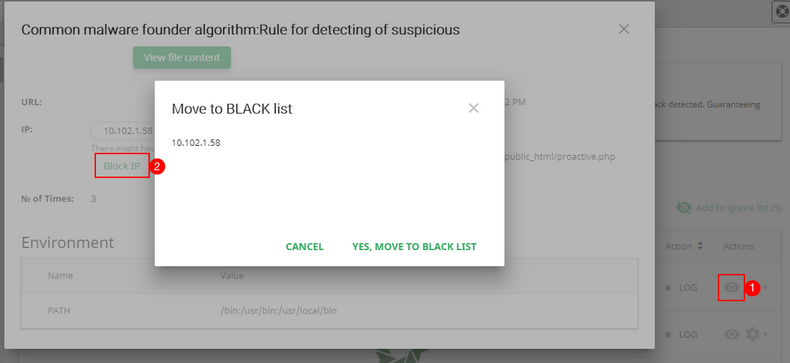
Move IP to the Black List
Click View details icon in the row of the desired event. Then, click Block IP button. To move the IP to the Black list click Yes, move to Black list. In the pop-up displayed click Yes, move to black list to complete the action or Cancel to return to the Details window. When a file is added to the Black List, you will see the confirmation pop-up.
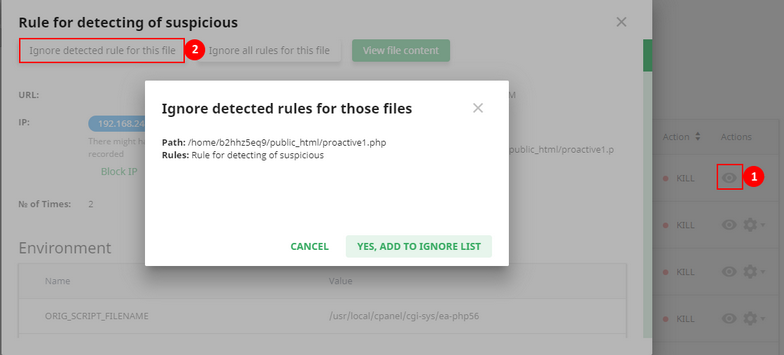
Move file to Ignore List (ignore detected rule)
The first way Click Cog icon in the row of the desired event and choose Ignore detected rule for the file. Click Yes, add to Ignore List in the confirmation pop-up or click Cancel to close pop-up. Now you can see this file on the Ignore List tab. 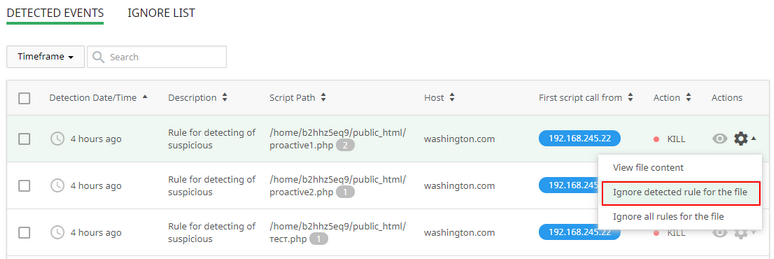
The second way Click View details icon and then in the file details pop-up click Ignore detected rule for this file. Click Yes, add to Ignore List in the confirmation pop-up or click Cancel to close the pop-up. Now you can see this file on the Ignore List tab.
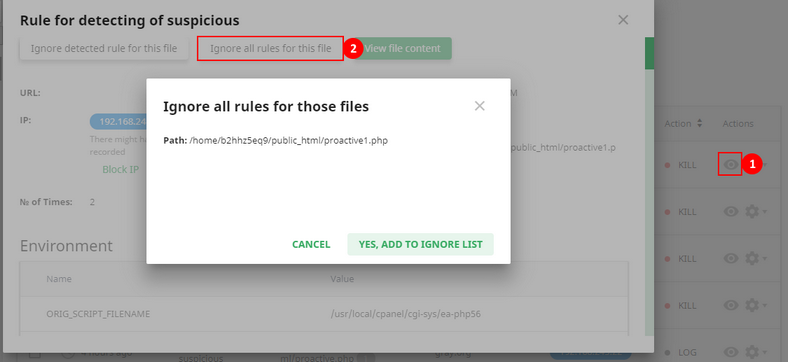
Move file to Ignore List (ignore all rules)
The first way Click Cog icon in the row of the desired event and choose Ignore all rules for the file. Click Yes, add to Ignore List in the confirmation pop-up or click Cancel to close pop-up. The file will be moved to Ignore List tab. 
The second way Click View details icon and then in the file details pop-up click Ignore all rules for this file. Click Yes, add to Ignore List in the confirmation pop-up or click Cancel to close the pop-up. Now you can see this file on the Ignore List tab.
Remove file from Ignore List
On the Ignore List tab click Bin icon and confirm the action. 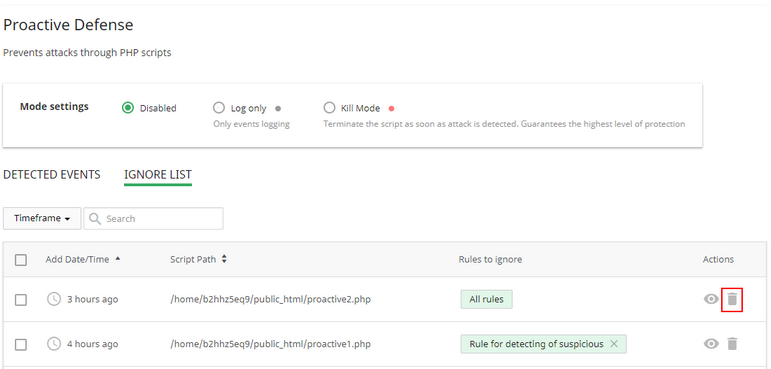
To perform bulk action, tick required checkboxes and click Remove from ignore list at the top of the table, then confirm the action in the pop-up.
Ignore List tab
Here, there is a table with files with ignored rules. If file is added to Ignore List, Proactive Defense will not analyze scripts activity from this file for all or specified rule. 
The Ignore List table includes the following columns:
- Add Date/Time — displays the date and the exact time of adding a file. To view the exact time click the clock icon in the desired file line. To order the files from the last to the first or vice versa click the ▲ icon in the Add Date/Time column header.
- Script Path — displays the path to the script.
- Rules to ignore — displays the pattern to be ignored.
- Actions — allows to view details and perform actions on the file.
See also: How to edit watched and excluded patterns for Malware Scanner?.
How to test Proactive Defense
- Set Proactive Defense to Log only mode (requests will not be blocked) or to Kill mode to kill all requests.
- Add the following row in order to enable test mode rules:
echo 'check_mode = -10' >> /usr/share/i360-php-opts/module.ini
- Create a file with the following content:
<?php
$pattern = 'TEST-FILE';
$external_code = @file_get_contents('https://secure.eicar.org/eicar.com.txt');
if (strpos($external_code,$pattern)){
    print "Poactive Defence DOESN'T work or NOT in KILL mode";
}
else {
    print "Proactive Defence works fine - file_get_contents function has been BLOCKED, please check Imunify360 Proactive Defence tab for corresponding BLOCK event";
}
?>
Note
This script is available starting from Imunify360 v. 4.10.2
This script will only check for PD if file_get_contents is not disabled and allow_url_fopen is enabled in the PHP settings on the server.
- Place this file on the server.
- Call a test page with the script from the point 2.
- If Proactive Defense is disabled, you will see "PD doesn't work or not in KILL mode" message after calling the script and no records will appear in "Incident" tab.
- If Proactive Defense is enabled and Log only mode is set, you will see "PD doesn't work or not in KILL mode" message after calling the script and a new event with description "Blamer detection" in the Detected Events table with "LOG" action.
- If Proactive Defense is enabled and Kill mode is set, the test page returns an error.And a new event with description "Blamer detection" in the Detected Events table with "KILL" action.
- Remove the following row from the
/usr/share/i360-php-opts/module.iniin order to disable test mode rules
check_mode = -10
Note
the number of triggered rule is 77777 and it is possible to check it via CLI
imunify360-agent proactive list
opcache.jit in PHP8 and the Proactive Defense module
Starting from PHP 8, the interpreter supports opcache.jit option to enable just-in-time compilation of the code.
When the Proactive Defense extension (or any other PHP extensions that use the hooks to intercept function calls) is enabled, opcache engine disables opcache.jit automatically and reports it into the error log. It does not affect the stability and performance of websites running PHP 8 when both opcache.jit and the Proactive Defense module are enabled, but the JIT will be off.
To keep opcache.jit forcibly enabled and keep the Proactive Defense module enabled, set jit_compatible_mode to True under the PROACTIVE_DEFENCE section in the Imunify360 configuration file (merged config), for example:
PROACTIVE_DEFENCE:
  jit_compatible_mode: True
The merged config is typically at /etc/sysconfig/imunify360/imunify360-merged.config (or the non-privileged variant when used). See also Config file description for the full list of PROACTIVE_DEFENCE options.
Note
The PHP extension applies jit_compatible_mode from the merged Imunify360 YAML configuration (not from module.ini). Older documentation referred to module.ini; use PROACTIVE_DEFENCE.jit_compatible_mode in the merged config as shown above.
Reputation Management
Choose Reputation Management in the main menu of the Imunify360 admin interface to get to the Reputation Management page.
Reputation Management allows to check if a domain registered on your server is safe or not based on the following reputation engines:
How does it work:
- We get a list of domains periodically (via crontab)
- Send it to the central Imunify360 server
- Get results from it
- Add bad domains to the list of Reputation Management
If a domain or an IP is blocked, then this information will be available in the table below. If a user’s website appears in this table, then it would be useful to send this link to the user. This instruction can help to solve problems with the domain.
At the top of the page (also in the main menu near Reputation Management item), Imunify360 shows the number of affected domains. This number is a quantity of affected domains that exist on the server.
The table shows:
- ID – domain owner username
- URL – the affected domain link
- Type – read more about types on the link (we still do not support THREAT_TYPE_UNSPECIFIED and POTENTIALLY_HARMFUL_APPLICATION).
- Detection time – exact time when the Reputation Management has detected the domain
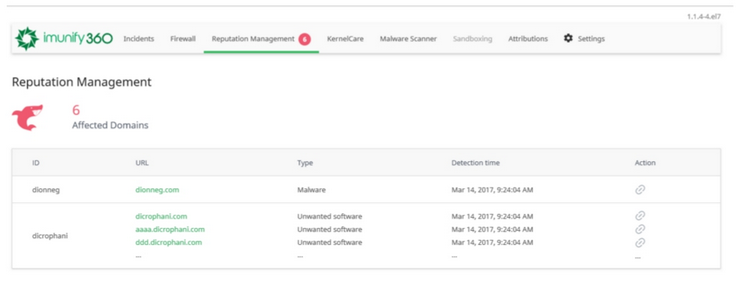
Click link icon in the Action column to copy the URL to the clipboard.
Note
Reputation Management online and browser look may differ. This is because Google Safe Browsing has an issue described on github.
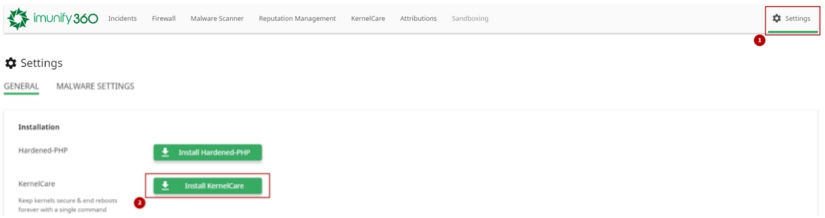
KernelCare Integration
Imunify360 has KernelCare KernelCare integration. To install KernelCare go to the Settings tab and click Install KernelCare.
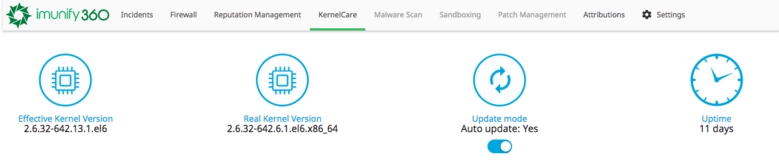
To observe current KernelCare status in the Imunify360 main menu choose KernelCare tab.
Here you can check:
- Effective Kernel Version – version of the kernel that KernelCare enable on the server
- Real Kernel Version – real version of the kernel
- Update mode – auto updated mode On or Off
- Uptime – uptime of the kernel in days
To disable auto update mode toggle the Update mode switch to No.
Note
If you have KernelCare license(s) on the same server(s), then cancel this license in CLN because KernelCare will be free for that server. If you do not know how to cancel licenses then follow this link for details.
Note
KernelCare tab can load slowly on highly loaded systems.
Read more about KernelCare on the link.
Settings
Choose Settings in the main menu to get to the Imunify360 settings page. The following tabs are available:
General
Go to Imunify360 → Settings → General. The following sections are available:
- Installation
- WAF Settings
- DoS Protection
- SMTP Traffic Manager
- 3-rd Party Integration
- Auto White List
- Incidents Logging
- WebShield
- Anti-bot protection
- OSSEC
- PAM
- Error Reporting
- WordPress plugin
- Contact Details
Installation
Here you can install and uninstall the following components:
- HardenedPHP
- KernelCare
If you want to install it using CLI, please follow this article. 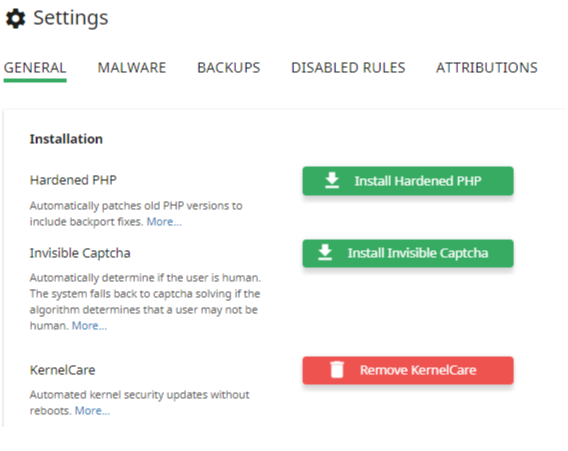
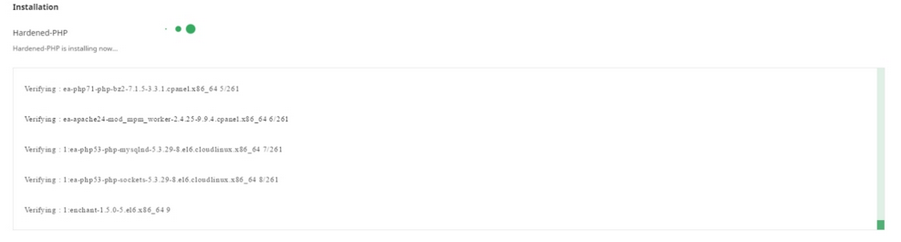
HardenedPHP
To install or uninstall HardenedPHP click on a button related. Please find additional information about HardenedPHP in this article. During HardenedPHP installation process the installation log will appear and will update automatically.
Note
HardenedPHP is free on the servers with Imunify360 installed.
KernelCare
To install or uninstall KernelCare click on a button related. Please find additional information about KernelCare here.
Note
KernelCare is free on the servers with Imunify360 installed.
WAF Settings
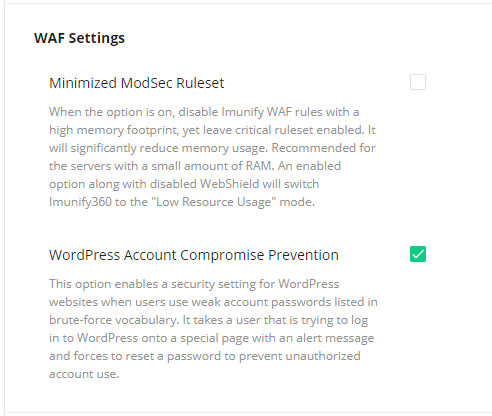
When the Minimized ModSec Ruleset option is on, it disables Imunify WAF rules with a high memory footprint, yet leaves critical ruleset enabled. It is recommended for the servers with a small amount of RAM. It is enabled by default for the installations with low RAM.
You can switch back to the normal mode by enabling WebShield or unchecking Minimized ModSec Ruleset in Settings | General | WAF Settings
Click Save changes button on the bottom of the section to save changes.
WordPress Account Brute-force Protection
We have two protection features against brute-force - one, Weak Password Login Prevention - prevents any logins with a weak password (e.g. "1234"), and the other Compromised Account Login Detection redirects known compromised accounts to reset their passwords.
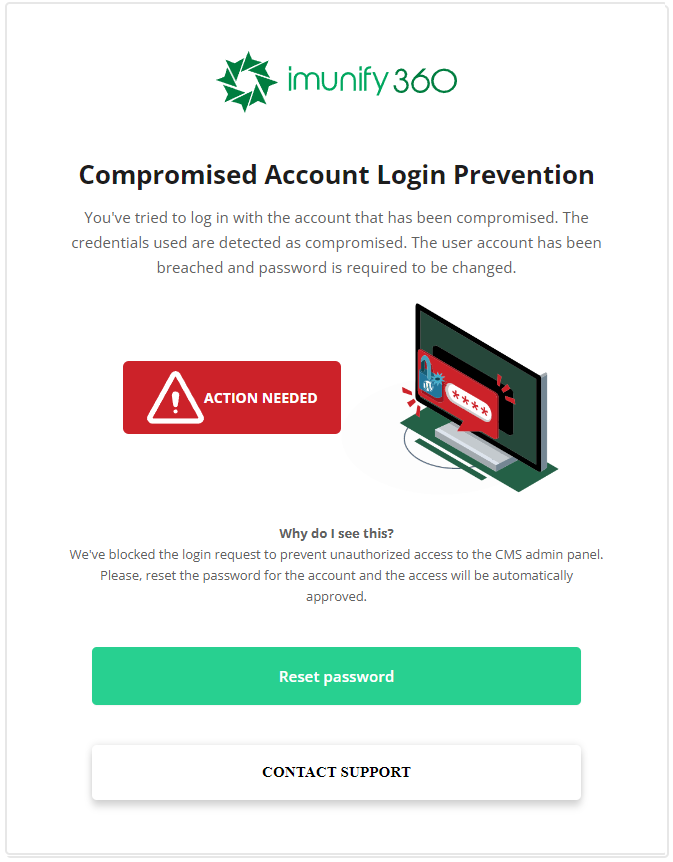
Server admin can enable an option to prevent access to WordPress accounts with well-known (trivial) passwords. When the option is enabled, all end-users that are trying to log into the admin account with weak/trivial or well-known passwords from the dictionary used by brute-forcers will be taken to the special alert page with an appeal to change their current password.
This feature can be enabled by setting cms_account_compromise_prevention to true in MOD_SEC config file section
Note
This feature is implemented via modsec rule and could be disabled on a per-domain basis (the rule id is 33355)

The alert page supports localization and is displayed in the language of the browser (on an external Imunify domain).
The WordPress Compromised Account Detection works independently of the Weak Passwords Prevention feature utilizing Cloud Based heuristic analysis.
Our heuristics analyze suspicions actions of the accounts such as malware drops, malicious plugins installation, other account actions and deliver a verdict to the specific host that are considered compromised. When account tries to login on the host, it will be redirected to the reminder to change the password. This feature does not have a switch in our settings and will produce alerts until the breach is fixed.
It employs the RBL system, and there is currently no settings switch to enable/disable it.
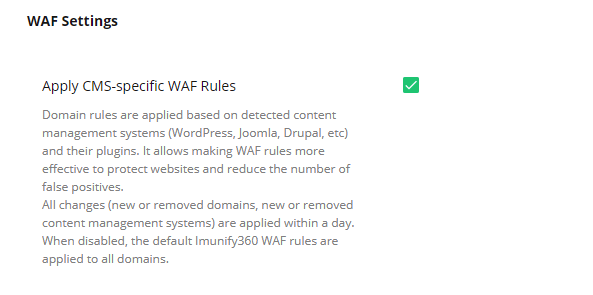
CMS-specific WAF Rules
WAF Rules Auto-Configurator generates a set of rules on a per-domain basis, considering the Content Management System (CMS), that the website is running (WordPress, Joomla, Drupal etc).
It allows making WAF rules more effective to protect websites and reduce the number os false positives.
It works in the background and scans domains for installed CMS daily, after that rebuilds ModSec configuration based on detected software.
Note
This feature is only available for the Apache 2.4 web server
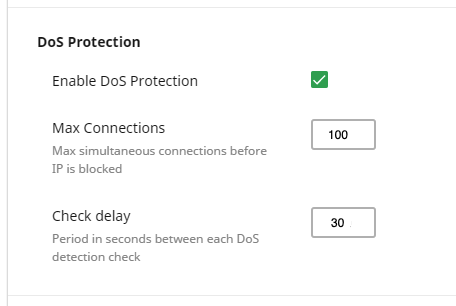
DoS Protection
DoS Protection section allows to enable or disable DoS protection. DoS protection works by counting connections from each remote IP address per local port separately. To enable/disable it, tick the Enable Dos Protection checkbox. Or you can enable it using the following CLI command:
imunify360-agent config update '{"DOS": {"enabled": true}}'
It is possible to configure how Imunify360 will behave:
- Max Connections– allows to setup the number of simultaneous connections allowed before IP will be blocked. Cannot be set lower than 100.
- Check delay – allows to setup period in seconds between each DoS detection system activation that will check a server for DoS attack.
- Per-port Max Connections – allows to set different connection limits for specific ports. Click "Manage per-port limits" to open a dialog where you can add, edit, or remove port-specific limits.
The minimum values:
- Max Connections = 100
- Check delay = 30
Note
Check delay is limited by the minimum value of 30, lower values can cause "false positives" triggering.
Note
Although DoS protection works on the TCP level, it is not the same as http request rate - even if there is large number of http connections, the number of TCP connections can be relatively low.
Note
Imunify360 DoS protection and Enhanced DoS Protection features are automatically disabled if CSF is active - a warning is shown in Imunify360 UI in that case
Enhanced DOS Protection
The Enhanced DOS Protection feature forms an additional layer of protection, increasing the stability of servers facing DOS attacks. It takes a different approach than our existing DOS Protection feature, which focuses on monitoring the number of simultaneous connections. Enhanced DOS Protection, on the other hand, monitors the rate of requests originating from attacker IP addresses per unit of time.
The new feature works better against attacks based on short-living connections and against attacks where the number of requests grows fast (hundreds of requests per second). As Enhanced DOS Protection monitors the number of requests in real-time, it reacts to the threats almost instantly, greylisting the detected IPs and redirecting their requests to the Anti-Bot challenge. However, it can also be configured to blacklist the IP immediately, completely dropping all further packets.
Standard DoS protection, in turn, will block attacks that use long-lived connections (e.g. Slowloris attacks), so these functions complement each other perfectly.
You can find all incidents related to the new feature in the incidents table by the description:
"Denial of Service (DoS) attack was discovered from %IP%: %threshold% connections per %timeframe% seconds to %port% port".
Configuring Enhanced DOS Protection via UI
Enhanced DOS Protection settings are available in the Imunify360 admin interface under Settings → General.
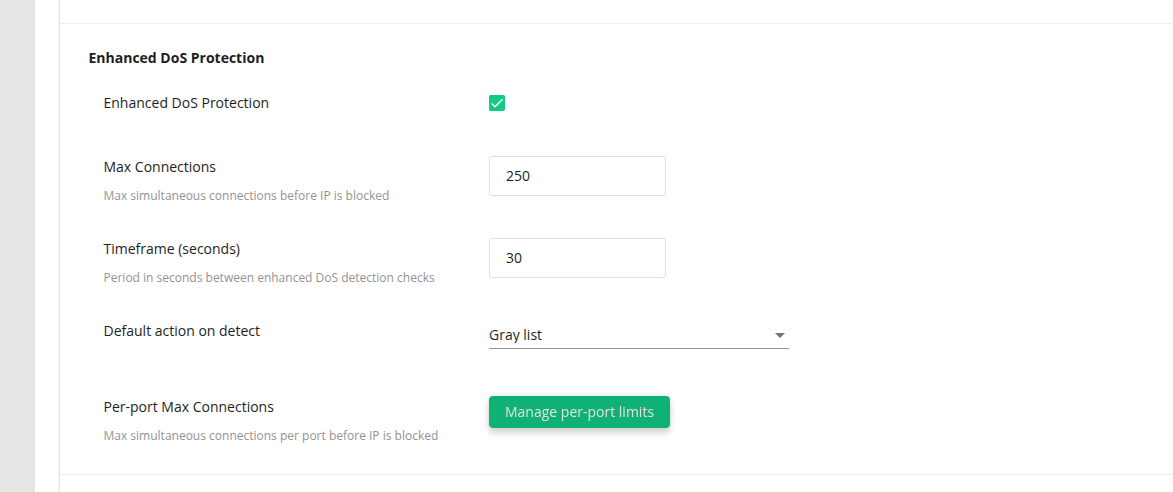
The following options are available:
- Enhanced DoS Protection – enables or disables the feature.
- Max Connections – the maximum number of requests allowed from a single IP within the timeframe before action is taken. Cannot be set lower than 100.
- Timeframe (seconds) – the period in seconds during which requests are counted.
- Default action on detect – the action taken when an attack is detected (Gray list or Black list).
- Per-port Max Connections – allows to set different request limits for specific ports. Click "Manage per-port limits" to open a dialog where you can add, edit, or remove port-specific limits.
Note:
Enhanced DoS Protection applies the default_limit to all ports unless a custom value is defined in port_limits.
When an IP is detected by Enhanced DoS Protection, the resulting graylist or blacklist entry remains active for 300 seconds.
At this time, the TTL for Enhanced DoS Protection entries is not configurable.
Per-port Max Connections Dialog
Click the "Manage per-port limits" button to open the port limits configuration dialog:
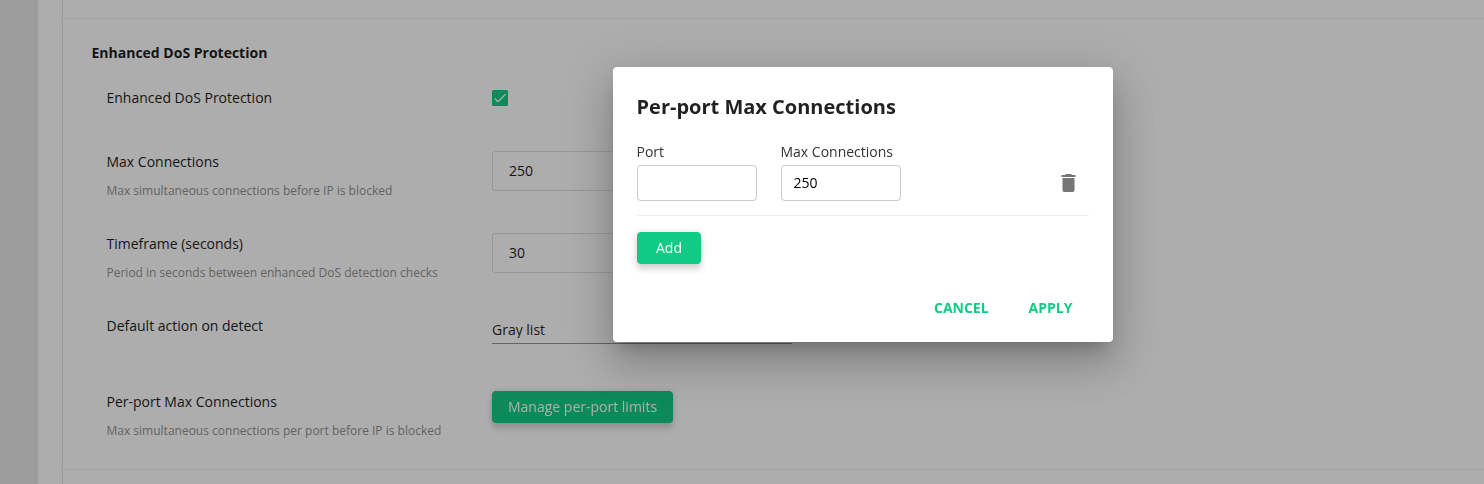
In this dialog you can:
- Add new port limits by clicking the "Add" button
- Set the port number (single port like
80or a range like8080-8090) - Set the maximum connections limit for that port (between 100 and 10000)
- Remove existing port limits by clicking the delete icon
Click "Apply" to save changes or "Cancel" to discard them.
Configuring Enhanced DOS Protection via CLI
The feature is switched off by default. You can activate Enhanced DOS Protection in Imunify360 using the following CLI command:
imunify360-agent config update '{"ENHANCED_DOS":{"enabled":true}}'
Configure the Protective Action
You can define the action taken against an attacking IP. The default action is graylist.
imunify360-agent config update '{"ENHANCED_DOS":{"action":"blacklist"}}'
"graylist"(Default): The attacker's IP is added to the Graylist. Their requests are redirected to a splashscreen challenge, and they can regain access by solving it."blacklist": The attacker's IP is added to the Blacklist, completely blocking them from accessing the server. They will not be presented with a challenge.
Adjust Thresholds and Timeframe
The default timeframe (seconds) and threshold of request (number) could be changed by the following CLI commands:
imunify360-agent config update '{"ENHANCED_DOS":{"timeframe":60}}'
imunify360-agent config update '{"ENHANCED_DOS":{"default_limit":500}}'
Per-port Limits via CLI
Request limits for different ports could be set separately, using the following CLI commands:
imunify360-agent config update '{"ENHANCED_DOS": {"port_limits": {"80": 150}}}'
To set limits for multiple ports:
imunify360-agent config update '{"ENHANCED_DOS": {"port_limits": {"80": 150, "443": 200}}}'
To clear all port-specific limits:
imunify360-agent config update '{"ENHANCED_DOS": {"port_limits": {}}}'
We also recommend checking and configuring the CAPTCHA_DOS section of parameters to blacklist IPs after repetitive requests to the captcha.
SMTP Traffic Manager
SMTP traffic management provides more control over SMTP traffic.
An administrator can redirect mail traffic to the local MTA, block it completely, or keep it available for local mails only. Administrators can also block particular ports and whitelist specific users or groups for outgoing mail.
This feature extends the existing cPanel “Block SMTP” functionality, albeit with more control and capabilities, and replaces the similar functionality from CSF.
You can enable the SMTP Traffic Management in the Settings:
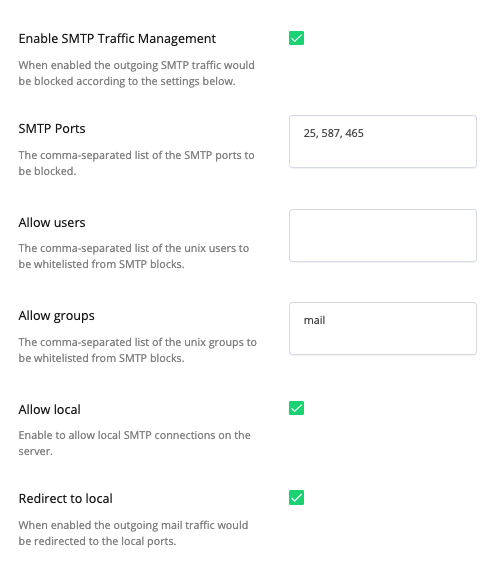
- SMTP ports - a list of the ports to be blocked. The defaults are: 25, 587,465
- Allow users a list of the users to be ignored (not blocked). By default it is empty. Including Unix and CPanel users (if a process that sends an email has a UID of one of the
allow_users, it will not be blocked) - Allow groups - a list of the groups to be ignored (not blocked). By default it is empty. Including Unix and CPanel users (if a process that sends an email has a UID of one of the
allow_users, it will not be blocked) - Allow local - block all except the local SMTP (localhost). By default it is disabled.
- Redirect to local - enable automatic redirection to the local ports for outgoing mail traffic. By default it is disabled.
Note that the term "group" here means the primary group of UNIX users.
For example, we have a user "john" whose primary group is "john" and the supplementary group is "admin":
- If you add a rule for the group "john", it'd match (the user would be allowed to send emails).
- If a rule is added for the group "admin", it wouldn't match (the user would be denied sending emails) because "admin" isn't a primary group of user "john".
Note
The following is added by default into the Allow users and the Allow groups for cPanel:
- UIDs - 0 (root), 202 (cpanel)
- GIDs - 12 (mail)
To enable these settings via direct config file update or a command-line interface, use this command:
imunify360-agent config update '{"SMTP_BLOCKING": {"allow_local": true, "enable": true}}'
The config file should show:
SMTP_BLOCKING:
 allow_groups:
 - mailacc
 allow_local: true
 allow_users: []
 enable: true
 ports:
 - 25
 - 587
 - 465
 redirect: true
What if the Conflict with WHM >> SMTP Restrictions message is shown?
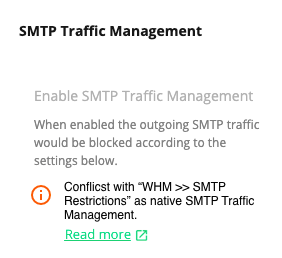
WHM SMTP Restrictions requires to be disabled at the cPanel to get SMTP Traffic Management working.
To disable it, log in to the cPanel WHM portal, select SMTP Restrictions on the left sidebar and disable it.
3-rd Party Integration
Tick the Manage CSF Events and Lists checkbox to enable/disable the integration between CSF and Imunify360.
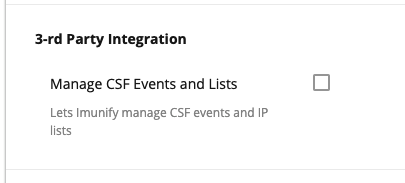
This settings is explained in more detail here
Auto White List
Auto White List section allows to automatically add admin IP to the White List each time when he logs in to hosting panel and enters Imunify360 admin interface. In Timeout field enter the number of minutes – the IP will be removed from the white list automatically after this time.
Note
0 means adding IP to the White List permanently.
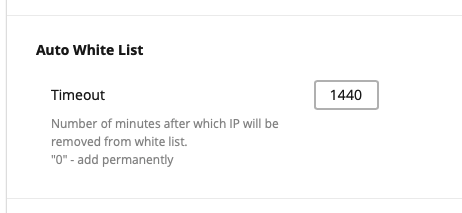
Click Save changes button on the bottom of the section to save changes.
Incidents Logging
In this section it is possible to control what kind of incidents will be shown on the Incidents page. Move the slider to change your preferences.
There are 15 available levels related to OSSEC and ModSecurity severity levels:
OSSEC
| Severity (Level) range | Agent's action | Notes |
|---|---|---|
| 0 | Ignored by agent | No action taken |
| 1 | Ignored by agent | None |
| 2 | Ignored by agent | System low priority notifications or status messages. No security relevance. |
| 3 | Just shows in reports | Successful/Authorized events (successful login attempts, firewall allow events, etc.) |
| 4 | Just shows in reports | System low priority error (related to bad configurations or unused devices/applications). No security relevance, usually caused by default installations or software testing. Default to be seen in Imunify360 UI on the fresh installation. |
| 5 | Just shows in reports | User generated error (missed passwords, denied actions, etc., no security relevance). Used in Active Response rules that are blocking specific ports. |
| 6 | Blocking with greylists | Low relevance attack. They indicate a worm or a virus that have no affect to the system (like code red for Apache servers, etc). They also include frequent IDS events and errors. |
| 7 | Blocking with greylists | “Bad word” matching. |
| 8 | Blocking with greylists | Include first time seen events. First time an IDS event is fired or the first time an user logged in. If you just started using OSSEC HIDS, these messages will probably be frequent. |
| 9 | Blocking with greylists | Error from invalid source. Include attempts to login as an unknown user or from an invalid source. May have security relevance (specially, if repeated). |
| 10 | Blocking with greylists | Multiple user generated error. They include multiple bad passwords, multiple failed logins, etc. They may indicate an attack or may just be that a user just forgot their credencials. |
| 11 | Blocking with greylists | Integrity checking warning. Includes messages regarding the modification of binaries or the presence of rootkits (by rootcheck). |
| 12 | Blocking with greylists | High importancy event. They include error or warning messages from the system, kernel, etc. They may indicate an attack against a specific application. |
| 13 | Blocking with greylists | Unusual error (high importance). Most of the times, it matches a common attack pattern. |
| 14 | Blocking with greylists | High importance security event. Most of the times, done with correlation and it indicates an attack. |
| 15 | Blocking with greylists | Severe attack. No chances of false positives. Immediate attention is necessary. |
ModSecurity
| Severity (Level) range | Incident type | Notes |
|---|---|---|
| 7 | DEBUG | Used for monitoring |
| 6 | INFO | Used for monitoring |
| 5 | NOTICE | Used for monitoring |
| 4 | WARNING | Generated by malicious client rules. Used for monitoring. |
| 3 | ERROR | Mostly generated from outbound leakage rules. Used for greylisting. |
| 2 | CRITICAL | Generated by the web attack rules. Used for greylisting. |
| 1 | ALERT | Generated from correlation where there is an inbound attack and an outbound application level error. |
| 0 | EMERGENCY | Generated from correlation of anomaly scoring data where there is an inbound attack and an outbound leakage. |
Autocleanup configuration allows to keep the Incidents page clean by default. The possible settings are as follows:
- Keep incidents for the last days – set the number of days Imunify360 will keep the incidents
- Keep maximum incidents count – set maximum quantity of the incidents to keep on the server
- Auto-refresh time for Incidents page – set Incidents page auto-refresh time in seconds
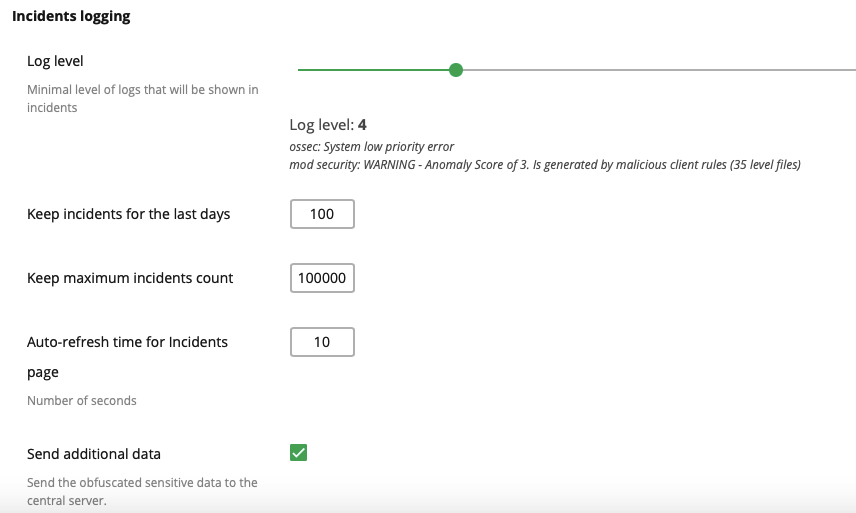
Click Save changes button on the bottom of the section to save changes.
WebShield

Enable WebShield. When the option is off, disable WebShield, GreyList, and Anti-bot Challenge. A disabled state is recommended for servers with a small amount of RAM. A disabled option along with enabled "Minimized WAF Ruleset" will switch Imunify360 to the "Low Resource Usage" mode.
Detect IPs behind CDN feature allows to recognize and block IPs with suspicious activity behind supported CDN providers.
To enable/disable it, tick the Detect IPs behind CDN checkbox.
Or you can enable it using the following CLI command:
imunify360-agent config update '{"WEBSHIELD": {"known_proxies_support": true}}'Supported CDN providers:
- Cloudflare
- MaxCDN
- StackPath CDN
- KeyCDN
- Dartspeed.com
- QUIC.cloud CDN
Click Save changes button on the bottom of the section to save changes.
Anti-bot protection
Tick the Anti-bot protection checkbox to enable the JavaScript challenge – "Splash Screen."
You can read more about Anti-bot protection here.
Click Save changes button on the bottom of the section to save changes.
cPanel account protection
Tick the checkbox next to the cPanel account protection option to enable the JavaScript challenge for users trying to access the cPanel interface.
More about the feature here.
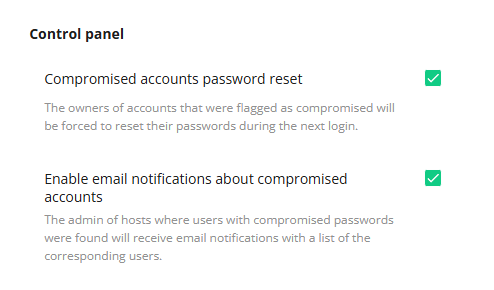
Compromised accounts
Compromised accounts password reset option prevents compromised accounts from accessing the server until their password is changed. When this setting is enabled, the owners of accounts that were flagged as compromised will be forced to reset their passwords during the next login.
Tick the Enable email notifications about compromised accounts checkbox to receive email notifications about users with compromised passwords. The notifications contain a list of the corresponding users.
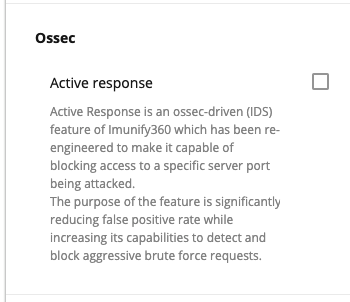
OSSEC
Tick the Active response checkbox to block access to a specific server port being attacked. The purpose of the feature is to significantly reduce the false-positive rate while increasing its capabilities to detect and block aggressive brute-force requests.
Click Save changes button on the bottom of the section to save changes.
Note
For now, the feature covers the following ports:
- FTP - 21 port,
- SSH - 22 port, and any other one manually defined starting from version 5.7
- SMTP - 25, 465, 587 ports
PAM
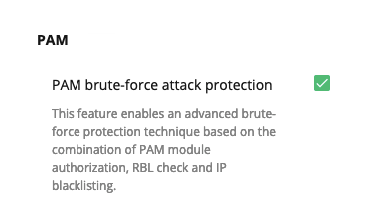
PAM brute-force attack protection
Tick the PAM brute-force attack protection checkbox to enable an advanced brute-force protection technique based on the combination of PAM module authorization, RBL check, and IP blacklisting.
You can also enable it via CLI with the following command:
imunify360-agent config update '{"PAM": {"enable": true}}'
Click Save changes button at the bottom of the section to apply changes. This will enable protection for SSH/FTP protocols.
Exim+Dovecot brute-force attack protection
Note
This protection type is available only in cPanel/WHM.
Tick the Exim+Dovecot brute-force attack protection checkbox to enable advanced protection against Dovecot brute-force attacks. PAM module protects against IMAP/POP3 brute-force attacks and prevents mail accounts from being compromised via brute-forcing.
You can also enable it via CLI with the following command:
imunify360-agent config update '{"PAM": {"exim_dovecot_protection": true}}'
Click Save changes button at the bottom of the section to apply changes.
FTP brute-force attack protection
Note
This protection type is available only in cPanel/WHM for the proftpd and pureftpd daemons.
Tick the FTP brute-force attack protection checkbox to enable protection for the ftpd server against FTP brute-force attacks. It uses a time-proven algorithm that we’ve been using in the SSH PAM extension.
You can also enable it via CLI with the following command:
imunify360-agent config update '{"PAM": {"ftp_protection": true}}'
Click Save changes button on the bottom of the section to save changes. This will enable protection for SSH/FTP protocols.
WordPress plugin
The WordPress plugin installation is currently allowed only if Settings > Malware > General > Default action on detect is set to Cleanup. Other installation options will be introduced in the future release.
Tick the Install WordPress plugin checkbox to install the Imunify Security WP plugin on all WordPress sites.
You can also enable it via CLI with the following command:
imunify360-agent config update '{"WORDPRESS":{"security_plugin_enabled": true}}'
Once the plugin is installed, the WordPress WAF provides virtual patching against known vulnerabilities in WordPress plugins, themes, and core. For what it protects against and how end users review incidents, see Web Application Firewall.
Tick the Enable WordPress WAF checkbox to turn the WAF on for WordPress sites on this server. When it is disabled, WAF rules are removed from all sites and the CMS WAF tab is hidden. This option can also be set per hosting account.
Tick the Enable WAF for new accounts by default checkbox to automatically enable the WAF for newly created hosting accounts.
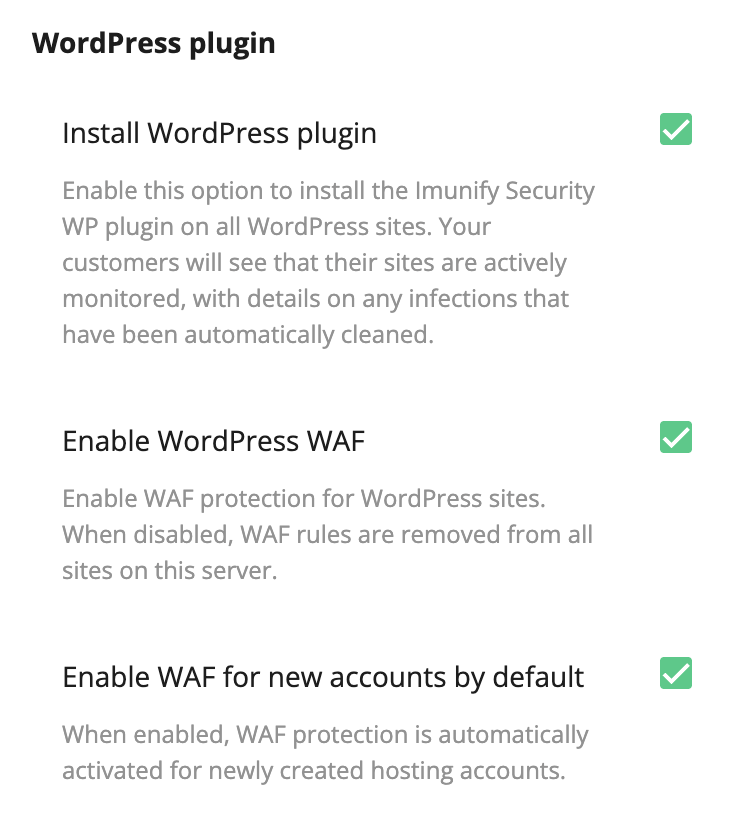
Note
The WAF is enabled by default for hosting accounts that already existed when it was first rolled out. Newly created accounts follow the Enable WAF for new accounts by default setting. A hosting-account owner may disable the WAF for their own account unless it is locked server-wide by the administrator.
You can also control the WAF via CLI:
imunify360-agent config update '{"WORDPRESS":{"waf_enabled": true}}'
imunify360-agent config update '{"WORDPRESS":{"waf_default": true}}'
For per-account and bulk control, see WordPress plugin CLI commands.
Error Reporting
Tick Enable Sentry error reporting checkbox to send reports to the Imunify360 error reports server.
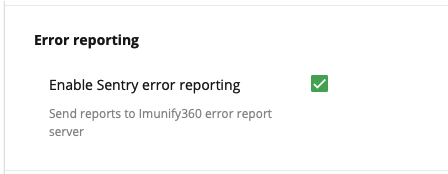
Click Save changes button on the bottom of the section to save changes.
Contact Details
Type your email into the Email field to receive email reports about critical issues, security alerts or system misconfigurations detected on your servers.
Note
This email address is used ONLY for receiving server reports.
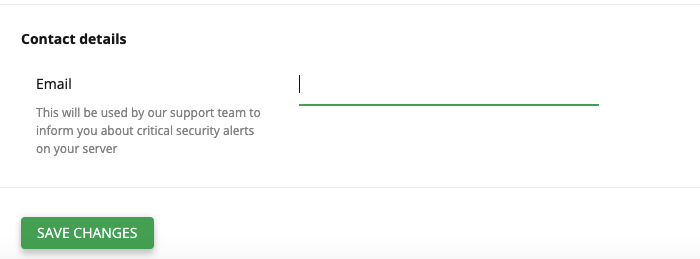
Click Save changes button at the bottom of the section to save changes.
Malware
Go to the Imunify360 → Settings → Malware. The following sections are available:
Here you can configure the following:
Note
Read CXS integration documentation carefully to make Malware Scanner work properly if you decided to use the former instead of Imunify360 anti-malware protection.
Resource consumption
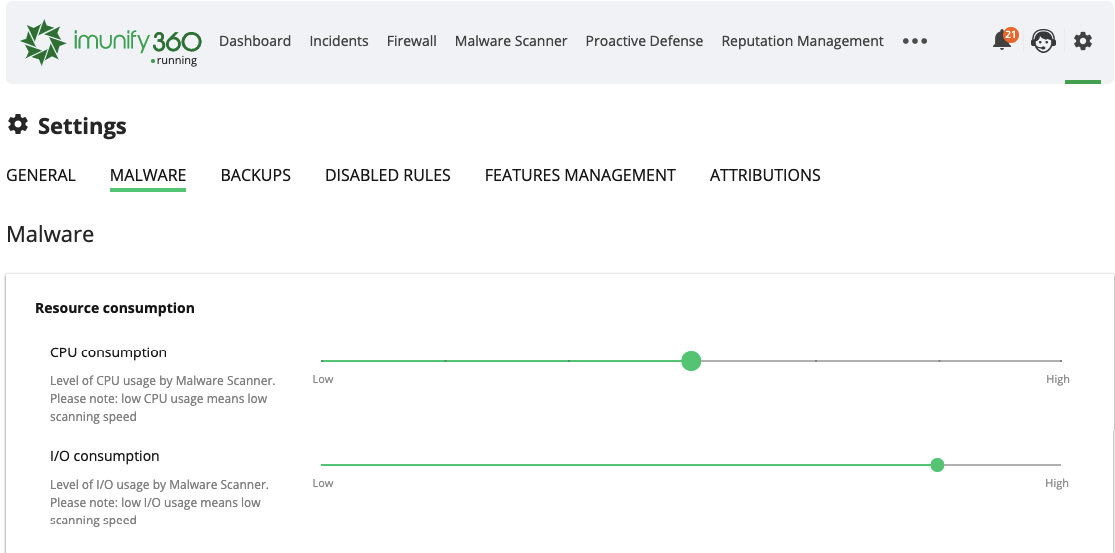
CPU consumption – allows setting a level of CPU usage by Malware Scanner.
Note
Low CPU usage means low scanning speed
I/O consumption – allows setting a level of I/O usage by Malware Scanner.
Note
Low I/O usage means low scanning speed
Note
If Imunify360 is running on CloudLinux OS, LVE is used to manage scan intensity. If it is running on other operating systems, “nice” is used to control the CPU and “ionice” is used when the I/O scheduler is CFQ.
General

Automatically scan all modified files – enables real-time scanning for modified files. The scanner uses fanotify (kernel 3.10+) as the primary file monitoring mechanism, with a legacy inotify fallback for older systems. The Scanner searches for modified files in user’s DocumentRoot directories.
Note
Real-time scanning may put additional load on a system. See the Optimize real-time scan option below for ways to reduce this.
Optimize real-time scan – enables the File Change API and fanotify support to reduce the system load while watching for file changes in comparison with inotify watches.
Note
File change API can work only with ext4 file system.
Note
Starting from imunify-realtime-av 8.0.7, the realtime scanner automatically filters out file operations from system services (MySQL/MariaDB, PostgreSQL, Redis, etc.) to significantly reduce CPU overhead. No configuration is needed — the system service threshold is auto-detected from the OS configuration.
inotify fanotify File change API CentOS 6 ✓ x x CentOS 7 ✓ ✓ x CentOS 8 / AlmaLinux 8 ✓ ✓ x | AlmaLinux 9 | ✓ | ✓ | x | | AlmaLinux 10 | ✓ | ✓ | x | | CloudLinux OS 6 | ✓ | x | x | | CloudLinux OS 7 | ✓ | ✓ | ✓ | | CloudLinux OS 7 hybryd | ✓ | ✓ | ✓ (6.8+) | | CloudLinux OS 8 | ✓ | ✓ | ✓ | | CloudLinux OS Solo | ✓ | ✓ | x | | Ubuntu 16.04 / Debian 9 | ✓ | ✓ | x | | Ubuntu 18.04 / Debian 10 | ✓ | ✓ | x | | Ubuntu 20.04 | ✓ | ✓ | x | | Ubuntu 22.04 | ✓ | ✓ | x | | Ubuntu 24.04 | ✓ | ✓ | x | | Ubuntu 26.04 | ✓ | ✓ | x | | Debian 11 | ✓ | ✓ | x | | Debian 12 | ✓ | ✓ | x | | Debian 13 | ✓ | ✓ | x | | Rocky Linux 8 | ✓ | ✓ | x |
Automatically scan any file uploaded using web – enables real-time scanning of all the files that were uploaded via http/https.
Note
It requires ModSecurity to be installed.
Automatically scan any file uploaded using ftp – enables real-time scanning of all the files that were uploaded via ftp.
Note
It requires Pure-FTPd to be used as FTP service.
Automatically send suspicious and malicious files for analysis – malicious and suspicious files will be sent to the Imunify360 Team for analysis automatically.
Try to restore from backup first – allows to restore file as soon as it was detected as malicious from backup if a clean copy exists. If a clean copy does not exist or it is outdated, default action will be applied. See also CloudLinux Backup.
Block malicious file uploads via cPanel File ManagerExperimental – enable blocking malicious file uploads via cPanel File Manager. Also, the file operations via cPanel File Manager that turn out to be malicious are blocked. The type of operations processed are: edits and saves.
Use backups not older than (days) – allows to set the a maximum age of a clean file.
Default action on detect – configure Malware Scanner actions when detecting malicious activity:
- Just display in dashboard
- Cleanup (default)
Warning
Starting from ImunifyAV(+) v.6.2, the Quarantine and Delete actions were removed permanently from the UI as well as the CLI in ImunifyAV(+). Previously quarantined files are also subject to deletion. After this change is implemented, the restoration of the previously quarantined files will become impossible. For more information see this this blog post.
Note
Those options may be hidden for end-user if Cleanup is disabled in Features Management.
- Enable RapidScan – dramatically speeds up repeated scans based on smart re-scan approach, local result caching and cloud-assisted scan. When you first enable the RapidScan feature, the first scan will run as before. But subsequent scans will see a dramatic speed improvement, anywhere between 5 to 20 times faster. You can find details here.
- Binary (ELF) malware detection – this option allows to search for any binaries (ELF files) in the user home directories and consider them malicious.
- Enable Hyperscan – this option allows to use the regex matching Hyperscan library in Malware Scanner to greatly improve the scanning speed. Hyperscan requires its own signatures set that will be downloaded from the files.imunify360.com and compiled locally. There are few platform requirements to use this feature:
- Hyperscan supports Debian, Ubuntu and CentOS/CloudLinux 7 and later.
- SSE3 processor instructions support. It is quite common nowadays, but may be lacking in virtual environments or in some rather old servers.
- Enable Malware Database Scanner – a database antivirus: automated malware detection and clean-up of web applications.
Note
Requires MariaDB/MySQL DB management system version 5.5. The recommended version is 5.6+. Note, that only WordPress, Joomla, and Magento databases are supported now.
Background Scanning
Allows to set up automatic, scheduled, background scanning of user accounts.
- Run scanning — select the desired period:
- Never
- Daily
- Weekly
- Monthly
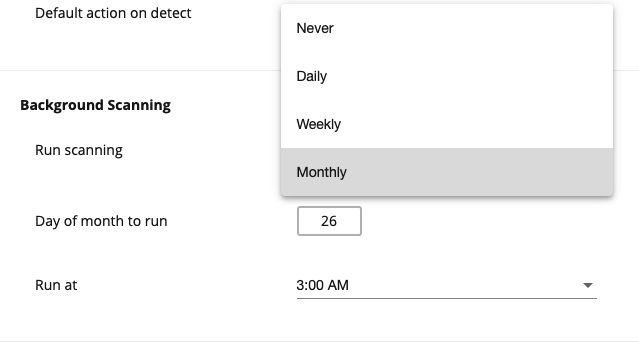
Depending on the selected period, precise settings.
If Run scanning is set to Daily, choose the exact time at the Run at dropdown.
If Run scanning is set to Weekly, choose the day of the week at the Run on dropdown and exact time at the Run at dropdown.
If Run scanning is set to Monthly, choose the day of the month at the Day of month to run dropdown and exact time at the Run at dropdown.
You can track the scanning activity at the Malware Scanner tab.
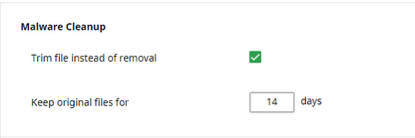
Cleanup
- Trim file instead of removal — do not remove infected file during cleanup but make the file zero-size (for malware like web-shells);
- Keep original files for … days — the original infected file is available for restoration within the defined period. The default is 14 days.
Proactive Defense
- Enable Blamer — tick to allow Imunify360 to find a root cause of how infection got injected into the server through PHP. Blamer pinpoints the exact URL, PHP script & PHP execution path that allowed a hacker to inject malware onto the server. Imunify360 security team will use that information to prevent future infections from happening.
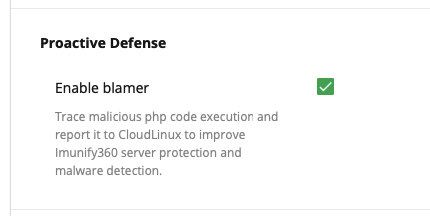
To reduce the number of blamer events, similar events are combined by default into a single one. In order to disable it, specify the filter_messages=off in the /usr/share/i360-php-opts/module.ini
- PHP Immunity — tick to allow Imunify360 automatically detect and patch vulnerabilities in software at the Proactive Defense level preventing re-infections through the same vulnerability.
Once a vulnerable script or unknown malware executes any malicious flow which in turn leads to a malware drop, it causes the auto-generate rule to be released for the Proactive Defence. Ultimately, it will stop any further attempts to exploit the vulnerability or drop malware. Any dropped malware will be also auto-cleaned by the real-time malware scanner keeping the system clean and protected.
By enabling this feature Blamer will be enabled as well and Proactive Defence switched into the KILL mode.
Click Save changes at the page bottom to apply all changes.
Backups
Overview
Imunify360 provides customers with the ability to integrate with backup providers and automatically or manually restore files from their backup if they have become infected. Only the administrator can choose a backup provider but the end-user has the ability to backup and restore files within this selected backup provider.
The following integrated with Imunify360 backup providers are available:
- Hosting panel Backup (cPanel, Plesk, or DirectAdmin)
Warning
JetBackup: The Imunify360 integration is implemented on the JetBackup side. JetBackup server backup application is not available right now because of the rework.
Requirements
- Imunify360 version 2.7.0 and later
- For the hosting panel backup, it is required that the backup option is configured by the administrator of the hosting panel
How to enable backups
To enable backups log in to a hosting panel as administrator, go to the Imunify360 plugin and do the following.
- Go to Imunify360 → Settings → Backups. If the feature is not currently used the Backup and restore is Disabled.
- To enable it, select the backup provider from the dropdown:
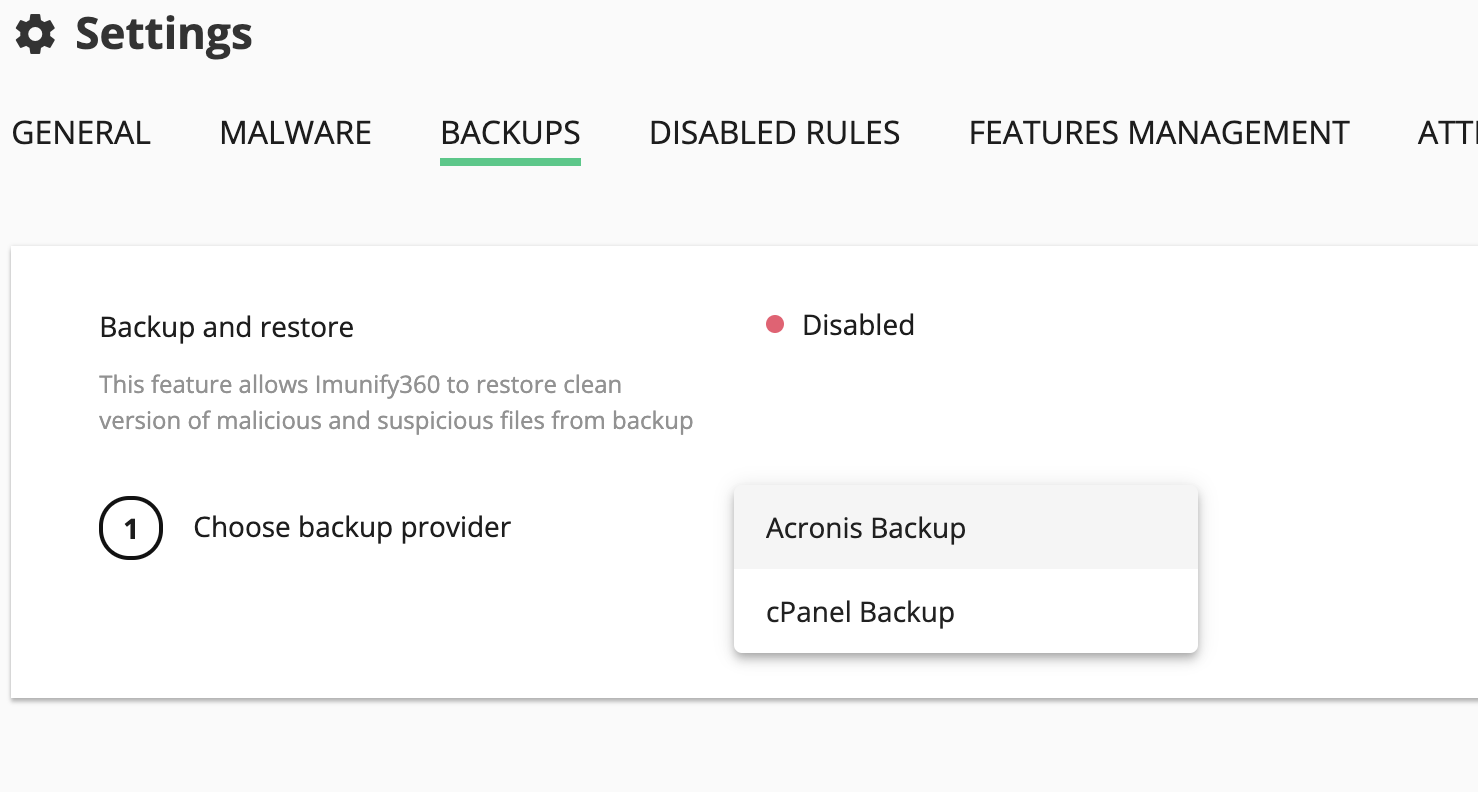
cPanel Plesk or DirectAdmin Backup
- Choose cPanel/Plesk/DirectAdmin backup
- Select cPanel/Plesk/DirectAdmin Backup
- Click Connect Backup button

After the successful connection, Imunify360 will return the appropriate message.
How to disable backups
To disable backups do the following:
- Go to Imunify360 → Settings → Backups
- Move the slider to Disabled
- Imunify360 returns confirmation pop-up
- Click Yes, disable backup to disable backups or click Cancel to close the pop-up.
How to restore file
To restore a file do the following:
- Go to Imunify360 → Malware Scanner.
- Find the file to restore in the table and click Cog icon, then click Try to restore clean version from backup.
- In the pop-up confirm the action by clicking Yes, restore from backup or click Cancel to close the pop-up.
You can configure the automatic restore. Please find more details here.
Disabled Rules
Editing in UI
Go to Settings page and choose Disabled rules. This page allows users to manage disabled rules which have already been added.
Note
You can also add a new rule to the Disabled Rules list on the Incidents page.
The list of disabled rules contains:
- Rule ID — ID number of the rule provided by the plugin
- Plugin — the name of the firewall plugin of the added rule
- Description — rule description or details of the rule from ModSecurity or OSSEC
- Domains — the list of the domains for which the rule is disabled (blank field means all domains)
To add a new rule click Add Rule button.
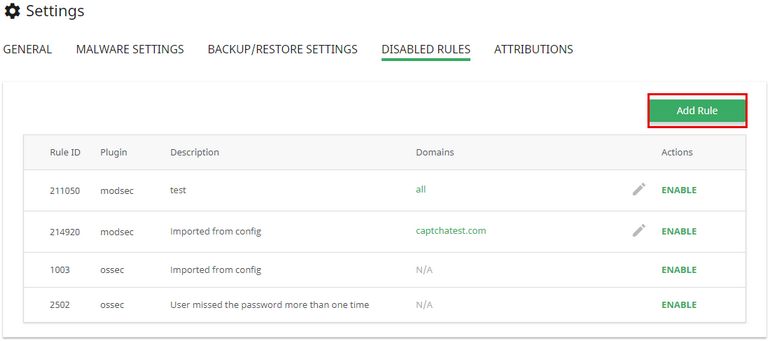
In the pop-up specify the following:
- Rule ID — ID provided by firewall plugin;
- Select firewall plugin from the drop-down (ossec for OSSEC, modsec for ModSecurity)
- Description — rule description or details from ModSecurity or OSSEC
- Domains — this option is available only for modsec firewall plugin. Specify a comma-separated list of domains for which this rule will be disabled. Leave empty to disable for all domains
Click Add Rule to add rule to the list or Cancel to close the pop-up.
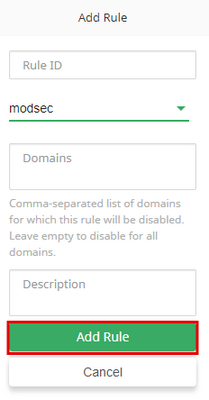
To edit the list of domains where the rule should be disabled, click the edit icon in the row of the rule and enter domains registered on the server separated by a comma.
Note
It is possible to specify domains only for ModSecurity rules. For OSSEC rules it always applies to all domains.
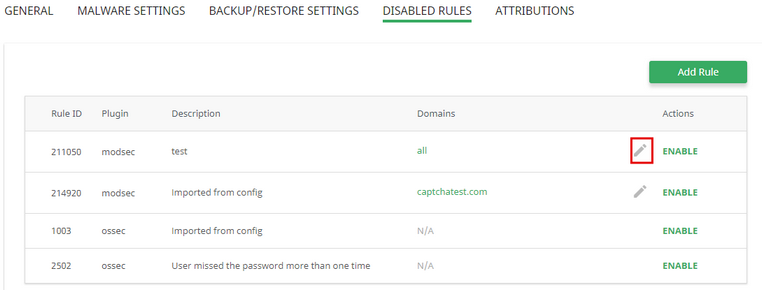
To remove the rule from the disabled list click Enable and confirm the action in the pop-up.
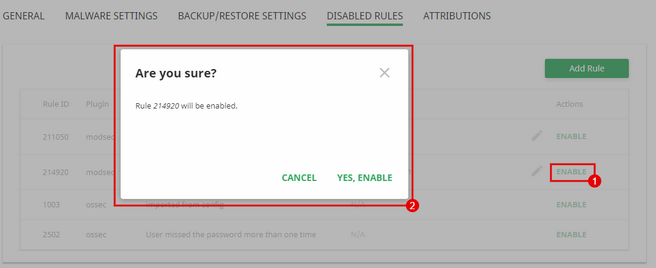
Note
To prevent managing the rules there's an option allow_local_rules_management.
Config file
An alternative way to disable rules is to use the config file /etc/imunify360/rules/disabled-rules. It's especially usable with provisioning tools like Ansible, Puppet, Chef, etc.
Note
Please note that all rules in the config file are not visible in the UI above.
The config file contains lines in the following format:
MODULE_ID:RULE_ID:Description
Where:
MODULE_IDcan have one of the following values:modsecfor ModSecurity rulesossecfor OSSEC rulescphulkfor cpHulkd ruleslfdfor Login Failuer daemon rules
RULE_IDis the rule id for the module and it is mandatory.Description- text string without specialized symbols.
Example:
modsec:1010:
ossec:1008
modsec:1001:this is why
Features Management
Overview
Features Management allows hosters to enable/disable Imunify360 features for each customer. On Features Management it is possible to manage Proactive Defense and Malware Cleanup for each customer account. If a feature is enabled for the user in the hoster’s account, the user will be able to see and use it in his account.
Note
Default settings in Features Management are inherited by newly created user accounts only.
Note
Features are enabled/disabled account-wide.
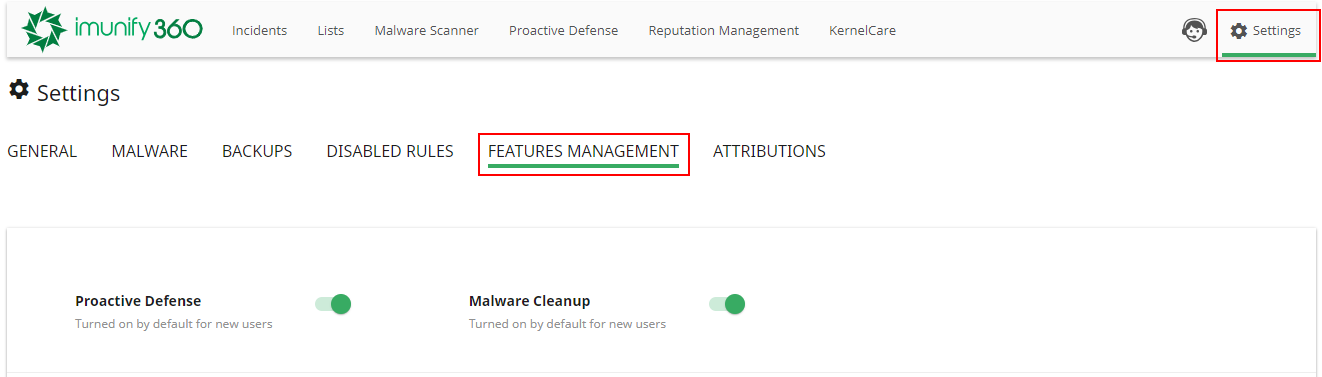
Below, there is a table with all users and their domains and features for each user.
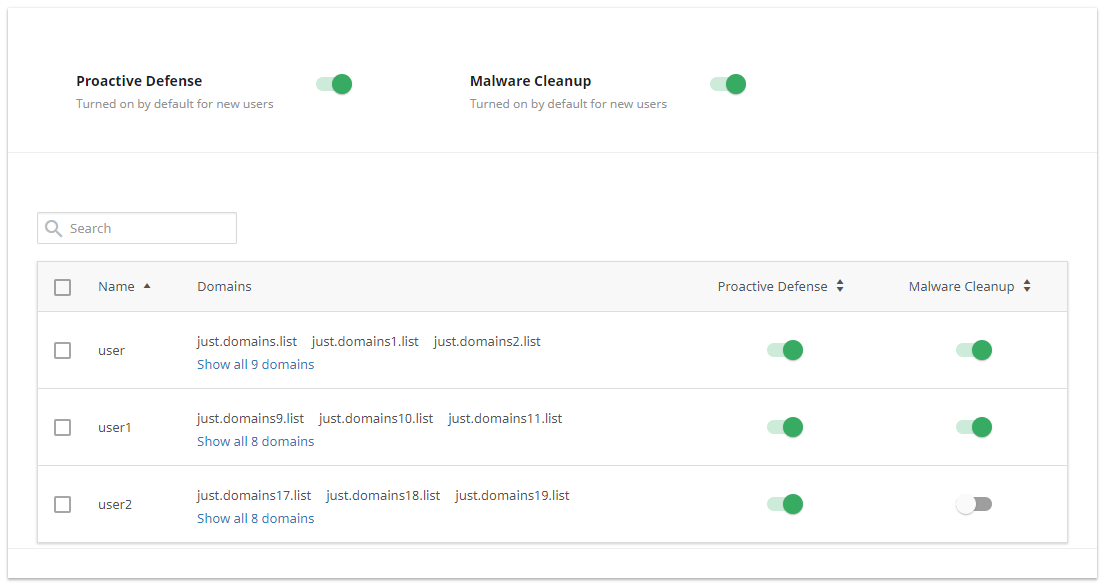
- Name — username or path to a user;
- Domains — a list of user’s domains;
- Proactive Defense — a slider to enable/disable the feature for a specific user. Move a slider in feature column to enable/disable that feature for a specific user. After that, this specific feature tab will be displayed/hid in that user’s account.
- Malware Cleanup — a slider to enable/disable the feature for a specific user. Move a slider in feature column to enable/disable that feature for a specific user. After that, the Cleanup button will be available in the Malicious files list in that user’s account.
Group Action To perform a group action tick the users and move sliders for them.
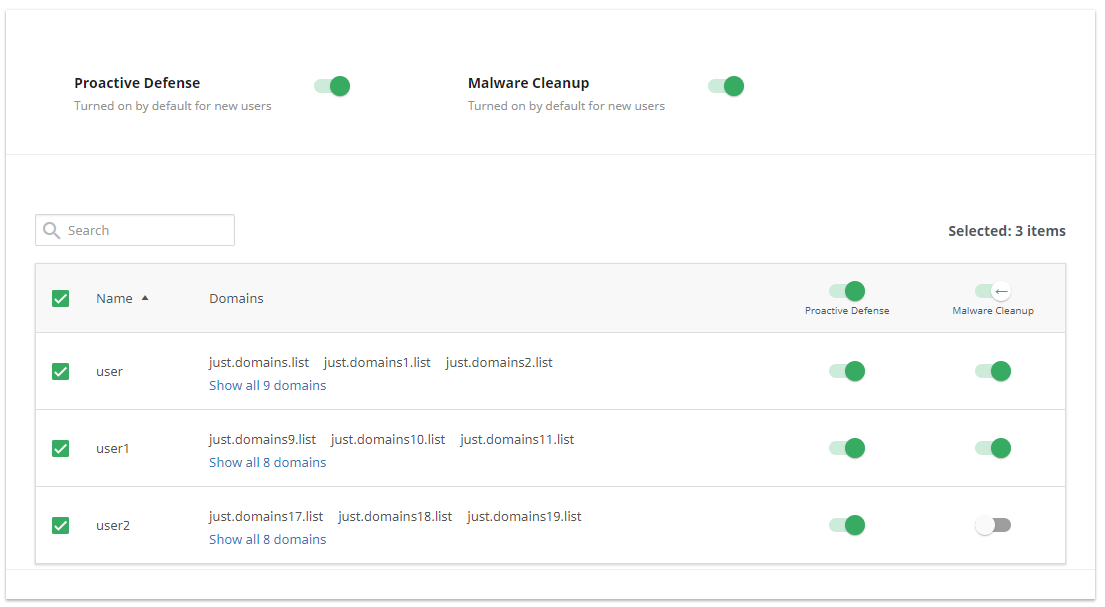
How to enable/disable Proactive Defense
The Proactive Defense feature is enabled by default account-wide. So, all newly created user accounts will have Proactive Defence tab in their Imunify360 Section.
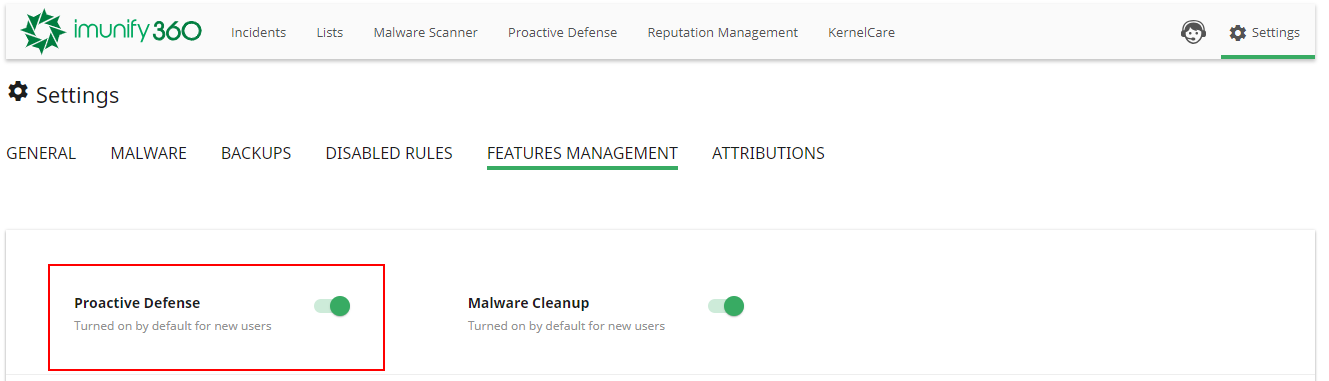
To disable Proactive Defense account-wide just move the slider to Turned Off. And confirm the action in the popup by clicking Yes, disable Proactive Defense for new users or click Cancel to close the popup.
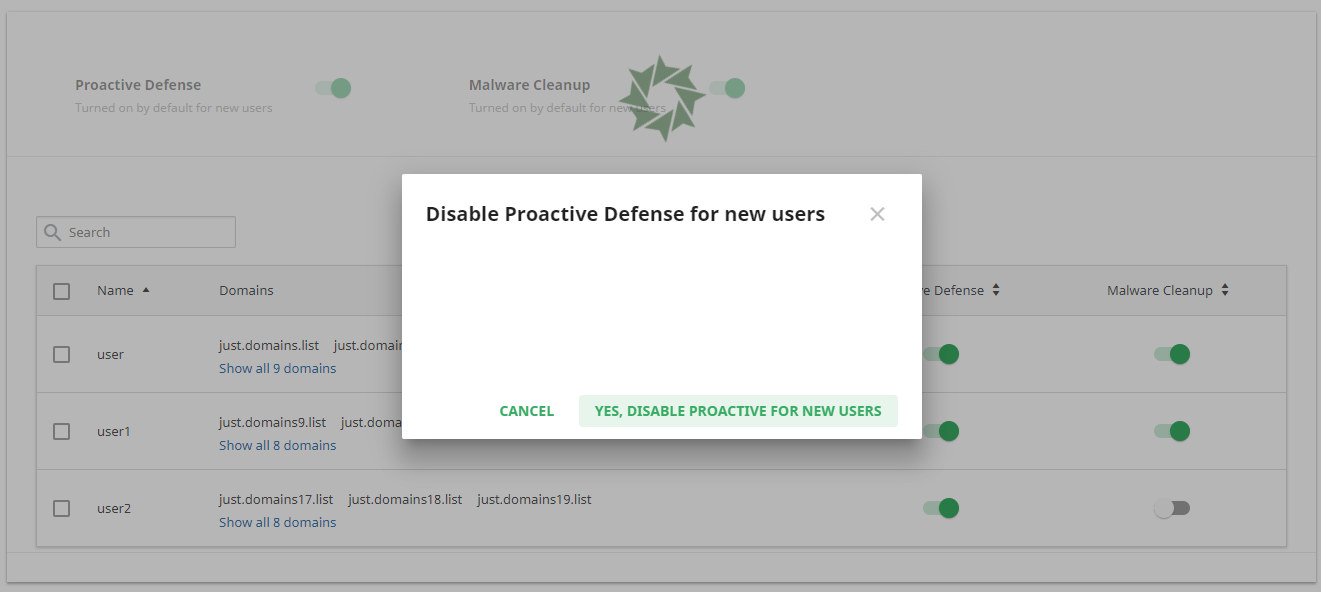
How to enable/disable Malware Cleanup
The Malware Cleanup feature is enabled by default account-wide. So, all newly created user accounts will have Malware Cleanup feature in their Imunify360.
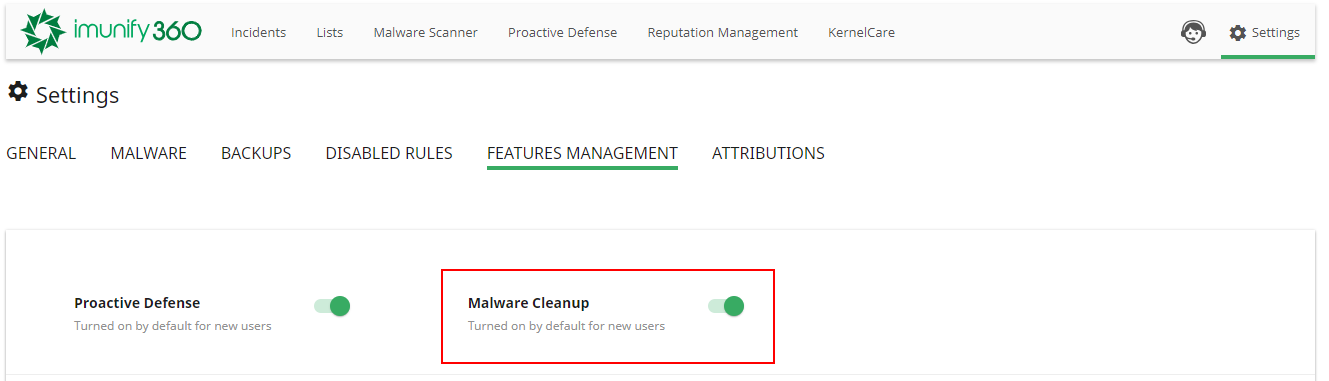
To disable Malware Cleanup account-wide just move the slider to Turned Off. And confirm the action in the popup by clicking Yes, disable Malware Cleanup for new users or click Cancel to close the popup.
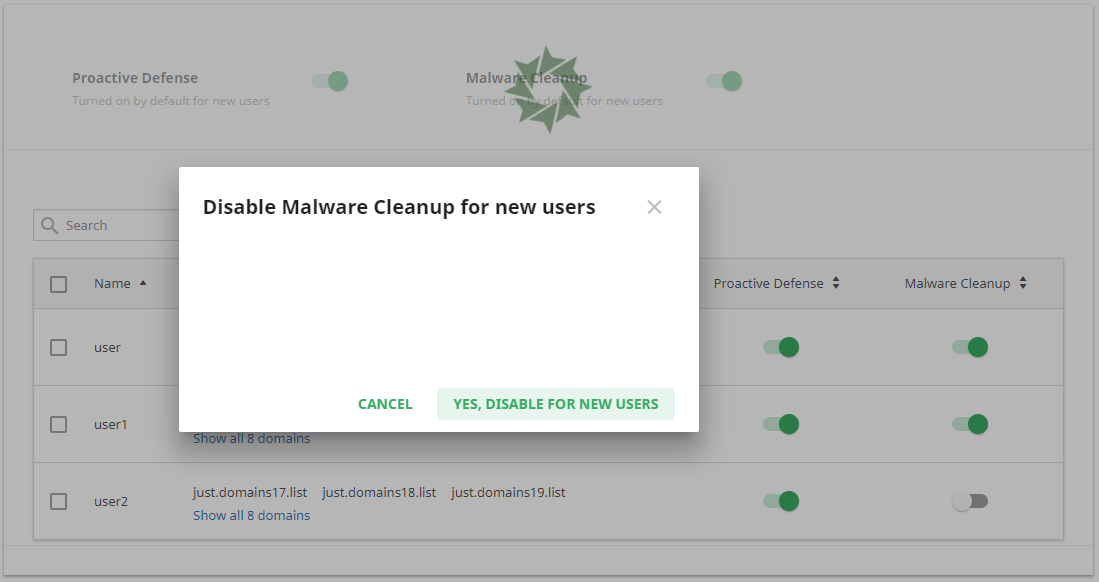
You can perform all these actions via CLI.
Native Feature Management
Feature Management allows a hoster to enable/disable different Imunify360 features for server users. Using this functionality, hosting companies may resell chosen Imunify360 features as a part of hosting packages to end-users as well as make features available/unavailable for a group of end-users.
WHM/cPanel
WHM/cPanel Feature Management is now available under WHM/cPanel Package Manager via Package Extension (PE). Using WHM/cPanel Native Feature Management a hoster can enable/disable Malware Scanner and Proactive Defense for all users with the same package (service plan) instantly.
Note
When switched to WHM/cPanel Feature Management, the same functionality will be disabled in the Imunify360 UI. The previous Feature Management config becomes overridden by defaults.
How to switch to WHM/cPanel Feature Management
Go to Imunify360 → Settings → Features Management. You will see the following.
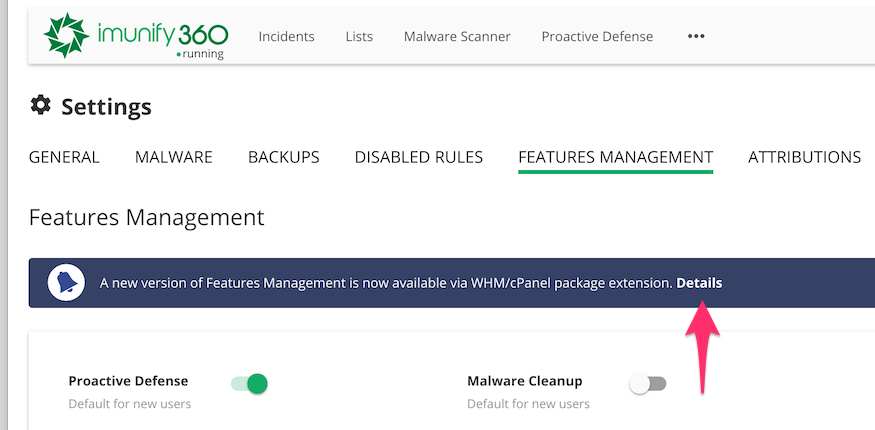
Click Details. You will see the following pop-up.
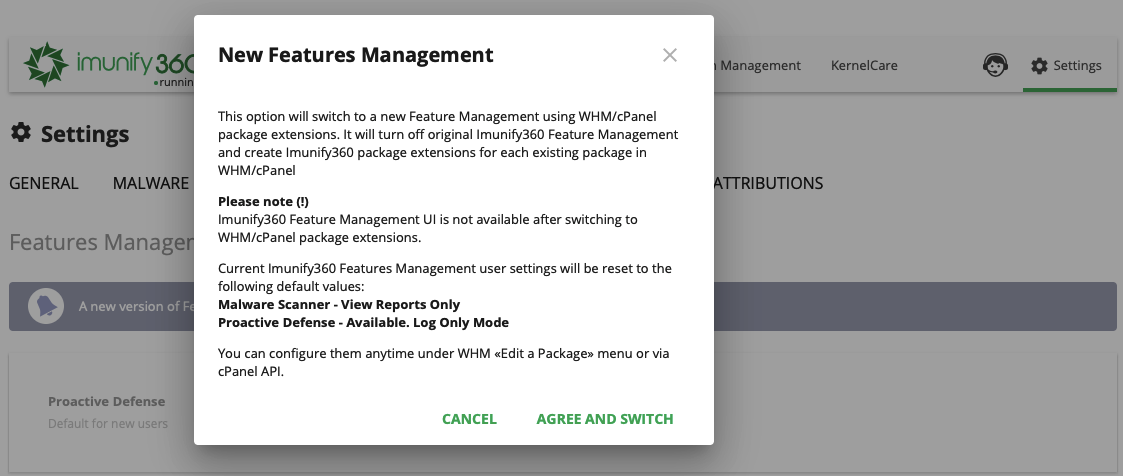
Click Agree and Switch to confirm the action or click Cancel to close the popup.
Note
Note that current Imunify360 settings will be reset to default values after switching to WHM/cPanel Feature Management mode. You can switch back to in-app Imunify360 Feature Management mode at any time via CLI command. The end-user values will be reset to default values upon any mode switching.
When switched, you will see the following.
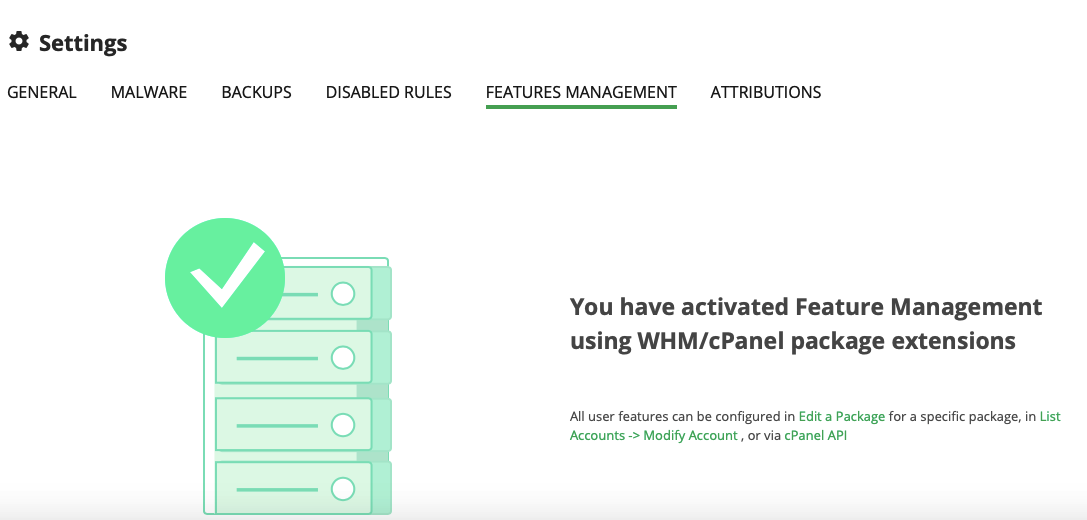
How to configure Imunify360 Features using WHM/cPanel Package Extensions
Go to WHM/cPanel → Add a Package → Package Extensions and tick Imunify360 Features (if it’s not selected).
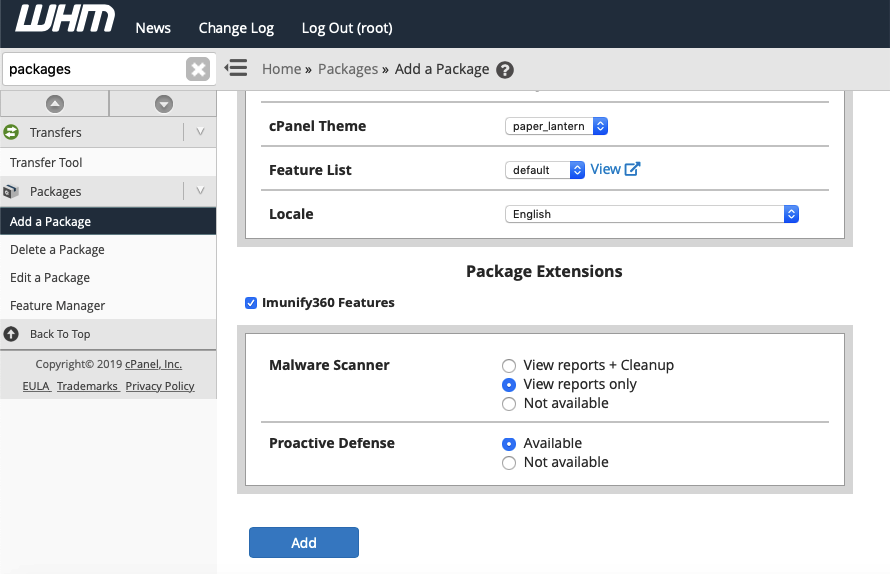
Choose an option for each feature.
Malware Scanner
- View reports + Cleanup – a user can view scanning reports and cleanup found malware
- View reports only – a user can view scanning reports but can't cleanup found malware
- Not available – the Malware Scanner is not available for a user, and its tab is hidden on the Imunify360 main menu
Note
The last option is available in the WHM/cPanel Package Manager only and is not available via Imunify360 UI or CLI.
Note
When the Malware Scanner is not available for the end-user, it doesn't exclude user folders from scanning, so his files will be scanned and the results will be listed in an admin UI as usual.
Proactive Defense
- Available – the Proactive Defense feature is available for a user
- Not available – the Proactive Defense is deactivated for a user: the feature does not run and its UI is hidden from the Imunify360 main menu
Click Add to apply changes.
See also: CLI.
Attributions
Click Settings and choose Attributions tab to observe a list of IDS install on the server.
- Name – name of the IDS
- Version – IDS version
- License – under which licenses this IDS is working
- Link – URL to the IDS official page
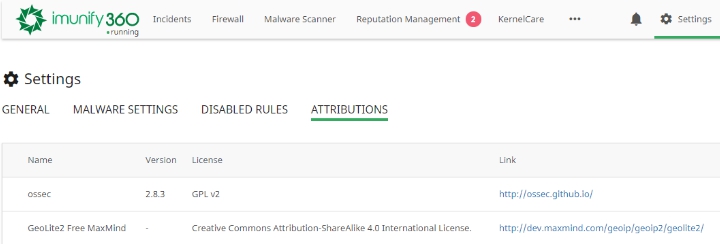
Country-based white or blacklisting includes GeoLite2 data created by MaxMind, available from https://www.maxmind.com.
Hosting panels specific settings
cPanel
It is possible to enable the Service Status checker for Imunify360. Perform the following steps:
- Go to Service Configuration and choose Service Manager.
- In Additional Services section tick
imunify360checkbox. - Click Save and wait until cPanel enables the Service Status checker for Imunify360.
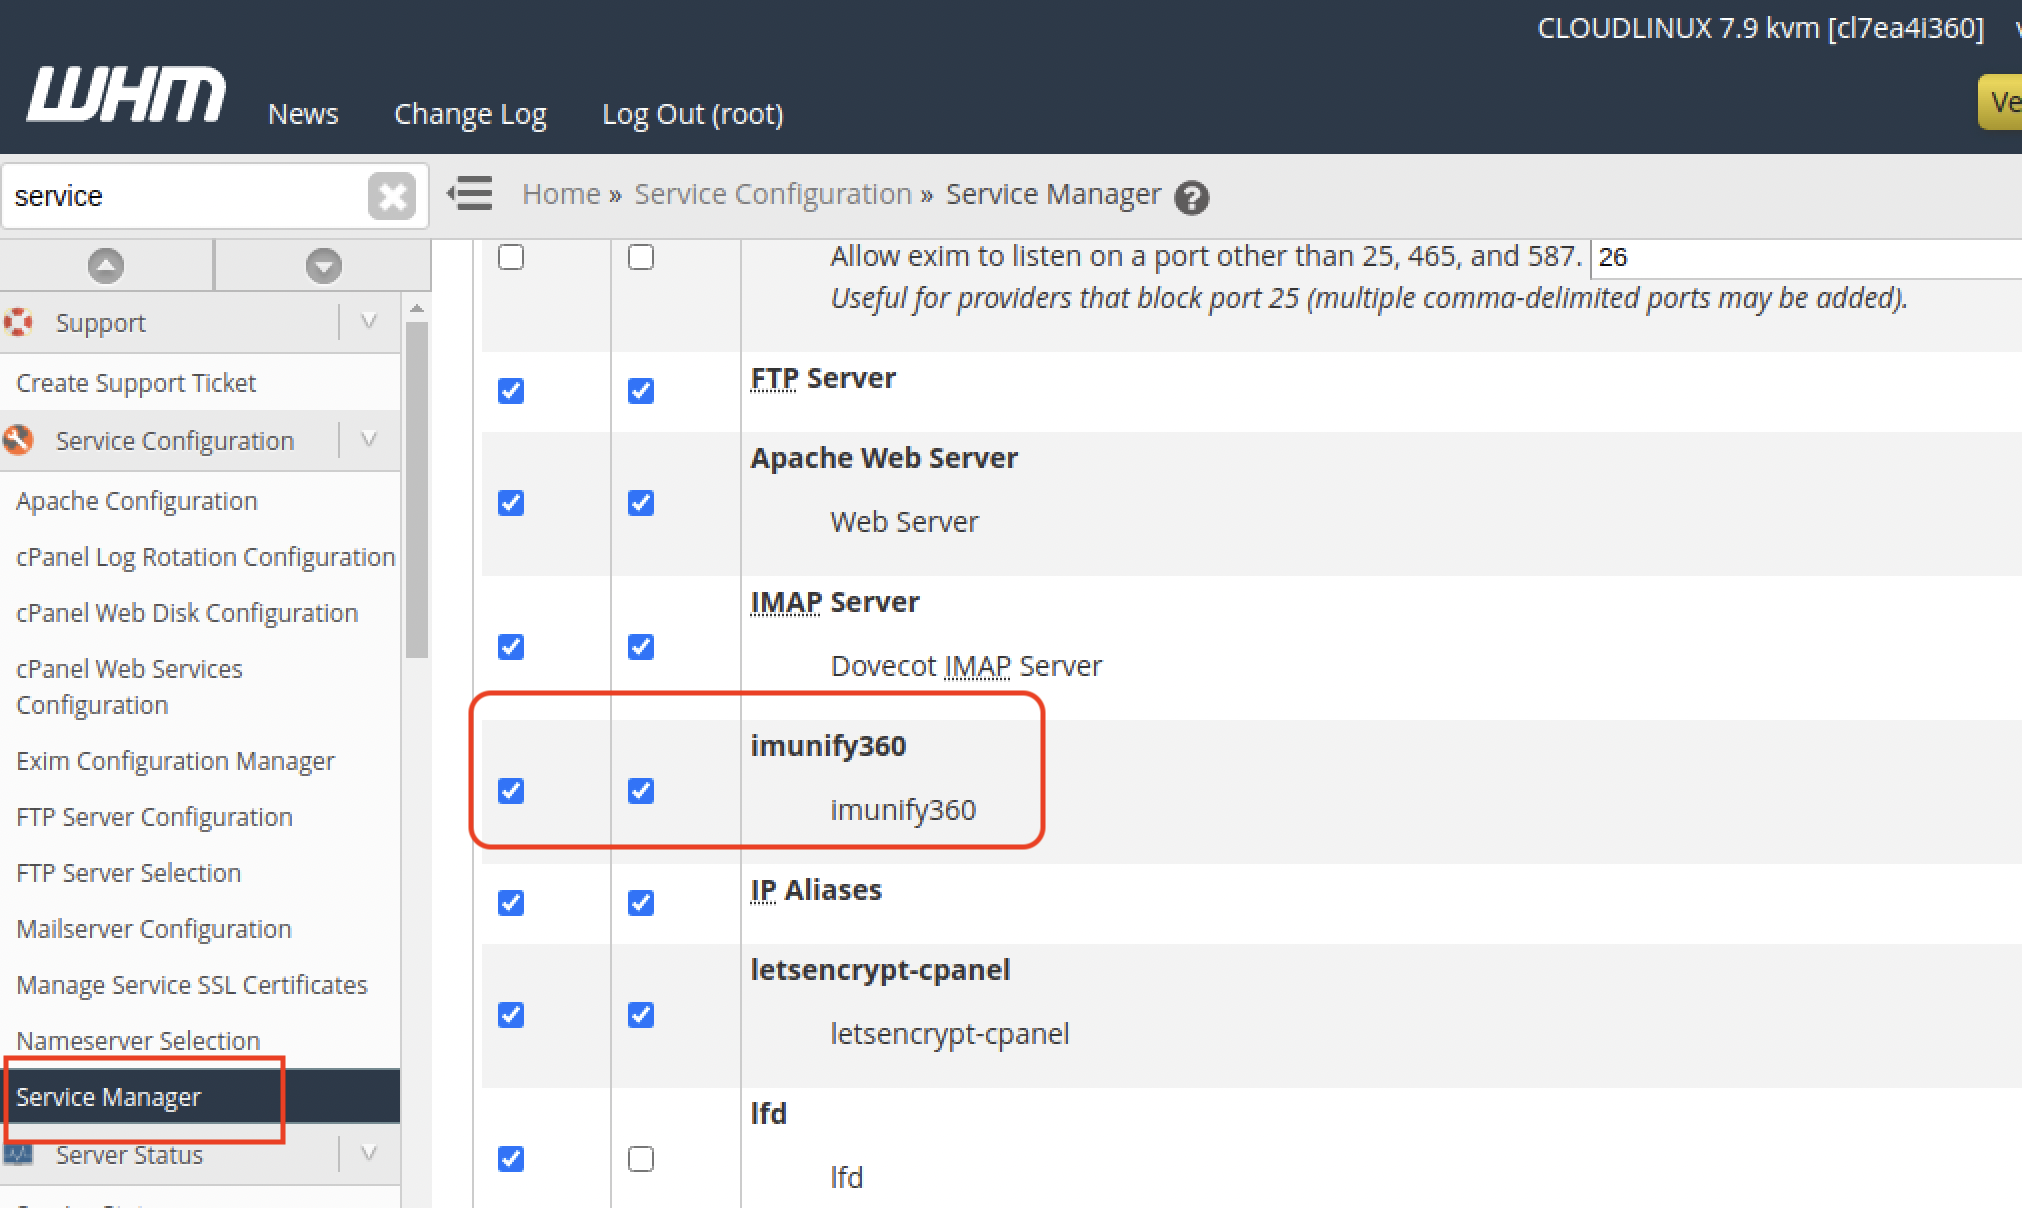
If succeeded, the status of the Imunify360 service will be displayed at the Service Status section of Server Status.