Other Integrations
IDS Integration
Note
Please be aware that firewalld is not fully compatible with Imunify360. While it is possible to use Imunify360 and firewalld on the same server, you may need to duplicate certain rules or permissions and manually implement changes to configure both Imunify360 and firewalld. Therefore, we recommend utilizing either the Imunify360 firewall exclusively or Imunify360 in conjunction with CSF.
CSF Integration
It is possible to use ConfigServer Security & Firewall (CSF) along with Imunify360.
Imunify360 automatically detects that CSF is running (you can enable it anytime). Imunify360 Blocked Ports, DoS Protection and SMTP Traffic Manager features are automatically disabled in this case. In general:
- Black List, Gray List, and White List can be managed in Imunify360 regardless of CSF.
- CSF Allow, Deny and Ignore Lists are not automatically imported from CSF. They can still be managed using CSF interface.
- Imunify360 will not block addresses from CSF Allow and Ignore Lists.
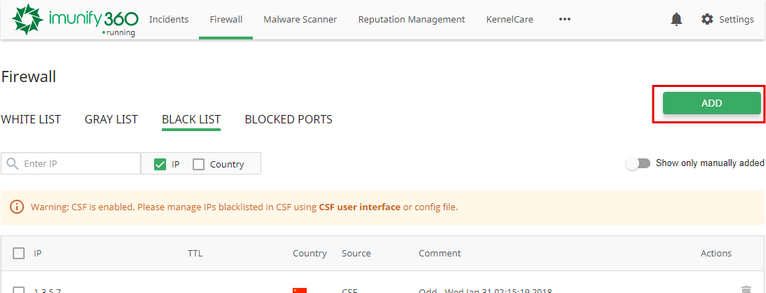
To check that running CSF is detected, go to Imunify360 → Firewall tab → White List section and check if there is a warning message "CSF is enabled. Please manage IPs whitelisted in CSF using CSF user interface or config file".
Mod_security recommendations
When mod_security is configured with SecRuleEngine On (blocking mode), CSF blocks IP addresses by mod_security events. The number of events to block IP address is defined by LF_MODSEC variable in csf.conf. This can lead to a large number of false positives.
We recommend to set LF_MODSEC variable to 0.
In this case, Imunify360 will block IPs only by mod_security events with high severity.
3-rd Party Integration mode
The main setting that defines how Imunify360 works along with CSF is 3-rd Party Integration switch. (The config file equivalent is CSF_INTEGRATION.catch_lfd_events). When this mode is disabled (default), CSF and Imunify360 work as two independent solutions (with redundant modules disabled on the Imunify360 side - see above).
When 3-rd Party Integration mode is enabled Imunify360 uses Login Failure Daemon (LFD) as source for security events instead of OSSEC. To get events from Login Failure Daemon (LFD), Imunify360 automatically replaces BLOCK_REPORT variable to the file path of Imunify360 script. When some IP address is blocked by LFD, Imunify360 adds this IP address to its Graylist and then removes it from CSF deny/tempdeny lists. The latter is done to unblock IP by passing Anti-Bot Challenge and to store all automatically blocked IP addresses in a single place. Thus, no IP is automatically added to CSF deny/tempdeny lists.
Migration from CSF to Imunify360
The migration tool is included in the latest version of Imunify360. Here’s how to use it in four simple steps.
Step 1: Verify the Tool's Presence
First, ensure your server has the latest version of Imunify360 by checking for the migration tool's directory:
/opt/imunify360/venv/share/imunify360/scripts/migrate_csf
If this directory is missing, your server has not yet updated. You can either force a manual update or wait a couple of days for the regular update cycle to complete.
Step 2: Run the Migration Script
Once you've confirmed the tool is present, navigate to the directory and execute the script.
cd /opt/imunify360/venv/share/imunify360/scripts/migrate_csf
./main.py # executable, no python prefix needed
Step 3: Verify the Migration
The tool will display color coded logs in your console as it runs. For a complete record of all actions taken, you can review the detailed log file located at:
/var/log/imunify360/migrate_csf.log
Step 4: Disable and Remove CSF
Once you have successfully migrated your configuration, you must disable CSF to allow Imunify360's firewall to take over your protection.
csf -x
systemctl disable csf
systemctl disable lfd
CXS Integration
ConfigServer eXploit Scanner (CXS) has different types of malware scanning, which affects Imunify360 Malware Scanner functionality. Below we describe how to make Imunify360 Malware Scanner work properly. These functionalities can be configured at Malware Scanner settings page, but CXS itself must be configured as follows:
Automatically scan all modified files
CXS Watch daemon must be disabled.
Click here for more guidelines.
# stop and disable the service so it won’t start on boot
systemctl stop cxswatch
systemctl disable cxswatch

# hard-prevent other units from starting it
systemctl mask cxswatch

# (optional) to allow it again later, unmask it:
systemctl unmask cxswatch
Note:
You normally don’t need to chmod or rename /etc/cxs/cxswatch.sh. Masking the unit already prevents activation by other services. (If you do want an extra safety lock, you can chmod 000 /etc/cxs/cxswatch.sh and revert with chmod 755 later. The script path is standard for CXS.
Automatically scan any files uploaded using web
CXS ModSecurity vendor should be disabled.
You can do this by CLI (preferred for repeatability) or via WHM UI. Click here for more guidelines.
CLI (root)
The vendor short name for CXS is configserver (per vendor metadata). Use either the helper script or WHM API:
# Using cPanel helper script (works on all supported versions)
# Disable the ConfigServer (CXS) ModSecurity vendor
/usr/local/cpanel/scripts/modsec_vendor disable configserver

# (optional) also disable that vendor’s individual config files & updates via API:
whmapi1 modsec_disable_vendor_configs vendor_id=configserver
whmapi1 modsec_disable_vendor_updates vendor_id=configserver

# Apply ModSecurity settings and restart Apache
whmapi1 modsec_deploy_settings_changes
/usr/local/cpanel/scripts/restartsrv_httpd
WHM UI (if you prefer)
WHM » Security Center » ModSecurity® Vendors → find ConfigServer (CXS) → toggle Enabled to Off. (You may also click Delete to remove it entirely.)
Automatically scan any file uploaded using ftp
Imunify360 supports only Pure-FTPd. For Pure-FTPd CXS launches pure-uploadscript for the scan. Any pure-uploadscript used by CXS must be disabled. You can use the following commands to do that:
systemctl stop pure-uploadscript.service
systemctl disable pure-uploadscript.service
systemctl restart imunify360
On-Demand scanning
This type of scanning can be always run by Imunify360 and CXS separately. No special actions required.
Note
Imunify360 doesn’t make any imports from CXS.
Backup Providers Integration
Overview
Restore_infected is a library written in Python 3. It allows to restore files from backups. It supports several backup backends. Each backend is represented as a plugin which uses a particular API to the backup server and provides a user with a common interface to restore individual files regardless of backup backend selected. In addition to the existing backends custom ones can be added.
If one of the files is infected with malware the library can also search for the last uninfected revision of this file in available backups and restore it. By default it uses imunify360-agent to detect infected files but a custom algorithm can be used instead.
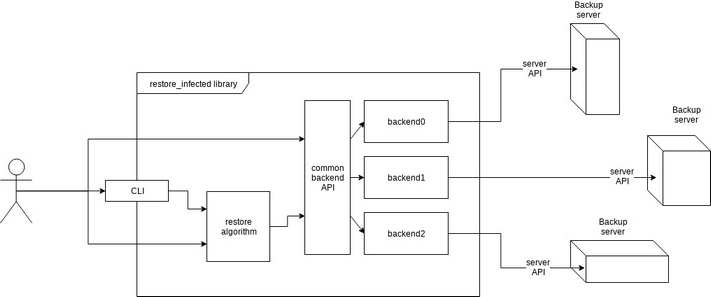
From the figure above can see that the user of the library is supposed to reference it either using command line interface or calling library functions directly. The CLI supports interaction with the restore algorithm but not with the backend API. Restore algorithm doesn’t have a functionality to restore a file from any backup but is capable of restoring files infected with malware instead. It treats absent files as infected ones therefore restores the last revision of those.
Command Line Usage
A command line interface to restore_infected library is present in the file restore_infected_cli.py. If installed from the RPM, the binary is located in /usr/bin/restore_infected and can be used as “restore_infected” . To use the CLI a backend and an action should be specified.
The library includes the following backup backend plugins:
- Acronis
- cPanel
- Plesk
Synopsis
restore_infected BACKEND ACTION
Where BACKEND is one of the backends - predefined or custom and ACTION is one of the actions described below.
Actions
init
The first step most of the plugins will need is initialization. The most common use of it is to save credentials for the backup server.
init arg0 arg1 ...
The arguments may vary depending on the backend used. To see which arguments are needed for the particular plugin you can call init with no arguments:
restore_infected acronis init
usage: restore_infected [-h] BACKEND {init,list,restore,cleanup} ...
restore_infected: error: init arguments required: username password
To install Acronis backup agent, pass --provision option to init command. To force installation when agent is present use --force option.
list
list shows available backups sorted by date starting with the newest.
list [--until]
If a date string is passed as --until, list all backups from now up to that date or all backups otherwise. The date for --until parameter can be in any format that python-dateutil can parse, e.g. 2017-08-01, 01 Aug 2017, etc.
Example:
restore_infected acronis list --until "01 Aug 2017"
2017-08-06T10:22:00
2017-08-05T06:00:00
2017-08-03T12:32:00
restore
restore files [--until]
Restore files from backup. restore takes a list of files (paths to them) which are considered infected, searches for the first uninfected entry of each file in backups and restores it. Backups older than the date set in --until are not considered.
Example:
restore_infected acronis restore "/root/file1" "/root/file2" --until "01 Aug 2017"
cleanup
The most common use is to delete any temporary files created by the plugin. Depending on the backend the functionality may vary or such function might not be present at all.
Example:
restore_infected plesk cleanup
extra
This is for acrivity not connected to restoring from backups.
Currently supported options are
login_url(for Acronis backend). This option returns url to log in to Acronis cloud web interface.refresh_token(for Acronis backend). This option refreshes authentication token to keep it valid.
Using as Library
Restoring Infected Files
The main purpose of the library is to search for uninfected files and to restore them as a replacement for infected ones. The function responsible for that is located in a module restore_infected.restore:
restore_infected(backend, files, until=None, scan_func=scan)
Where:
backendis a backend plugin module;filesis a list of files to scan and restore;untilfilters the backups before specified date;scan_funcis a function that scans files for malware. It takes a list of files and returns the list of infected ones, by default it uses the functionscanfrom the same module.
For example restore_infected can be called like this:
from restore_infected import backup_backends
from restore_infected.restore import restore_infected
from restore_infected.helpers import DateTime

plesk = backup_backends.backend('plesk')

def my_scan(files):
  infected = []
  # scan files here
  return infected

restore_infected(
plesk,
"/var/www/vhosts/u1.pl7.cloudlinux.com/httpdocs/index.php",
until=DateTime("9 Aug 2017"),
scan_func=my_scan)
Operating With Backend
A backend plugin can be imported directly from restore_infected.backup_backends. Every plugin has a function called backups which returns the list of objects each of which is representing a backup, and might have optional functions init and/or cleanup which initialize and cleanup the plugin respectively.
In the following example let’s print out all backups. For plesk in the following example the init function is not needed so we can call backups right away:
from restore_infected import backup_backends
plesk = backup_backends.backend('plesk')
for backup in plesk.backups():
       print(backup)
This will give us the following list of backups:
/var/lib/psa/dumps/clients/u3/domains/u3.pl7.cloudlinux.com/backup_info_1708080701_1708090501.xml
/var/lib/psa/dumps/clients/u1/domains/u1.pl7.cloudlinux.com/backup_info_1708090500.xml
<...>
/var/lib/psa/dumps/clients/u1/domains/u1.pl7.cloudlinux.com/backup_info_1707070347_1707070353.xml
/var/lib/psa/dumps/clients/u1/domains/u1.pl7.cloudlinux.com/backup_info_1707070347.xml
backups has an optional parameter until of restore_infected.helpers.DateTime. To filter out backups from 9 Aug 2017 till now the code can be changed like this:
from restore_infected import backup_backends
plesk = backup_backends.backend('plesk')
from restore_infected.helpers import DateTime
for backup in plesk.backups(DateTime("9 Aug 2017")):
       print(backup)
Operating With Backup
In the previous step we printed out some backups. Every backup entry regardless of the plugin also has a field created which tells when the actual backup was created. It makes backups comparable.
Example:
backups = plesk.backups()
print(backups[4].created)
print(backups[5].created)
print(backups[4] > backups[5])
Which gives us:
2017-08-08 07:01:00
2017-08-08 07:00:00
True
Operating With File in Backup
A method file_data returns a representation of a file in this backup as an instance of a class (hereafter, this class is referenced to FileData):
print(backup.file_data('/var/www/vhosts/u1.pl7.cloudlinux.com/httpdocs/index.php'))
Output:
<FileData(
fileobj=<ExFileObject name='/var/lib/psa/dumps/clients/u1/domains/u1.pl7.cloudlinux.com/backup_user-data_1708080700.tgz'>,
filename='/var/www/vhosts/u1.pl7.cloudlinux.com/httpdocs/index.php',
size=418,
mtime=datetime.datetime(2013, 9, 24, 20, 18, 11)
>
where mtime is the time of the last modification of a file.
Besides these fields, FileData also has a method restore. If destination is passed as a parameter then the file is restored and saved in specified folder saving the directory hierarchy. The default destination is / which means that the file is restored to the place of its origin.
Example:
from restore_infected import backup_backends
plesk = backup_backends.backend('plesk')
backups = plesk.backups()
filedata = \
backups[5].file_data('/var/www/vhosts/u1.pl7.cloudlinux.com/httpdocs/index.php')
filedata.restore('/home/user/restored_files')
It gives no output if zero errors occurred and creates 'var/...' directories in '/home/user/restored_files' with a restored file.
From now on Acronis backend supports provision=True/False (by default False) and force=True/False (by default False) options for init action, to install Acronis backend agent. Use force to reinstall agent if it is already present.
As of version 1.2-1, Acronis init takes optional argument tmp_dir to specify temporal directory for installing Acronis backup client.
Example:
from restore_infected import backup_backends
acronis = backup_backends.backend('acronis')
acronis.init(name, password, provision=True, force=True, tmp_dir=None)
login_urlaction for return URL to log in to Acronis web interface.Example:
from restore_infected import backup_backends acronis = backup_backends.backend('acronis') token = acronis.login_url()login_urlaction for refreshing authentication token.Example:
from restore_infected import backup_backends acronis = backup_backends.backend('acronis') acronis.refresh_token()infoaction to return region, schedule and used storage space in JSON format.Example:
from restore_infected import backup_backends acronis = backup_backends.backend('acronis') info = acronis.info() {'schedule': {...}, 'usage': 17890969600, 'region': 'eu2'}make_initial_backupmakes initial backup after Acronis backup client is installed. By default it does not wait for the backup completion. To wait for the backup to be completed use optiontrace=True. When such an option is on, current completion percentage is being outputted to log file (by default /var/restore_infected/acronis_backup.log. ReturnsTrueif backup is successful andFalseotherwise.Example:
 from restore_infected import backup_backends
 acronis = backup_backends.backend('acronis')
 acronis.make_initial_backup(trace=False)
Creating Custom Backup Backend Plugin
Creating Module
To create a plugin for a particular backup backend a python module should be created in backup_backends folder. The plugin will be registered automatically when a function backend(name) from backup_backends module is called. If the plugin should be used only in some appropriate systems environment is_suitable function could be implemented, which should return Boolean. It will be called during backend(name) from backup_backends function call and if is_suitable False, then BackendNonApplicableError exception will be raised.
Here is an example of is_suitable function for DirectAdmin module:
def is_suitable():
return os.path.isfile('/usr/local/directadmin/directadmin')
Defining Classes
There are two mandatory classes that have to be implemented in the plugin.
Backup Class
This class represents a backup. It can have any name since it is not directly referenced to from the outside of the module. It can either be inherited from
backup_backends_lib.BackupBase
which already have some features (e.g. comparison) implemented or it can be written from scratch. The class must define a method file_data that returns a FileData object (described below). Objects of this class should also be comparable by the date created as if they were actual backups.
FileData Class
The second class that has to be implemented is FileData which represents a file in a backup. It must have file size, modify time and a method restore.
Implementing API Functions
There are 3 functions in the plugin, but only one of them is mandatory - backups. This function returns a list of Backup instances. Optional functions are init, cleanup, and info that are responsible for the initialization, cleanup and getting some information of the plugin respectively.
def init(*args):
...
def backups(until=None):
...
def cleanup():
   …
def info():
   ...
Depending on the features of the backend being integrated, the plugin might have one or more classes and functions responsible to authorise on the backup server and retrieve data from it, however only functions init, backups, cleanup, and info are called from the outside of the module.
To check that the plugin works as intended try passing your plugin name to the CLI for example like this:
restore_infected <your_backend_name> list
To be used in asynchronous libraries async_restore_infected routine has been added. Typical use case:
import logging
from restore_infected import backup_backends
from restore_infected.restore import async_restore_infected
from defence360agent.malscan.scanner import MalwareScanner

async def _custom_scan_function(files):
    if not files:
        return []
    still_infected = []
    scanner = MalwareScanner().scan_filelist()
    scanner.start(files)
    result = await scanner.async_wait()
    if result['results']:
        still_infected = list(result['results'].keys())
    return still_infected

class DummyDumper:
    @classmethod
    async def do_restore(cls, files):
        backend = backup_backends.backend('cpanel')
        return await async_restore_infected(
            backend, files, scan_func=_custom_scan_function
For Acronis backup two restore modes are available:
- Download mode – a file to be restored is simply pulled by HTTP from backup server
- Recovery mode –
restore_infectedjust sends command to backup server and then waits for the file to be restored is actually placed to expected folder. Its size is equal to expected one.
Recovery mode is used by default because it restores file owner and permissions, too. Though downloading mode can be enabled with passing use_download option to restore_infected function. The second optional parameter - timeout can be passed to restore_infected function to change the default waiting time (time to wait while a file to be restored is being pulled by recovery agent). By default timeout is 600 seconds.
title: Hosting Panels Firewall Rulesets Specific Settings & ModSec meta:
- name: description content: Discover Hosting Panels Firewall Rulesets specific settings including modsec rules in Imunify360 security suite.
Hosting Panels Firewall Rulesets Specific Settings & ModSecurity
This section includes specific settings for each hosting panel that Imunify360 supports. It is important to follow these instructions to setup Imunify360 plugin properly.
Note
mod_security, the important software for Imunify360, is not installed automatically during Imunify360 installation process. Without mod_security, Imunify360 will lack the following features:
- Web application firewall
- Malware scanning of files uploaded using web
Mod_security installation process is specific for different panels:
Important!
If mod_security is installed after Imunify360, it is important to execute the following command to add mod_security ruleset to Imunify360:
For cPanel/Plesk/DirectAdmin/Stand-alone:
imunify360-agent install-vendors
If mod_security is installed before Imunify360, the rules will be installed automatically.
Note
If Imunify360 installer detects any existing ruleset, it installs only minimal set of its rules. So, you need to disable all third-party rulesets prior to Imunify360 installation to get the full ruleset installed automatically.
cPanel
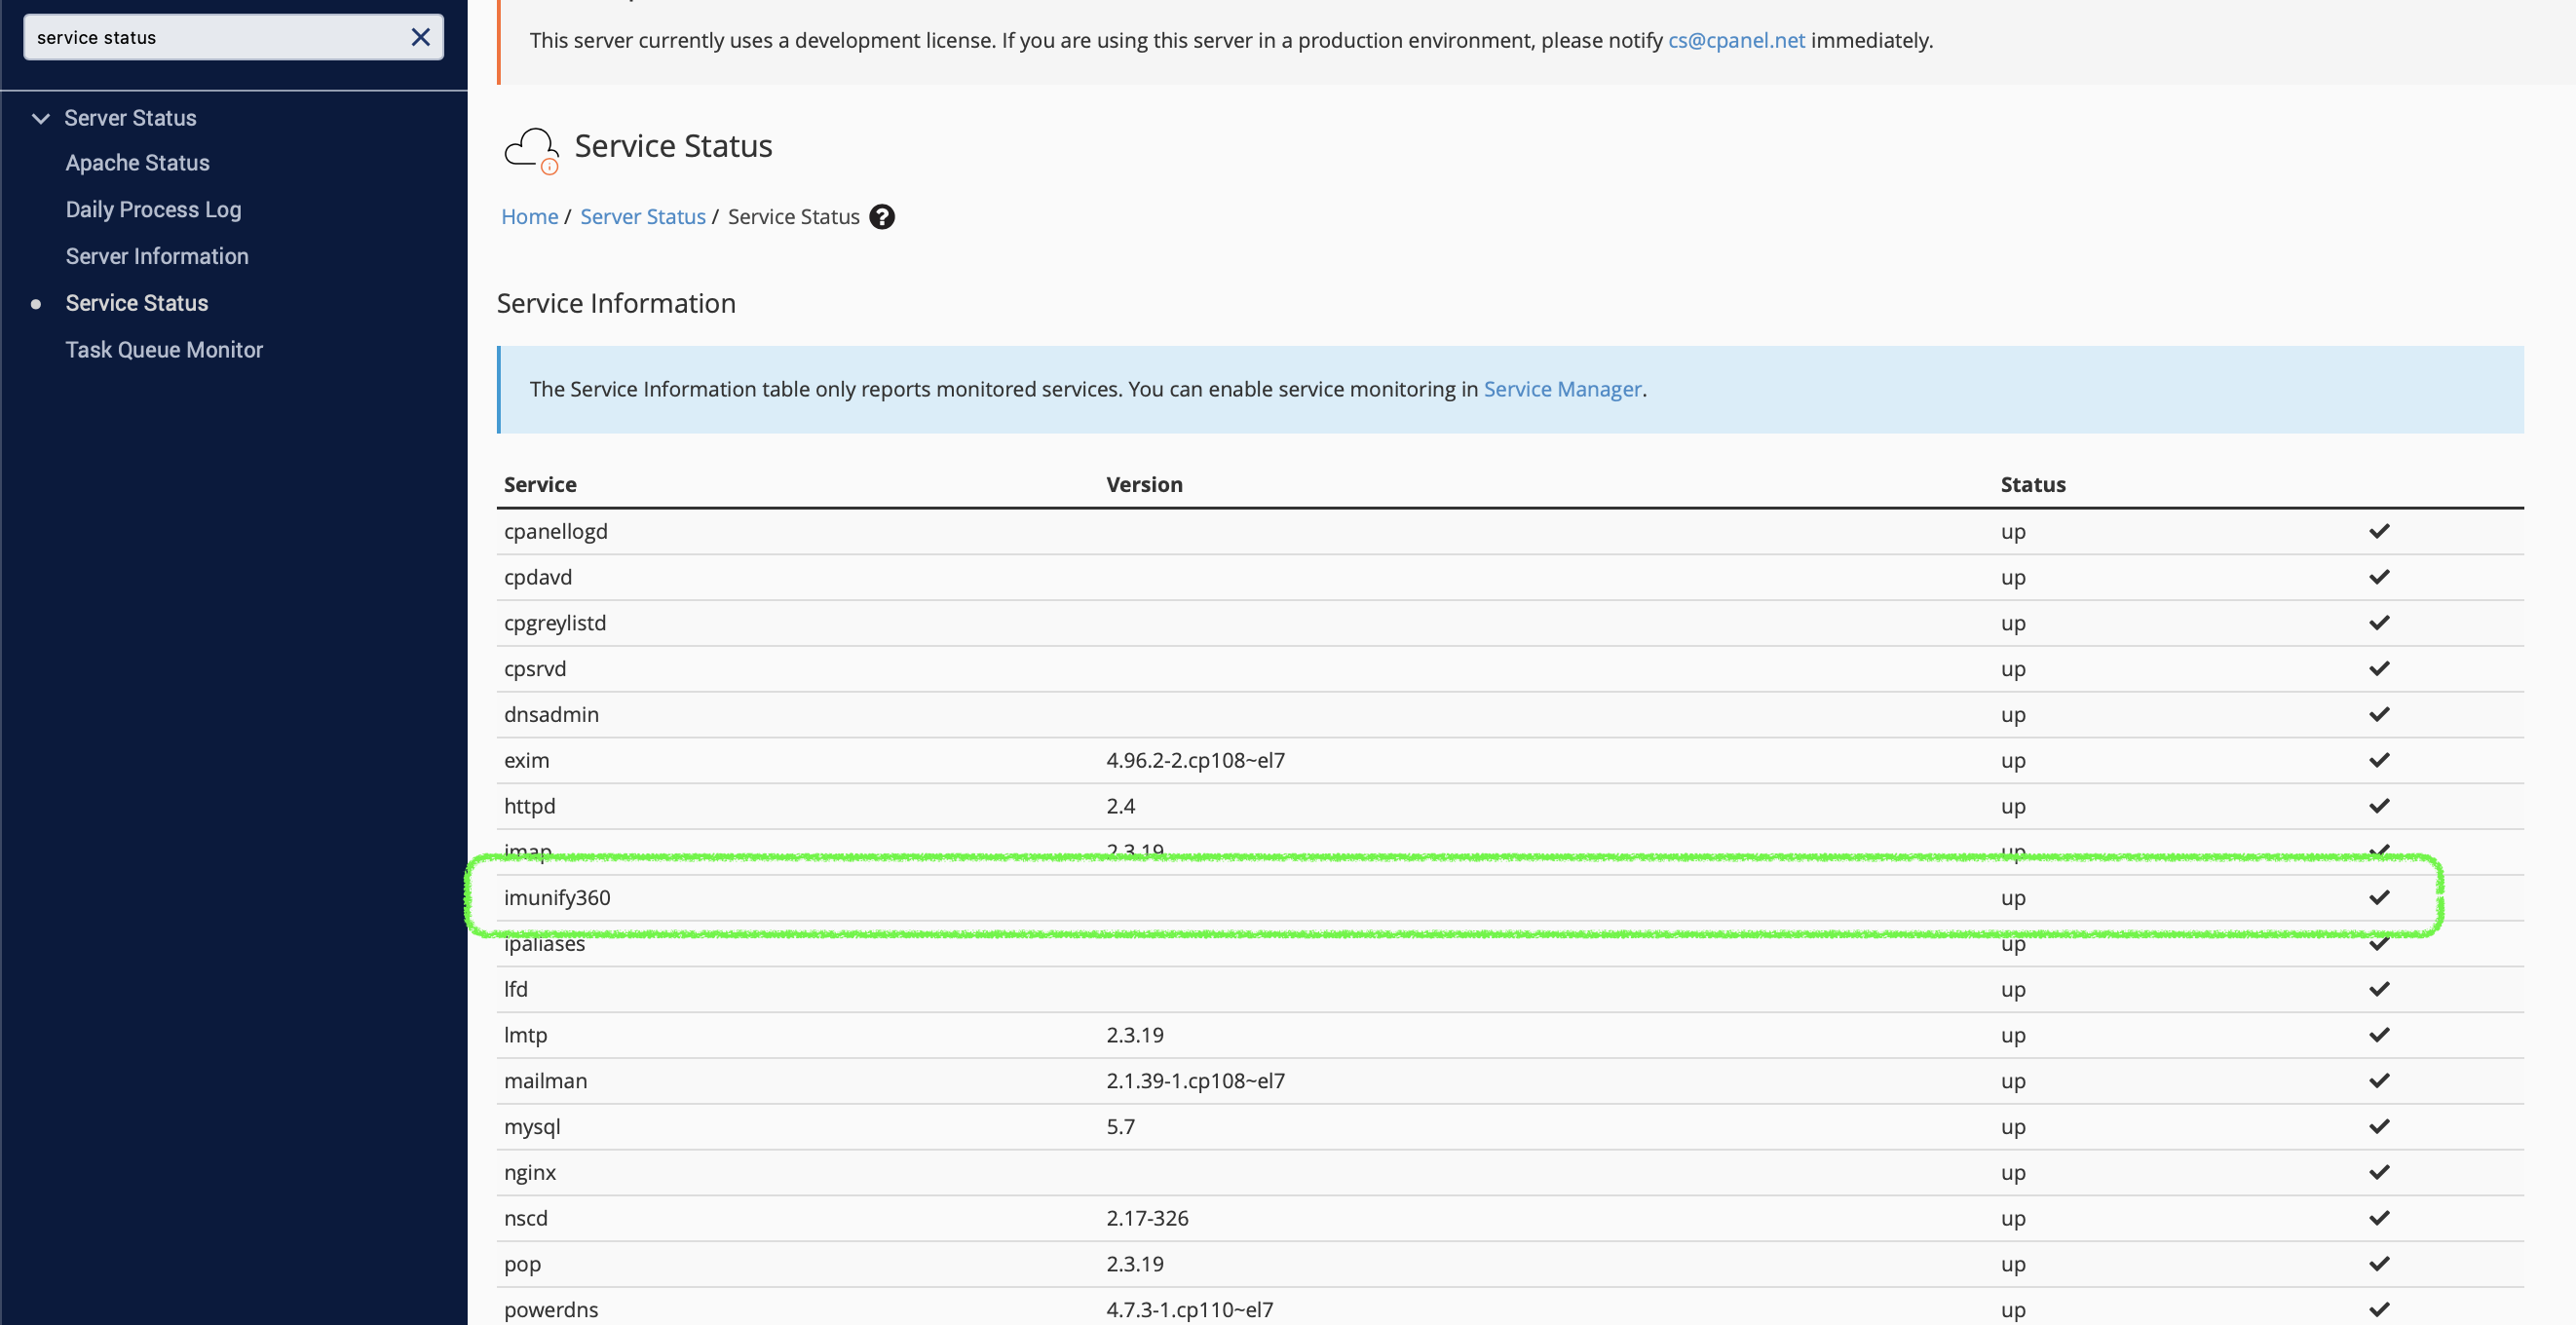
It is possible to enable Service Status checker for Imunify360. To do so, perform the following steps:
Go to Service Configuration and choose Service Manager.
In Additional Services section tick the
imunify360checkbox.Click Save and wait until cPanel enables the Service Status checker for Imunify360.
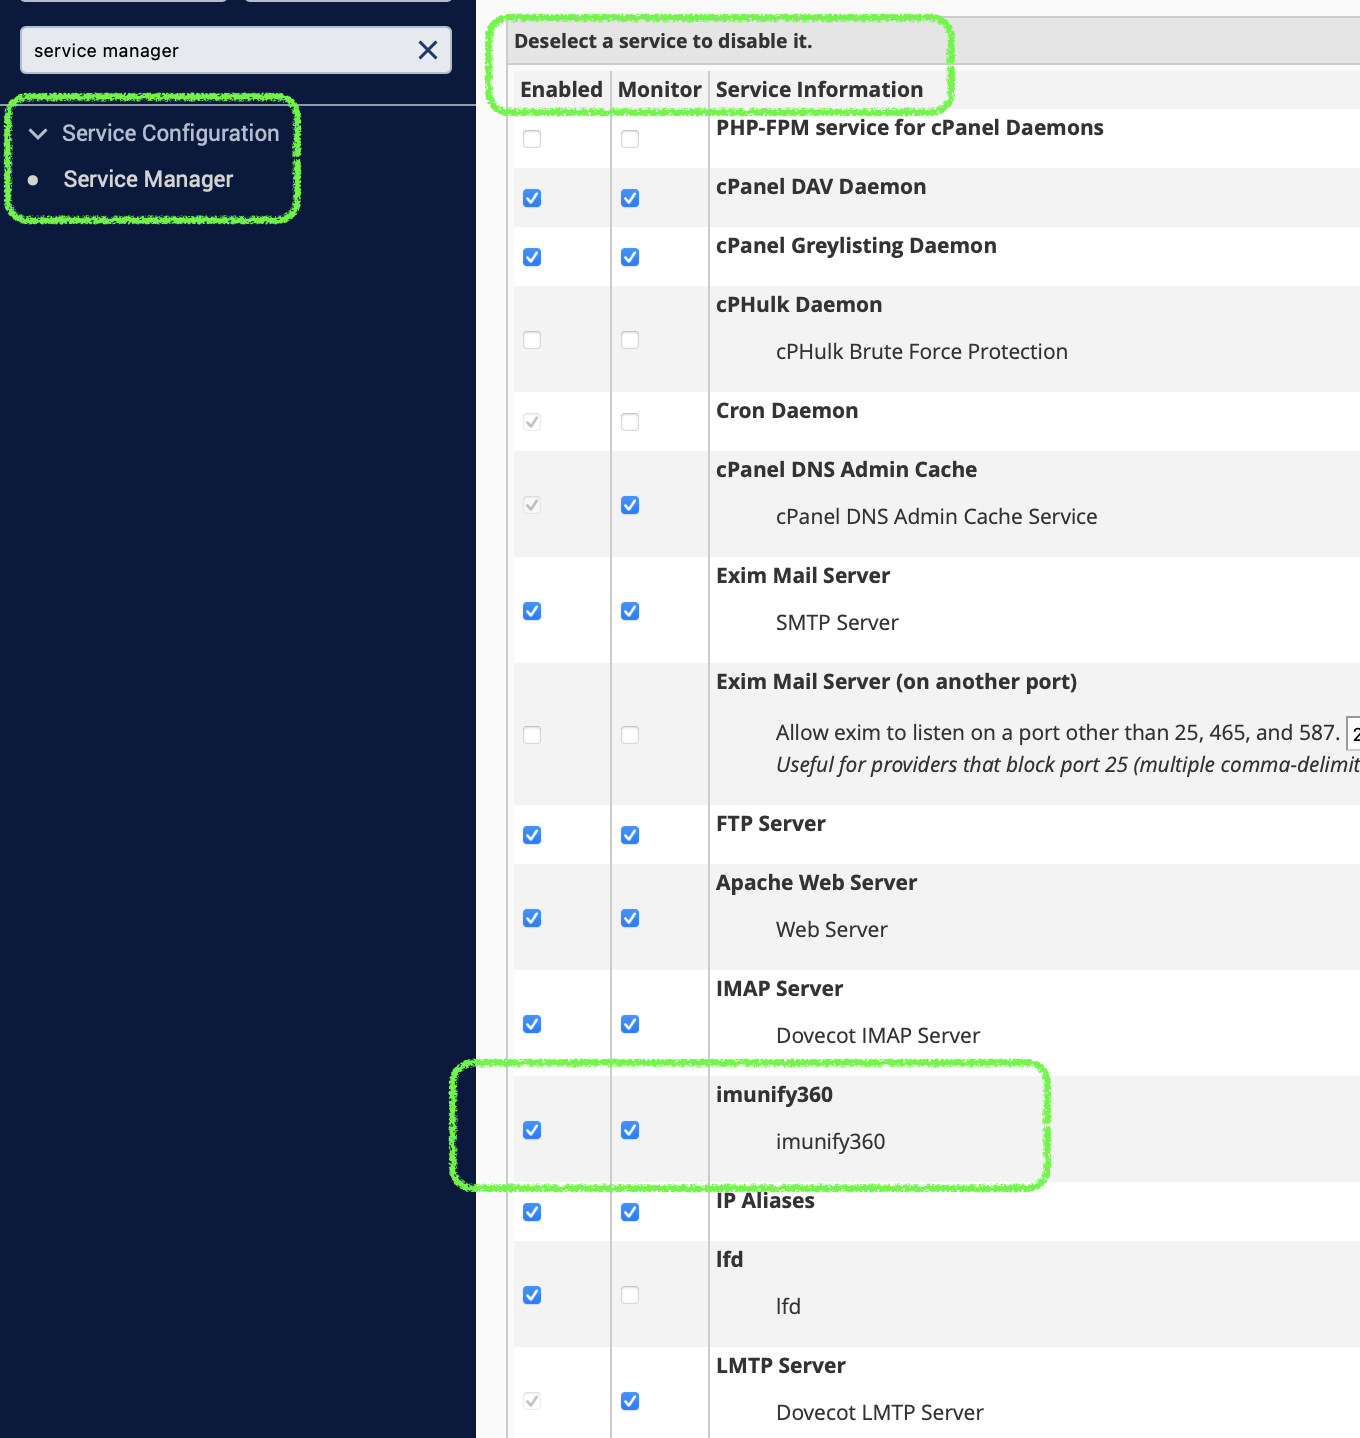
If succeeded, the status of Imunify360 service will be displayed at Service Status section of Server Status.
ModSecurity Settings
Note
Since version 92, cPanel is adding experimental support of ModSecurity 3.x and starting from version 5.7, we implement experimental support of ModSecurity version 3 on cPanel. Since the support is experimental, there are some limitations. Please find them here.
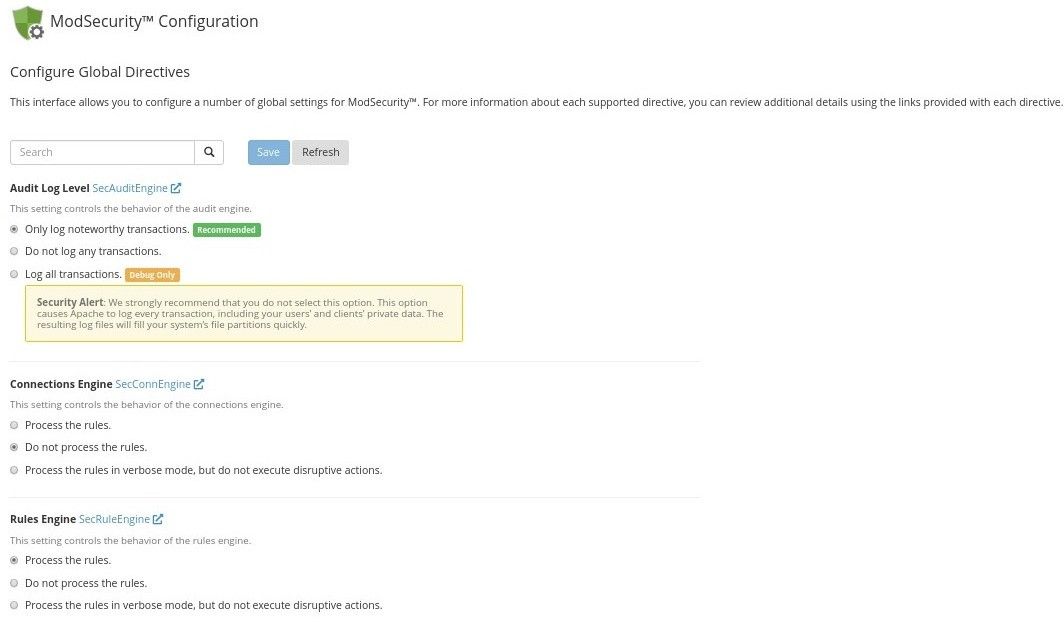
Recommended mod_security settings are:
- Audit Log Level – Only log noteworthy transactions
- Connections Engine – Do not process the rules
- Rules Engine – Process the rules
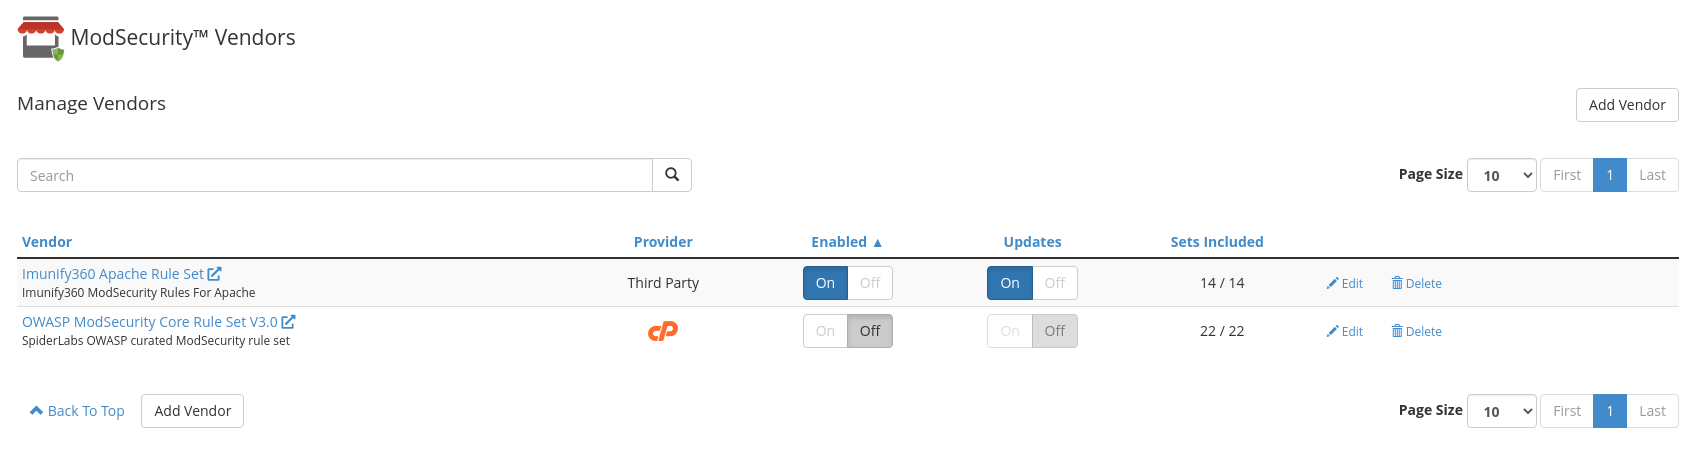
It’s also recommended to disable any third-party mod_security vendors except Imunify360 ruleset (especially OWASP and Comodo ). These rulesets can cause large number of false-positives and duplicate Imunify360 ruleset.
To do so, go to ModSecurity Vendors section of cPanel main menu, and switch to Off all enabled vendors except Imunify360 ruleset. If there is no Imunify360 ruleset installed, run imunify360-agent install-vendors command.
Enable rules auto-update. Otherwise, you won't get important updates of ModSecurity ruleset in time
For Apache run the following command:
/usr/local/cpanel/scripts/modsec_vendor enable-updates imunify360-full-apacheFor LiteSpeed run the following command:
/usr/local/cpanel/scripts/modsec_vendor enable-updates imunify360-full-litespeed
See details here.
Or you can use WHMAPI1 to enable vendor auto-updates.
It is possible to block ModSecurity rules only for IPs that belong to some country. More info can be found in FAQ
ModSecurity 3 + Apache limitations
Since version 92, cPanel is adding experimental support of ModSecurity 3.x and starting from version 5.7, we implement experimental support of ModSecurity version 3 on cPanel. There are still some issues that prevent some Imunify360 features from working property. The feature limitations are:
- working with mod_ruid2
- working with mod_remoteip
- app-specific ruleset feature
- HackerTrap
- uploaded files scanning
- simple password redirect
Plesk
It is not recommended to use firewalld and Plesk Firewall simultaneously, because Plesk does not fully support such configuration. We recommend to disable firewalld by running the command on the server:
systemctl disable firewalld
Read more about the problem at Plesk Help Center in this thread.
ModSecurity Configuration
- Web application firewall mode – On

If any mod_security ruleset was installed during Imunify360 installation, Imunify360 will not install its own ruleset, because Plesk supports only one ruleset at once.
To check, if Imunify360 ruleset is installed, run the following as root:
# plesk bin server_pref --show-web-app-firewall | grep "\[waf-rule-set\]" -A2
[waf-rule-set]
custom
If the output does not contain imunify360, for example:
# plesk bin server_pref --show-web-app-firewall | grep "\[waf-rule-set\]" -A2
[waf-rule-set]
comodo_free
Then install Imunify360 ruleset and check it again:
# imunify360-agent install-vendors
OK
# plesk bin server_pref --show-web-app-firewall | grep "\[waf-rule-set\]" -A2
[waf-rule-set]
custom
Note
Please make sure that Update rule sets option is disabled in your Plesk Web Application Firewall interface on the Settings tab.
Note
Note that in the current version of Plesk, Update rule sets option is available if one of the Atomic Basic ModSecurity/Advanced ModSecurity Rules by Atomicorp/Comodo ModSecurity Rule Set is enabled.
DirectAdmin
During installation on DirectAdmin, Imunify360 will try to install mod_security automatically using custombuild 2.0.
Note
Automatic installation of Imunify360 ruleset is only supported with custombuild 2.0.
The following values in the custombuild configuration are required for the installation of Imunify360 ModSecurity ruleset:
modsecurity=yes
modsecurity_ruleset=no