Hosting Provider Guide
Are you a WordPress site owner?
This page is written for hosting providers and server administrators. It covers requirements, installation on your servers, and the settings you control.
If you manage a WordPress site and want to know what the plugin does and what you can change in the WordPress dashboard, see the Site Owner Guide.
Overview
The Imunify Security plugin for WordPress brings the protection your Imunify product already provides into the WordPress dashboard of every site on your servers. It is available to all Imunify customers (ImunifyAV, ImunifyAV+, and Imunify360).
For your customers, the plugin:
- shows the security status of their site, including malware detected and cleaned;
- adds a Web Application Firewall (virtual patching) that blocks attempts to exploit known vulnerabilities in plugins, themes, and WordPress core;
- adds AI Bot Management, which rate-limits crawlers, scrapers, and AI bots;
- gives ImunifyAV and ImunifyAV+ users an upgrade path to Imunify360.
The plugin is not published in the WordPress.org plugin directory. It is delivered and updated by the Imunify agent on the server.
For what your customers see and can change themselves, send them to the Site Owner Guide.
Requirements
On each WordPress site:
- WordPress version: 5.0.0 or higher
- PHP version: 5.6 or higher
On the server:
- Imunify360
8.4.1or higher, or - ImunifyAV/AV+
8.6.0or higher
Individual features need newer versions of both the plugin and the Imunify agent:
| Feature | Plugin (imunify-wp-security) | Imunify360 (imunify360-firewall) | ImunifyAV/AV+ (imunify-antivirus) |
|---|---|---|---|
| Base plugin (dashboard widget, plugin page) | — | 8.4.1 | 8.6.0 |
| Web Application Firewall | wp-3.0.1-2 | 8.12.5-3 | av-8.7.1-2 |
| AI Bot Management | wp-4.0.2-2 | 8.13.6-6 | av-8.8.3-6 |
| Bot Traffic report page | wp-4.1.0-1 | 8.13.6-6 | av-8.8.3-6 |
| Whitelisted IPs skip AI Bot Management | wp-4.1.1-1 | imunify-core 8.14.1 | Not available |
| Partner REST APIs skip AI Bot Management | wp-4.1.3-1 | 8.13.6-6 | av-8.8.3-6 |
| Restoring a removed plugin | — | imunify-core 8.14.1 | imunify-core 8.14.1 |
The plugin is updated by the Imunify agent, so keeping the agent current is enough. imunify-core is a shared package that both Imunify360 and ImunifyAV install, and it is updated on its own schedule.
WordPress multisite networks are only partly supported and have not been fully tested. Some features may not behave as documented on multisite.
Installing the plugin
Installation is a single server-wide switch. Once it is on, the plugin is installed in the background on every active WordPress installation on the server, and new WordPress sites are picked up by the daily job that scans for them.
From the control panel
- Navigate to Imunify settings in your hosting control panel (e.g., cPanel).
- Open the
Generaltab. - Scroll to the
WordPress Pluginsection. - Tick the
Install WordPress plugincheckbox and clickSave changes.
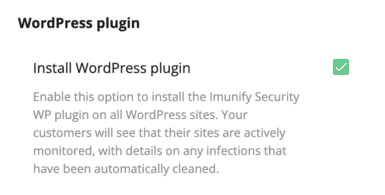
Plugin installation settings in the control panel
From the command line
imunify360-agent config update '{"WORDPRESS":{"security_plugin_enabled": true}}'
On ImunifyAV and ImunifyAV+, use imunify-antivirus instead of imunify360-agent.
security_plugin_enabled is the master switch for the plugin, its Web Application Firewall, and AI Bot Management. Setting it to false removes the plugin from the sites again.
See also WordPress plugin settings in the admin interface.
Checking the result
After a rollout, list the WordPress sites where the plugin is installed:
imunify360-agent wordpress-plugin list-sites
To check whether the WAF is on for each hosting account, and whether that comes from the server default or a per-account override:
imunify360-agent wordpress-plugin waf status
Both commands accept filters and paging — see the command-line reference.
When a site owner removes the plugin
A site owner can delete the plugin from their WordPress site like any other plugin. A daily job then records the site as removed by the user, cleans up the data kept for it, and stops managing it. The server does not install the plugin on that site again, and turning security_plugin_enabled off and on again does not bring it back.
To put the plugin back on such a site, first list the sites where the owner removed it:
imunify360-agent wordpress-plugin list-removed-sites
Then restore the site by its document root, as shown in the list. Add --install to install the plugin on that site right away:
imunify360-agent wordpress-plugin restore-site --docroot /home/user/public_html --install
Without --install, the site becomes eligible again and the plugin is installed on the next regular installation run.
Both commands need root and imunify-core 8.14.1 or later. On ImunifyAV and ImunifyAV+, use imunify-antivirus instead of imunify360-agent. See the command-line reference for all options.
Note
Talk to the site owner before you restore the plugin. They removed it on purpose.
Web Application Firewall
The WordPress WAF provides virtual patching against known vulnerabilities (CVEs) in WordPress plugins, themes, and core, without modifying site files. In Imunify360 matching requests are blocked with HTTP 403; in ImunifyAV and ImunifyAV+ they are logged only.
For how the WAF works and how site owners review incidents and disable individual rules, see Web Application Firewall (Virtual Patching).
Note
This WordPress WAF is a separate layer from the server-side WAF (ModSecurity) and from WordPress Account Brute-force Protection.
Server-wide settings
In the control panel, the WAF is controlled from Settings | General | WordPress plugin:
- Enable WordPress WAF — turns the WAF on for WordPress sites on this server. When it is disabled, WAF rules are removed from all sites, and site owners no longer see the WAF views in WordPress.
- Enable WAF for new accounts by default — automatically enables the WAF for newly created hosting accounts.
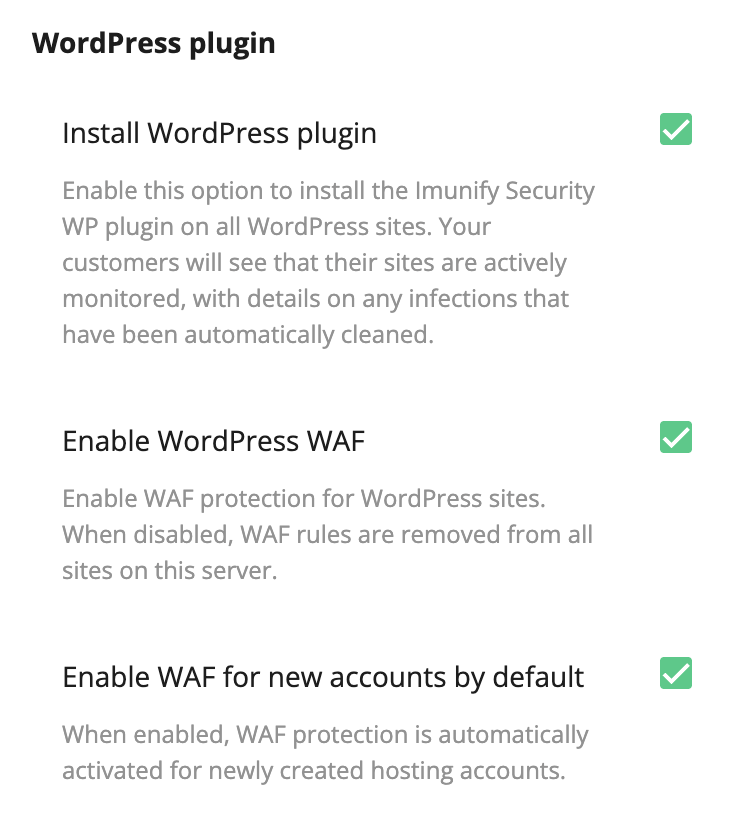
The same settings from the command line:
imunify360-agent config update '{"WORDPRESS":{"waf_enabled": true}}'
imunify360-agent config update '{"WORDPRESS":{"waf_default": true}}'
Note
The WAF is enabled by default for hosting accounts that already existed when it was first rolled out. Newly created accounts follow the Enable WAF for new accounts by default setting.
Per-account settings
Change the WAF for hosting accounts in bulk:
imunify360-agent wordpress-plugin waf set --status enabled --all-users
imunify360-agent wordpress-plugin waf set --status disabled --users user1 user2
Or for a single account:
imunify360-agent config update --user user1 '{"WORDPRESS":{"waf_enabled": false}}'
For all options, and for enabling or disabling individual WAF rules server-side, see the WordPress plugin CLI commands.
AI Bot Management
AI Bot Management classifies incoming traffic (verified search engines, verified AI crawlers, verified SEO crawlers, unknown automated clients, unverified bots, malicious bots, and humans) before WordPress finishes loading, and applies a per-minute request limit to each non-human category. Human visitors are never rate-limited, and the check is fail-open.
For the categories, the preset limits, and what site owners see, see AI Bot Management.
Server-wide settings
AI Bot Management is controlled through configuration keys rather than the control panel. Enable or disable it server-wide:
imunify360-agent config update '{"WORDPRESS":{"ai_bot_protection": true}}'
imunify360-agent config update '{"WORDPRESS":{"ai_bot_protection": false}}'
Set the default preset applied to sites that have not chosen their own — one of balanced, strict, or monitor:
imunify360-agent config update '{"WORDPRESS":{"ai_bot_protection_preset": "strict"}}'
While the feature is off server-wide, the Bot Protection row does not appear in the WordPress dashboard widget.
On ImunifyAV and ImunifyAV+, AI Bot Management always runs in monitor mode: it classifies and reports traffic, but does not limit or block it. The ai_bot_protection_preset setting, the site owner's choice in the widget, and IMUNIFY_AI_BOT_PROTECTION_PRESET have no effect there. This applies from plugin wp-4.1.0-1.
Per-site control
AI Bot Management is a server-wide setting. Unlike the WAF, it cannot be enabled or disabled for a single hosting account. Once it is on for the server, control belongs to the site:
- the WordPress administrator turns it on or off for their own site, and picks a preset, from the Bot Protection row of the dashboard widget;
- setting
IMUNIFY_AI_BOT_PROTECTIONorIMUNIFY_AI_BOT_PROTECTION_PRESETin thewp-config.phpfile overrides the widget.
See Turning it on or off.
Exempting IP addresses with the whitelist
On Imunify360, IP addresses on the server's whitelist are never rate-limited or blocked by AI Bot Management. This includes requests that hit the honeypot. Use it for a service that a site owner needs, for example an uptime monitor or a backup service:
imunify360-agent ip-list local add --purpose white 203.0.113.10 --comment "Uptime monitor"
How it works:
- Only entries that someone added on purpose count — from the command line, the admin interface, or a group sync. IP addresses whitelisted automatically, for example after a successful panel login or CAPTCHA, are not used.
- Single IP addresses and subnets work, for both IPv4 and IPv6. Country whitelists are not used.
- Entries with an expiration time stop counting when they expire.
- The agent checks the whitelist every minute and copies changes to the WordPress sites.
- Whitelisted traffic is still counted in the Bot Traffic report, under Whitelisted IPs.
This needs plugin wp-4.1.1-1 and imunify-core 8.14.1 or later, and AI Bot Management must be on. It is not available on ImunifyAV and ImunifyAV+, which have no IP whitelist. See also the Whitelist command reference.
Traffic that is never limited
Besides whitelisted IP addresses, AI Bot Management never limits:
- human visitors;
- requests that the site sends to itself from the same server, such as WordPress scheduled tasks;
- requests to the REST APIs of known partner plugins, such as WooCommerce.
See Traffic that is never limited in the Site Owner Guide for details.
Sites behind a CDN or proxy
When a site is behind a CDN, AI Bot Management uses the real visitor IP address from the CDN's header. It trusts the header only when the request comes from that CDN's published IP ranges. See Sites behind a CDN or proxy for the list of supported CDNs.
What site owners can change
| Setting | Controlled by you | Site owner can override |
|---|---|---|
Plugin installed (security_plugin_enabled) | Server-wide | A site owner can delete the plugin from their site manually. It does not come back by itself, but you can restore it — see When a site owner removes the plugin. |
| Web Application Firewall | Server-wide and per hosting account | The hosting account owner can turn it off for their own account, unless you have locked it server-wide. The setting then shows This value is set by server administrator. |
| AI Bot Management | Server-wide only | Yes — the WordPress administrator turns it on or off for their own site from the widget. Setting IMUNIFY_AI_BOT_PROTECTION in the wp-config.php file overrides both. |
| AI Bot Management preset | You set the server default | Yes — from the widget, or by setting IMUNIFY_AI_BOT_PROTECTION_PRESET in the wp-config.php file. On ImunifyAV and ImunifyAV+, the preset is always Monitor only. |
| Individual WAF rules | You can disable rules server-side | A site owner can disable a rule for their own site from the Imunify Security page in WordPress. |
Site owners can solve most common problems themselves. The Site Owner Guide covers them in Something is not working. What can I do? — blocked traffic, a WAF false positive, and Bot Protection refusing a tool they use. You can link to it from your own help pages.
If Bot Protection refuses a tool that a site owner needs, and a softer preset does not help, you can add the tool's IP addresses to the whitelist. See Exempting IP addresses with the whitelist.