Site Owner Guide
Are you a hosting provider or server administrator?
This page is written for WordPress site owners. It explains what the plugin does, what you see in your WordPress dashboard, and what you can change yourself.
If you run the server, see the Hosting Provider Guide for requirements, installation, and server-wide settings.
What the plugin does
The Imunify Security plugin for WordPress shows the security status of your website directly in the WordPress dashboard. It reports what the Imunify security software on your hosting server found and cleaned, and it adds two protection layers that run inside WordPress itself.
You do not need to buy, download, or configure anything. The plugin works together with the Imunify product your hosting provider already runs on the server (ImunifyAV, ImunifyAV+, or Imunify360).
Why the plugin is on your site
Your hosting provider installed the plugin for you, as part of the security service included with your hosting plan. This is why it appears in your plugin list without you installing it, and why you cannot find it in the WordPress.org plugin directory — it is delivered by the hosting server, not from the public repository.
What it protects you from
- Malware. Infected files, injected code, and backdoors. The Imunify scanner on the server checks your files, and the plugin shows you what was detected and cleaned.
- Zero-day attacks and dangerous code execution. Attacks that use undisclosed vulnerabilities, and backdoors that are already on the site, run PHP code that no scanner has a signature for yet. Proactive Defense stops that code at the moment it tries to run.
- Exploits of known vulnerabilities in the plugins, themes, and WordPress core you use — including the time between a vulnerability becoming public and you installing the update. The Web Application Firewall (virtual patching) blocks the attempt without changing any of your files. See Web Application Firewall.
- Aggressive crawlers, scrapers, and AI bots that slow your site down, use up its resources, and copy its content. AI Bot Management limits them while leaving real visitors untouched. See AI Bot Management.
Which of these are available depends on the Imunify product your hosting provider runs. ImunifyAV and ImunifyAV+ users see a smaller set of features than Imunify360 users.
Features
Dashboard Widget
The plugin adds a dashboard widget that helps administrators keep track of their site's security status:
- Real-time security status
- Proactive Defense status
- Web Application Firewall status and recent WAF incidents (see Web Application Firewall)
- Bot Protection status and recent bot activity (see AI Bot Management)
- Timestamps for last and next scheduled scans
- Detailed list of detected and cleaned malware (file path, signature, detection or clean-up time)
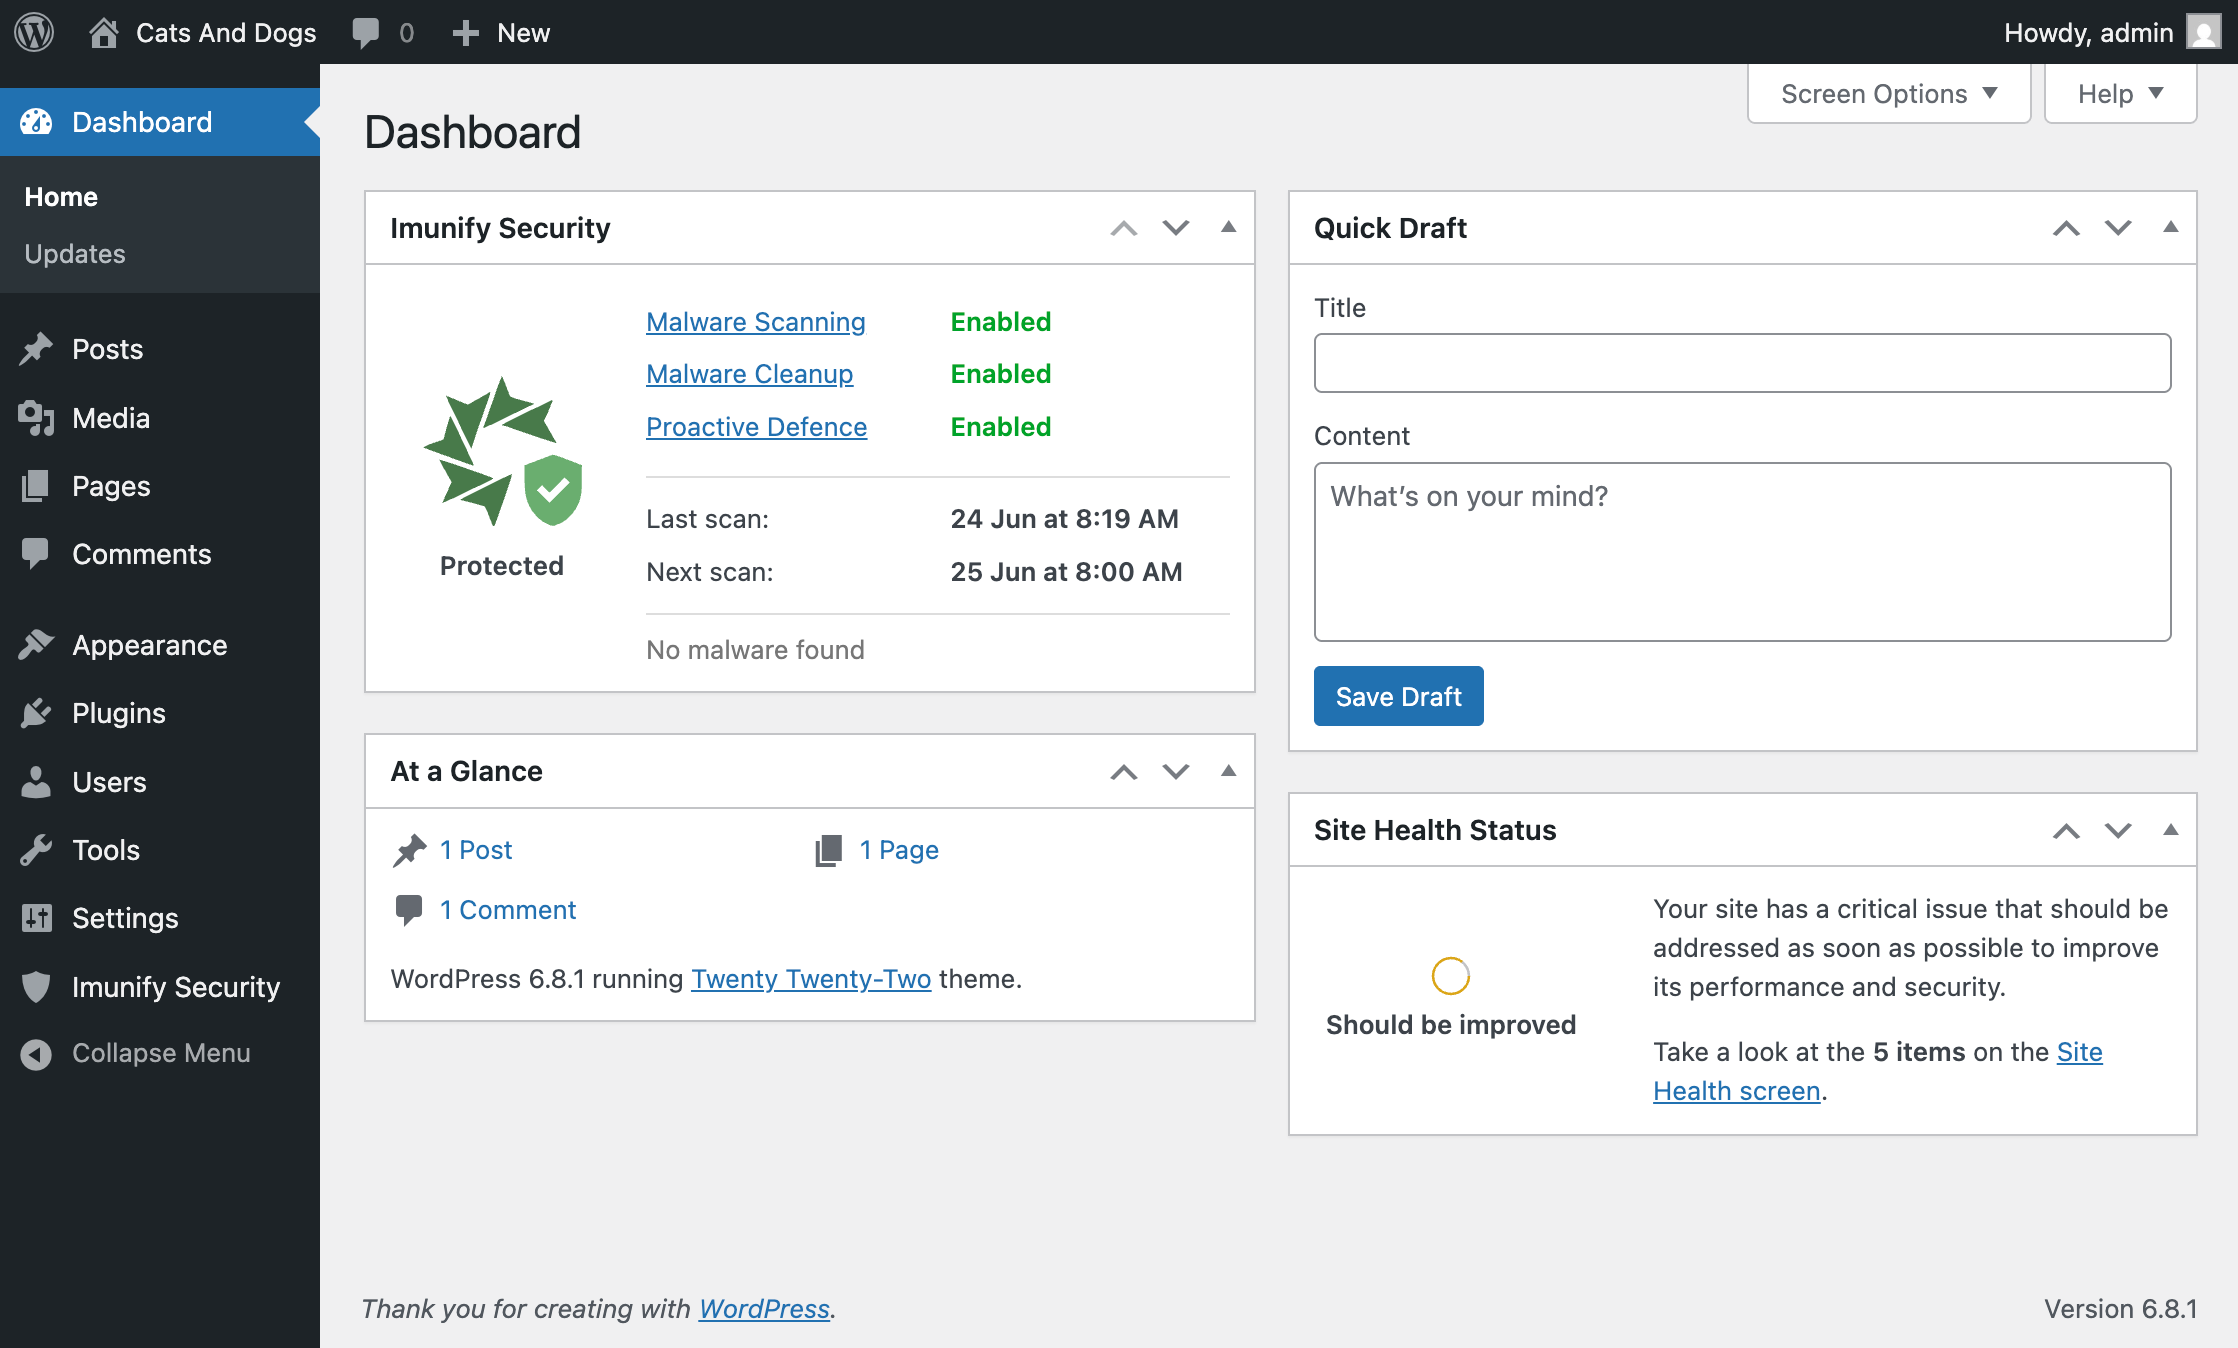 Widget - no malware found
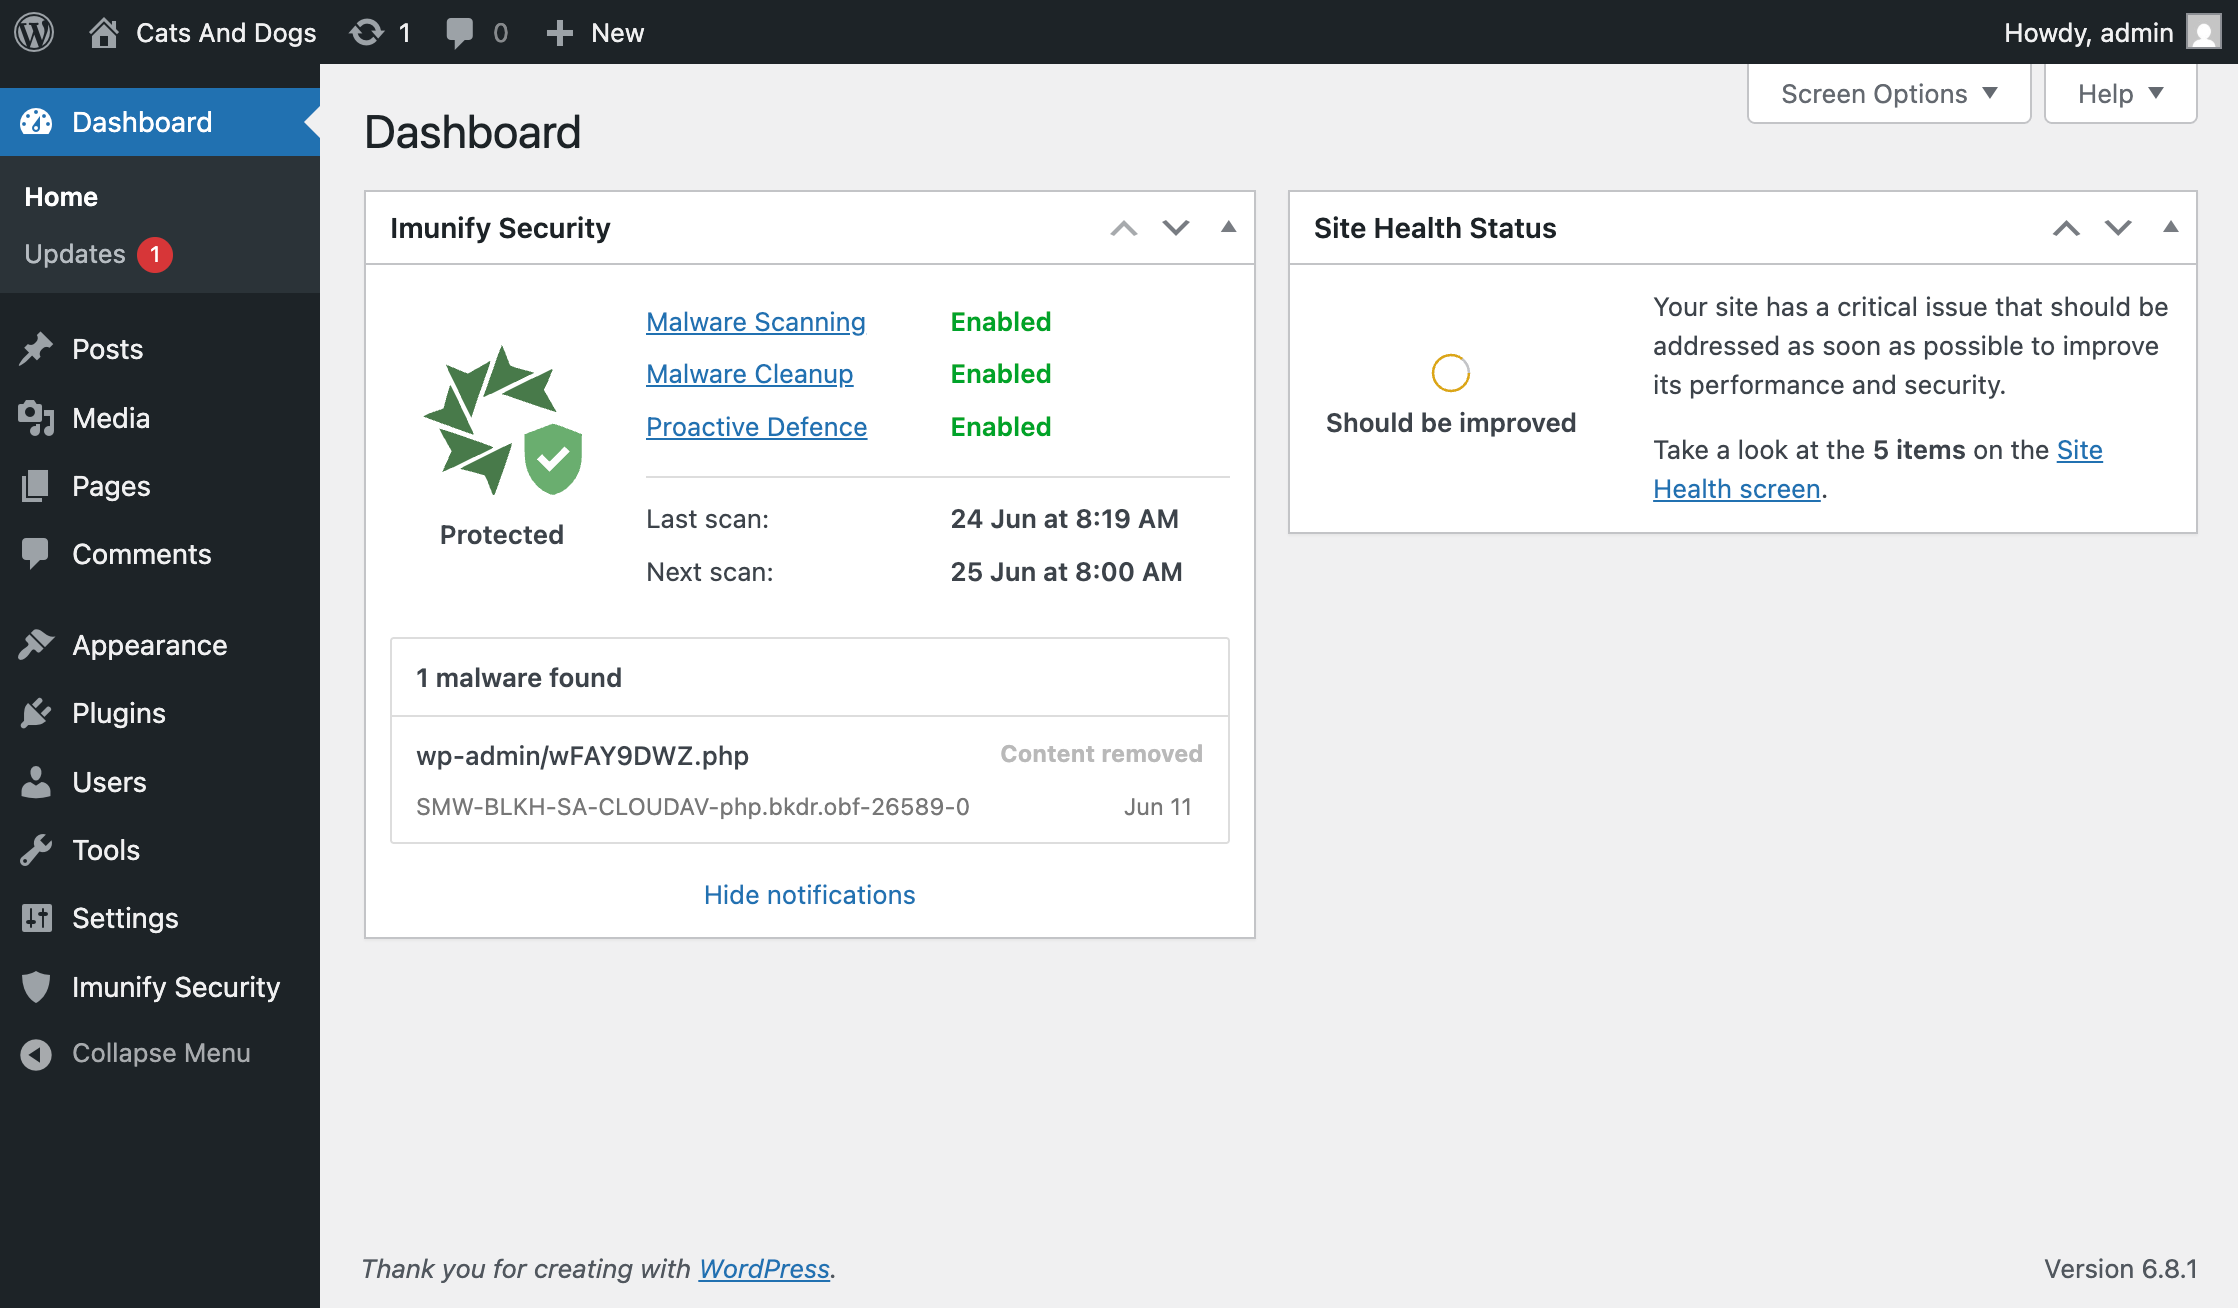 Widget - all malware cleaned
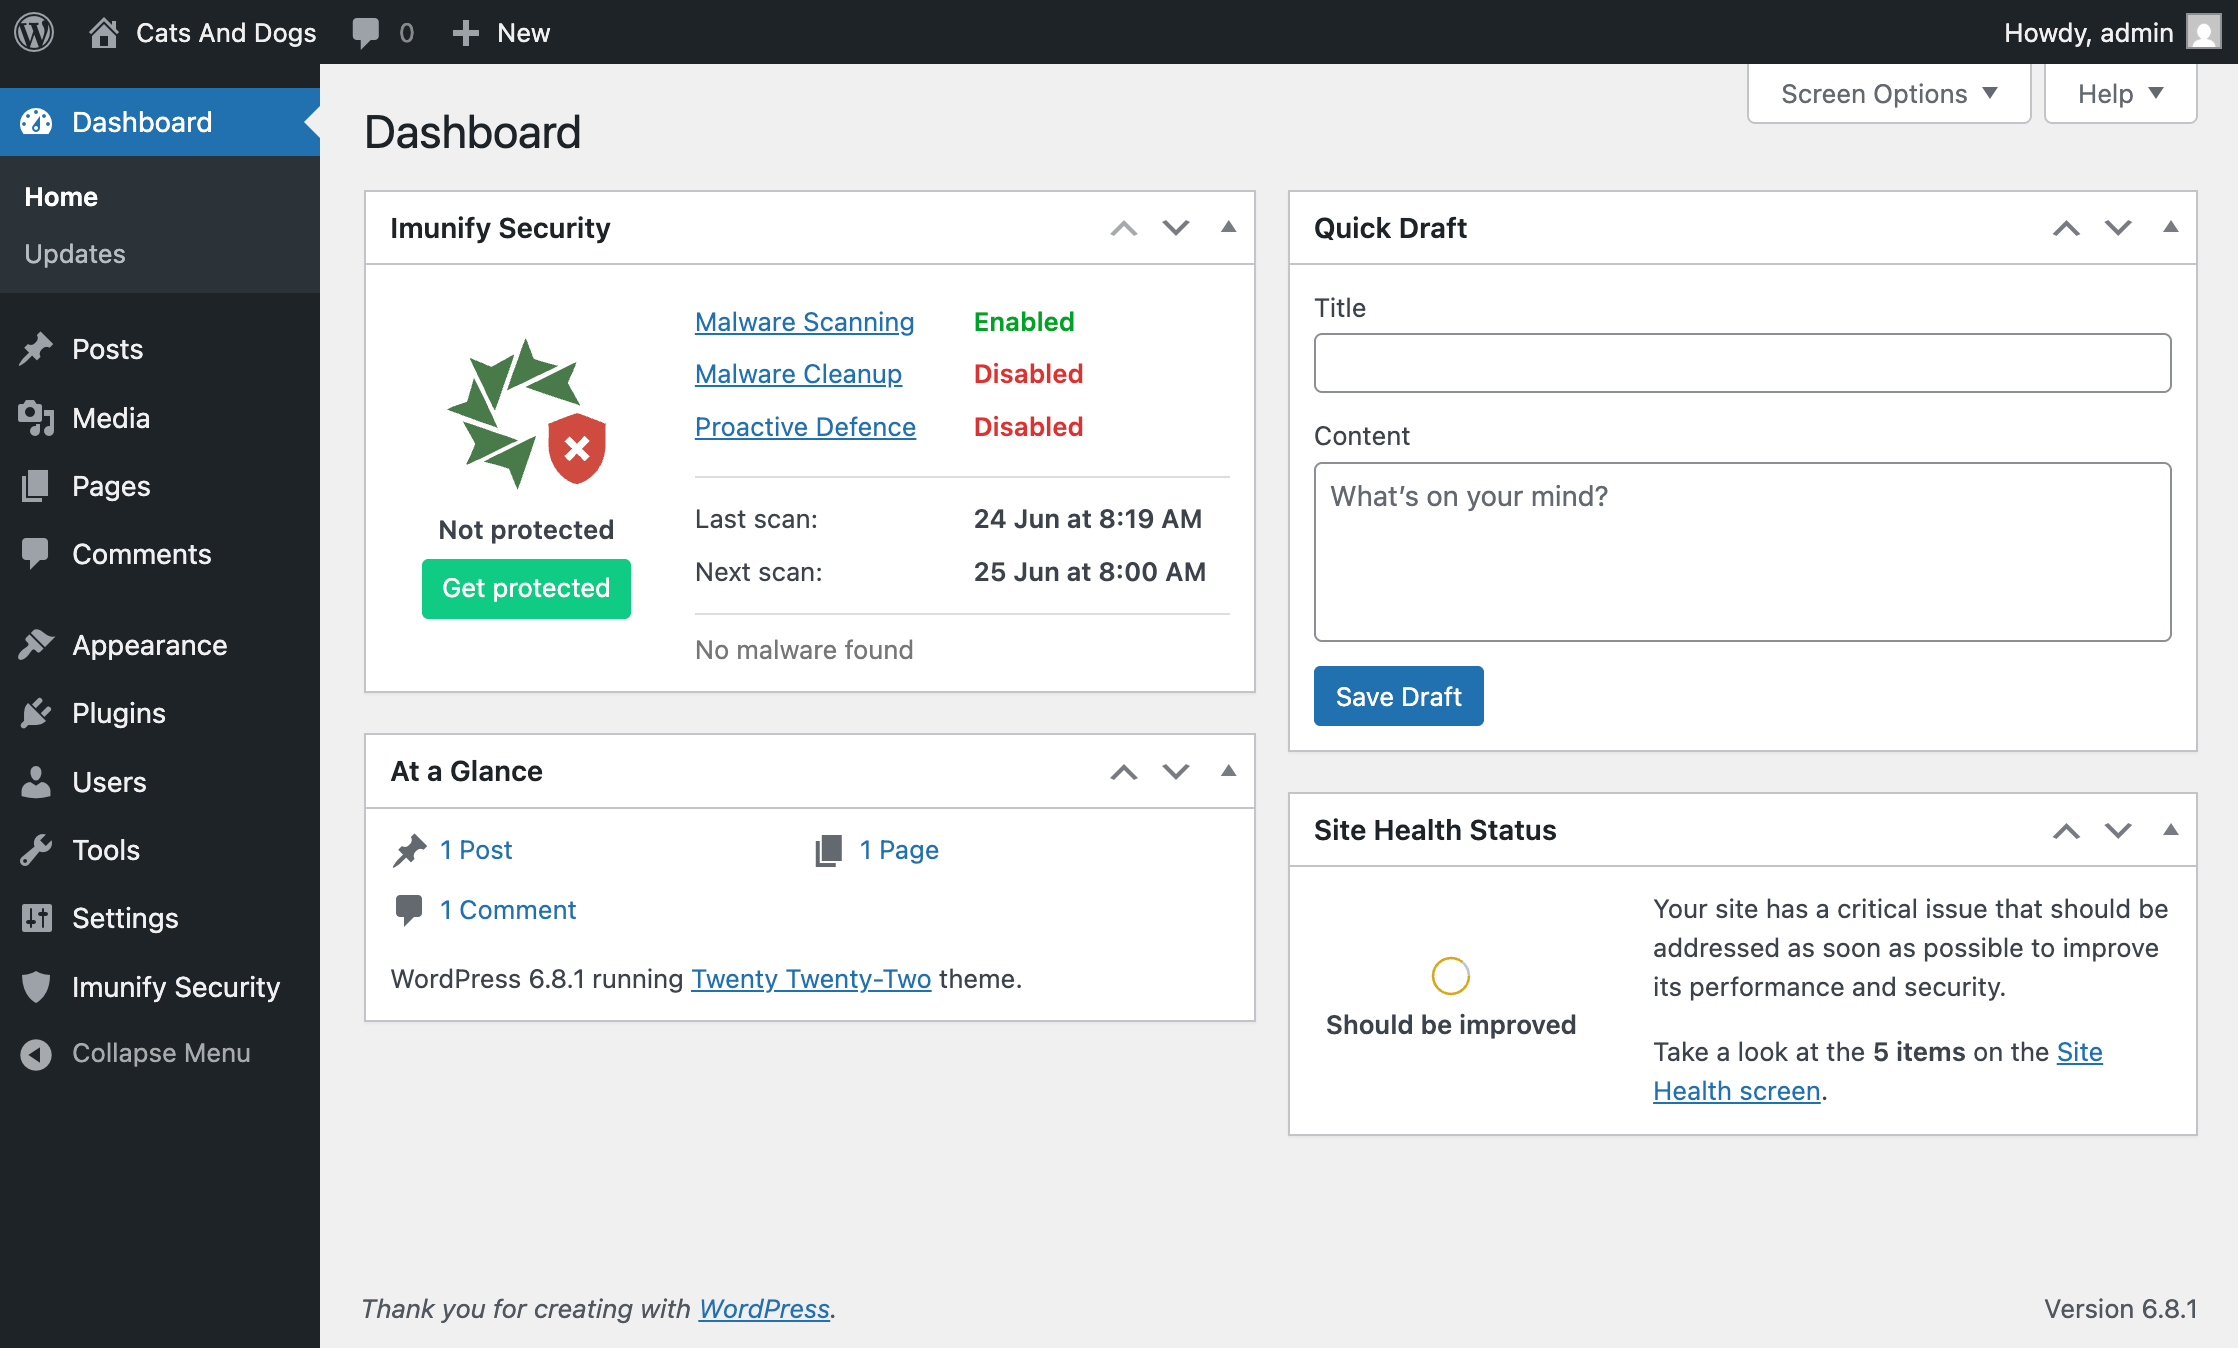 Widget - Imunify AV
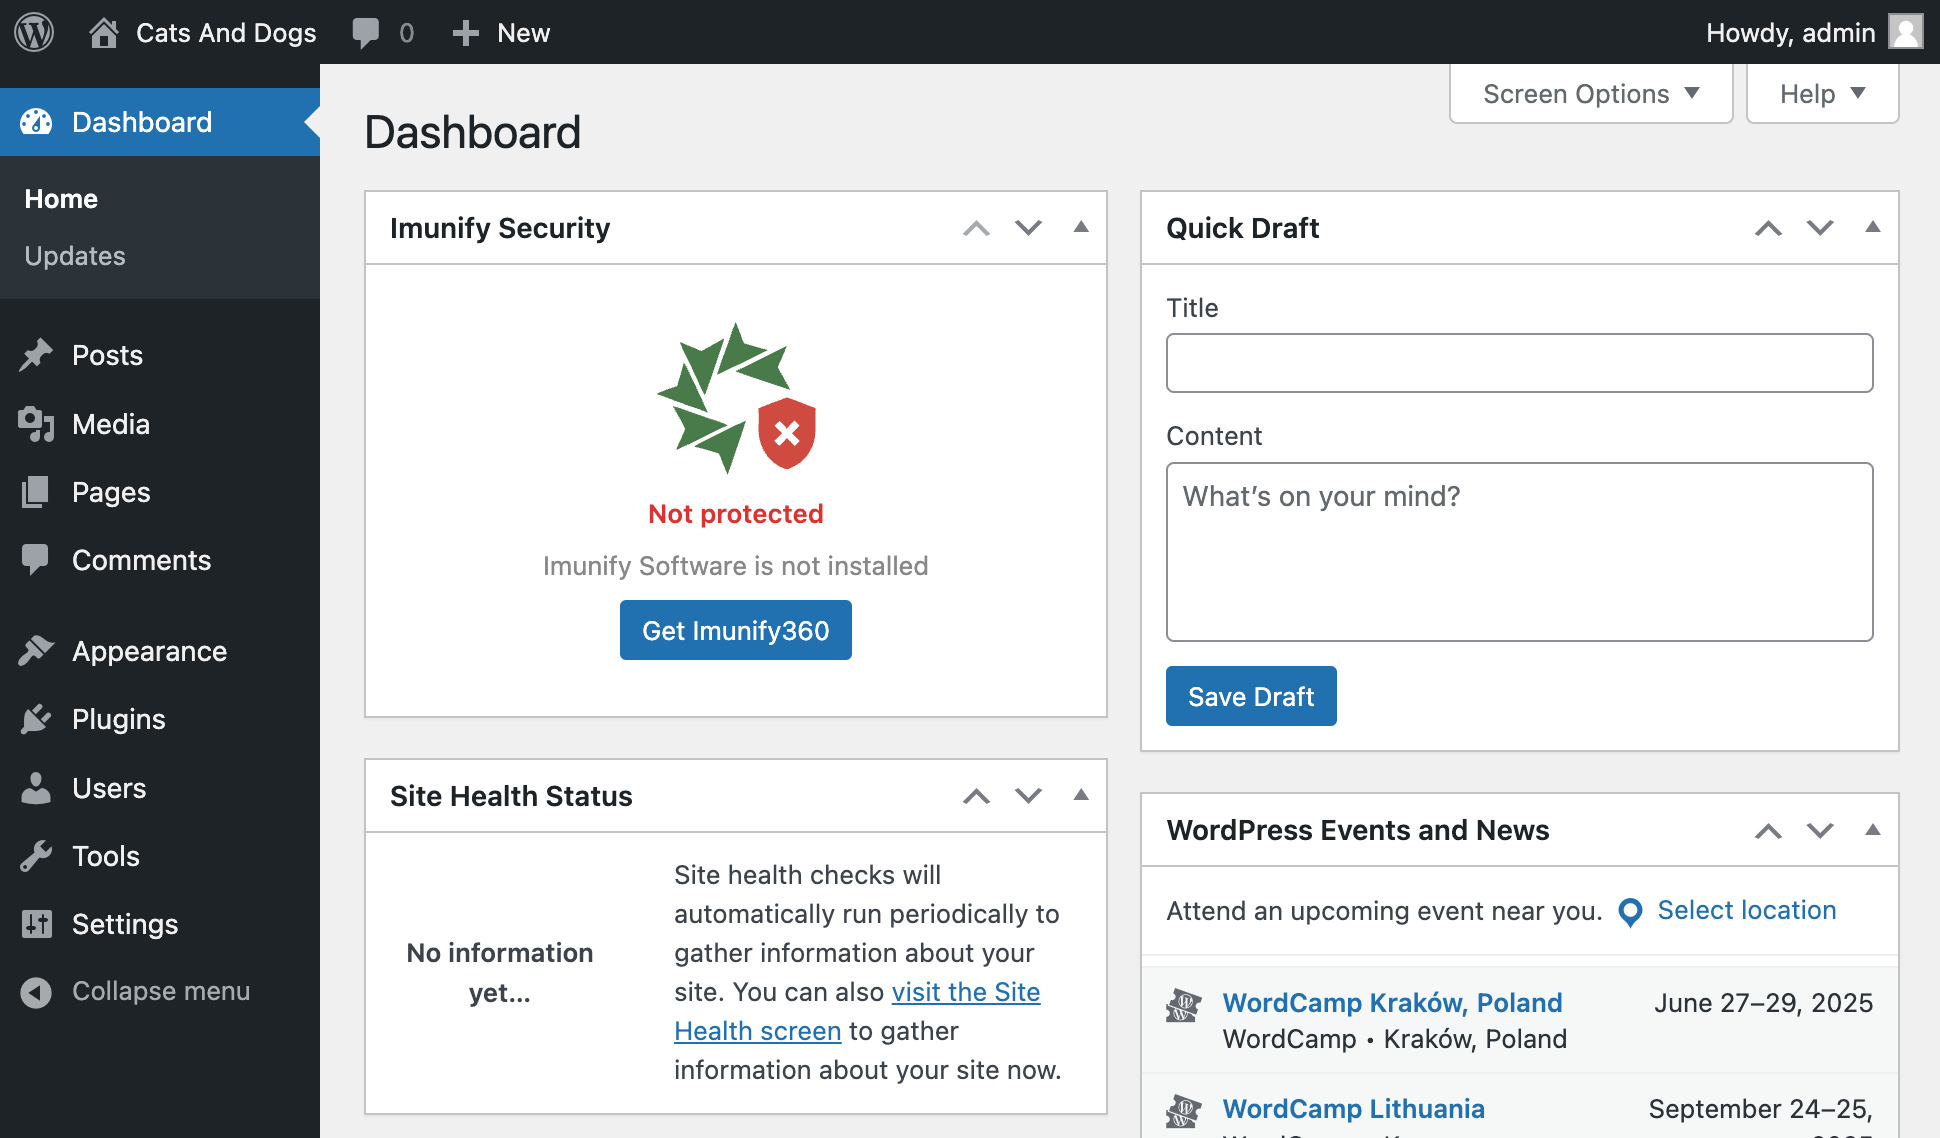 Widget - Imunify not installed
Notice
The plugin adds a notice to the WordPress admin dashboard for non-administrator users. This notice informs users about the security status of the website and provides a link to the Imunify360 dashboard for more information.
Plugin Page
The plugin provides a dedicated page within the WordPress admin area where you can view more granular details about your website's security. Here, you can:
- See an overview of your site's protection status
- Access scan results and malware details
- Find recommendations for improving your site's security
- For ImunifyAV users, see information about upgrading to Imunify360 for additional features
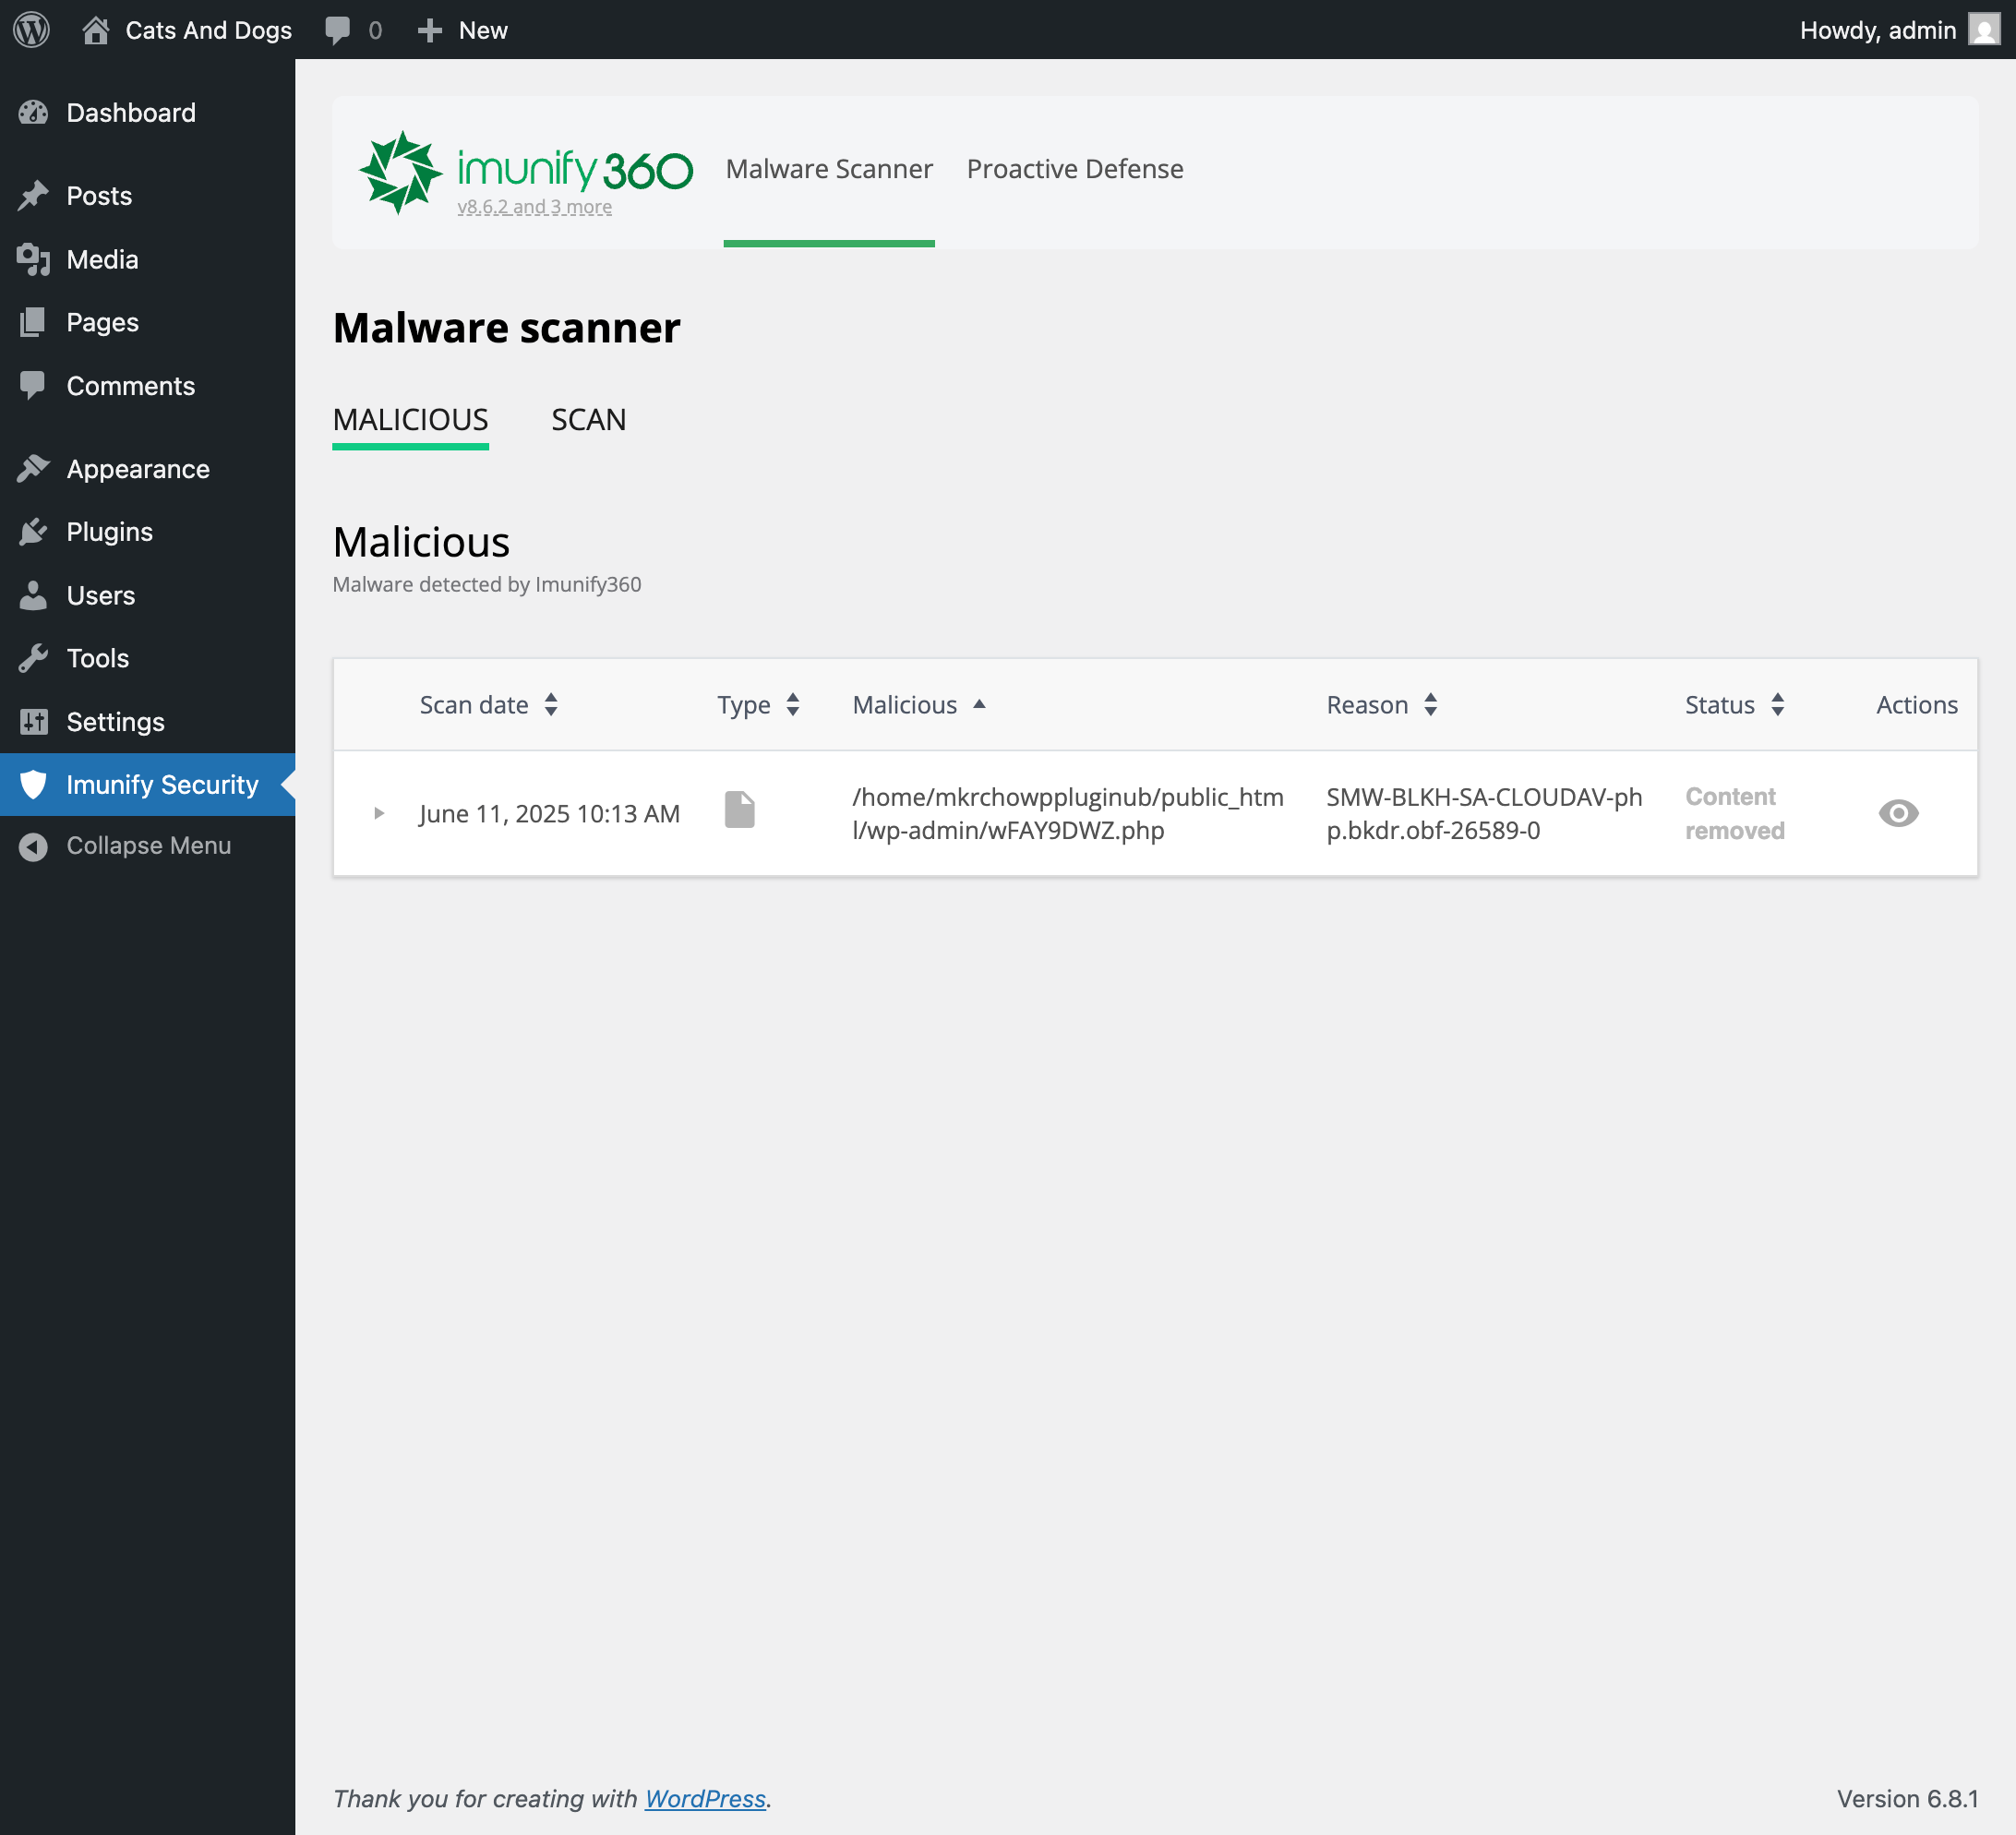 Malware Scanner tab on the plugin page: view and manage detected threats.
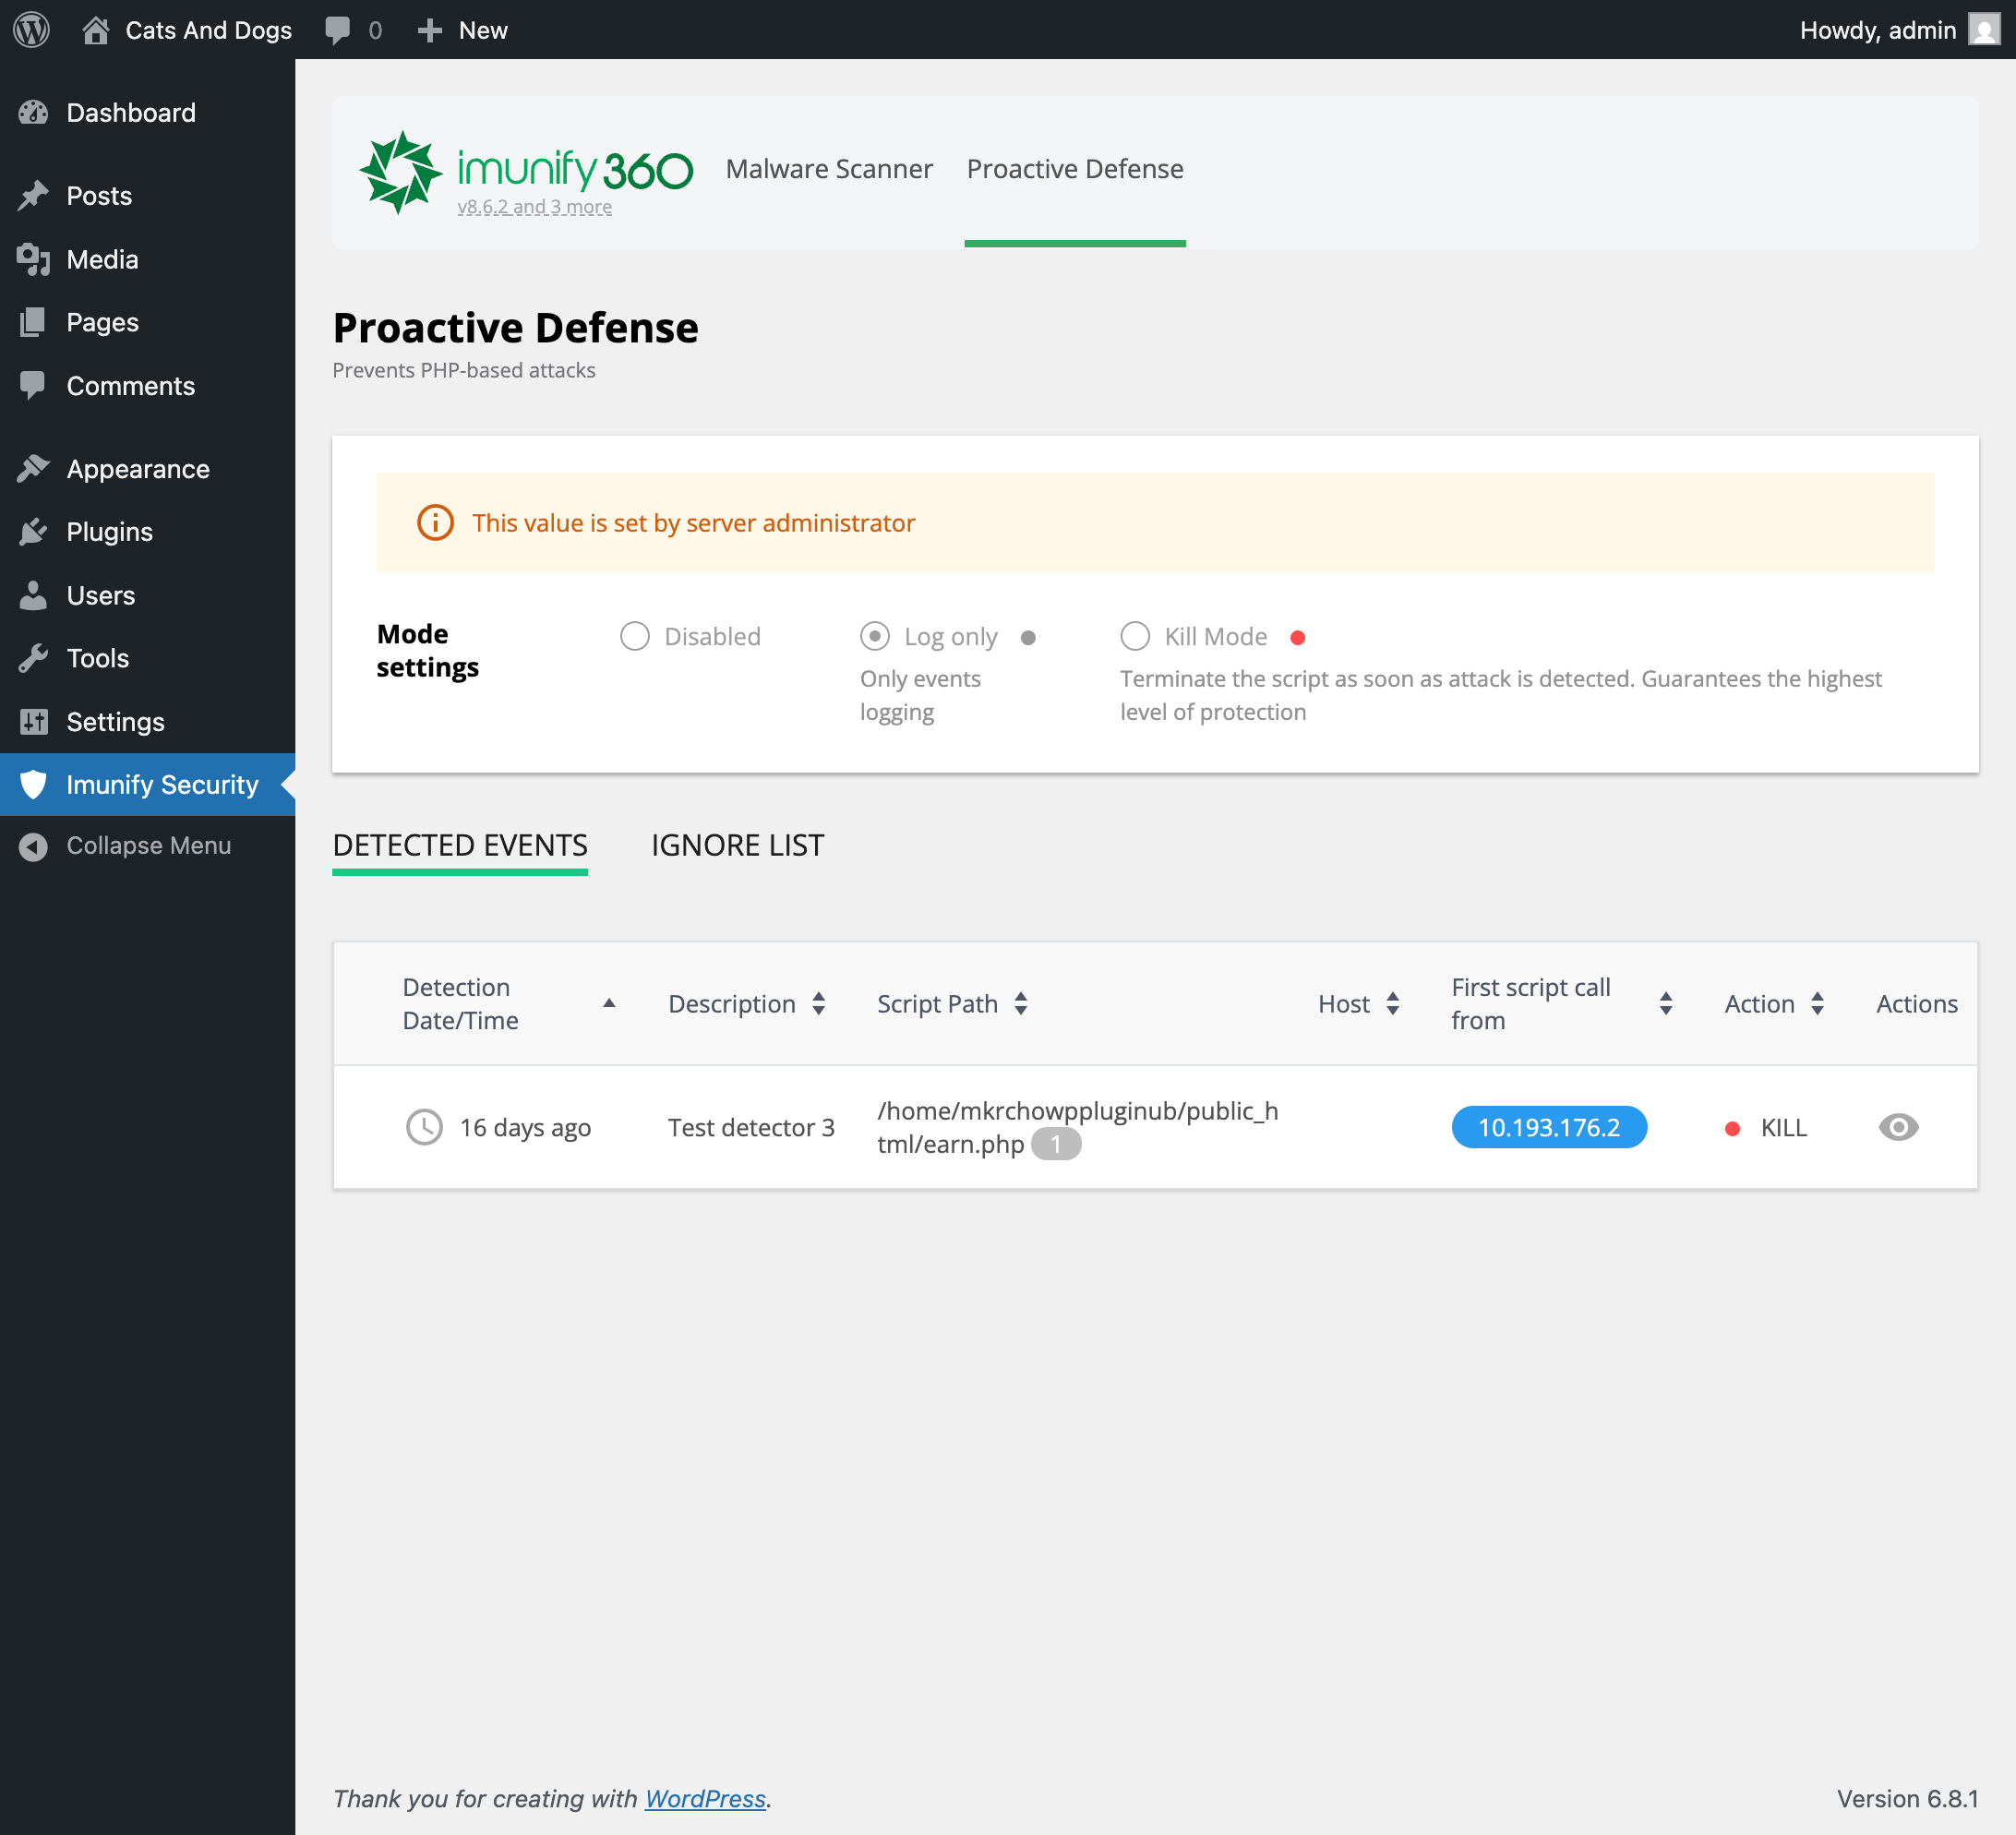 Proactive Defense tab: monitor and configure proactive protection.
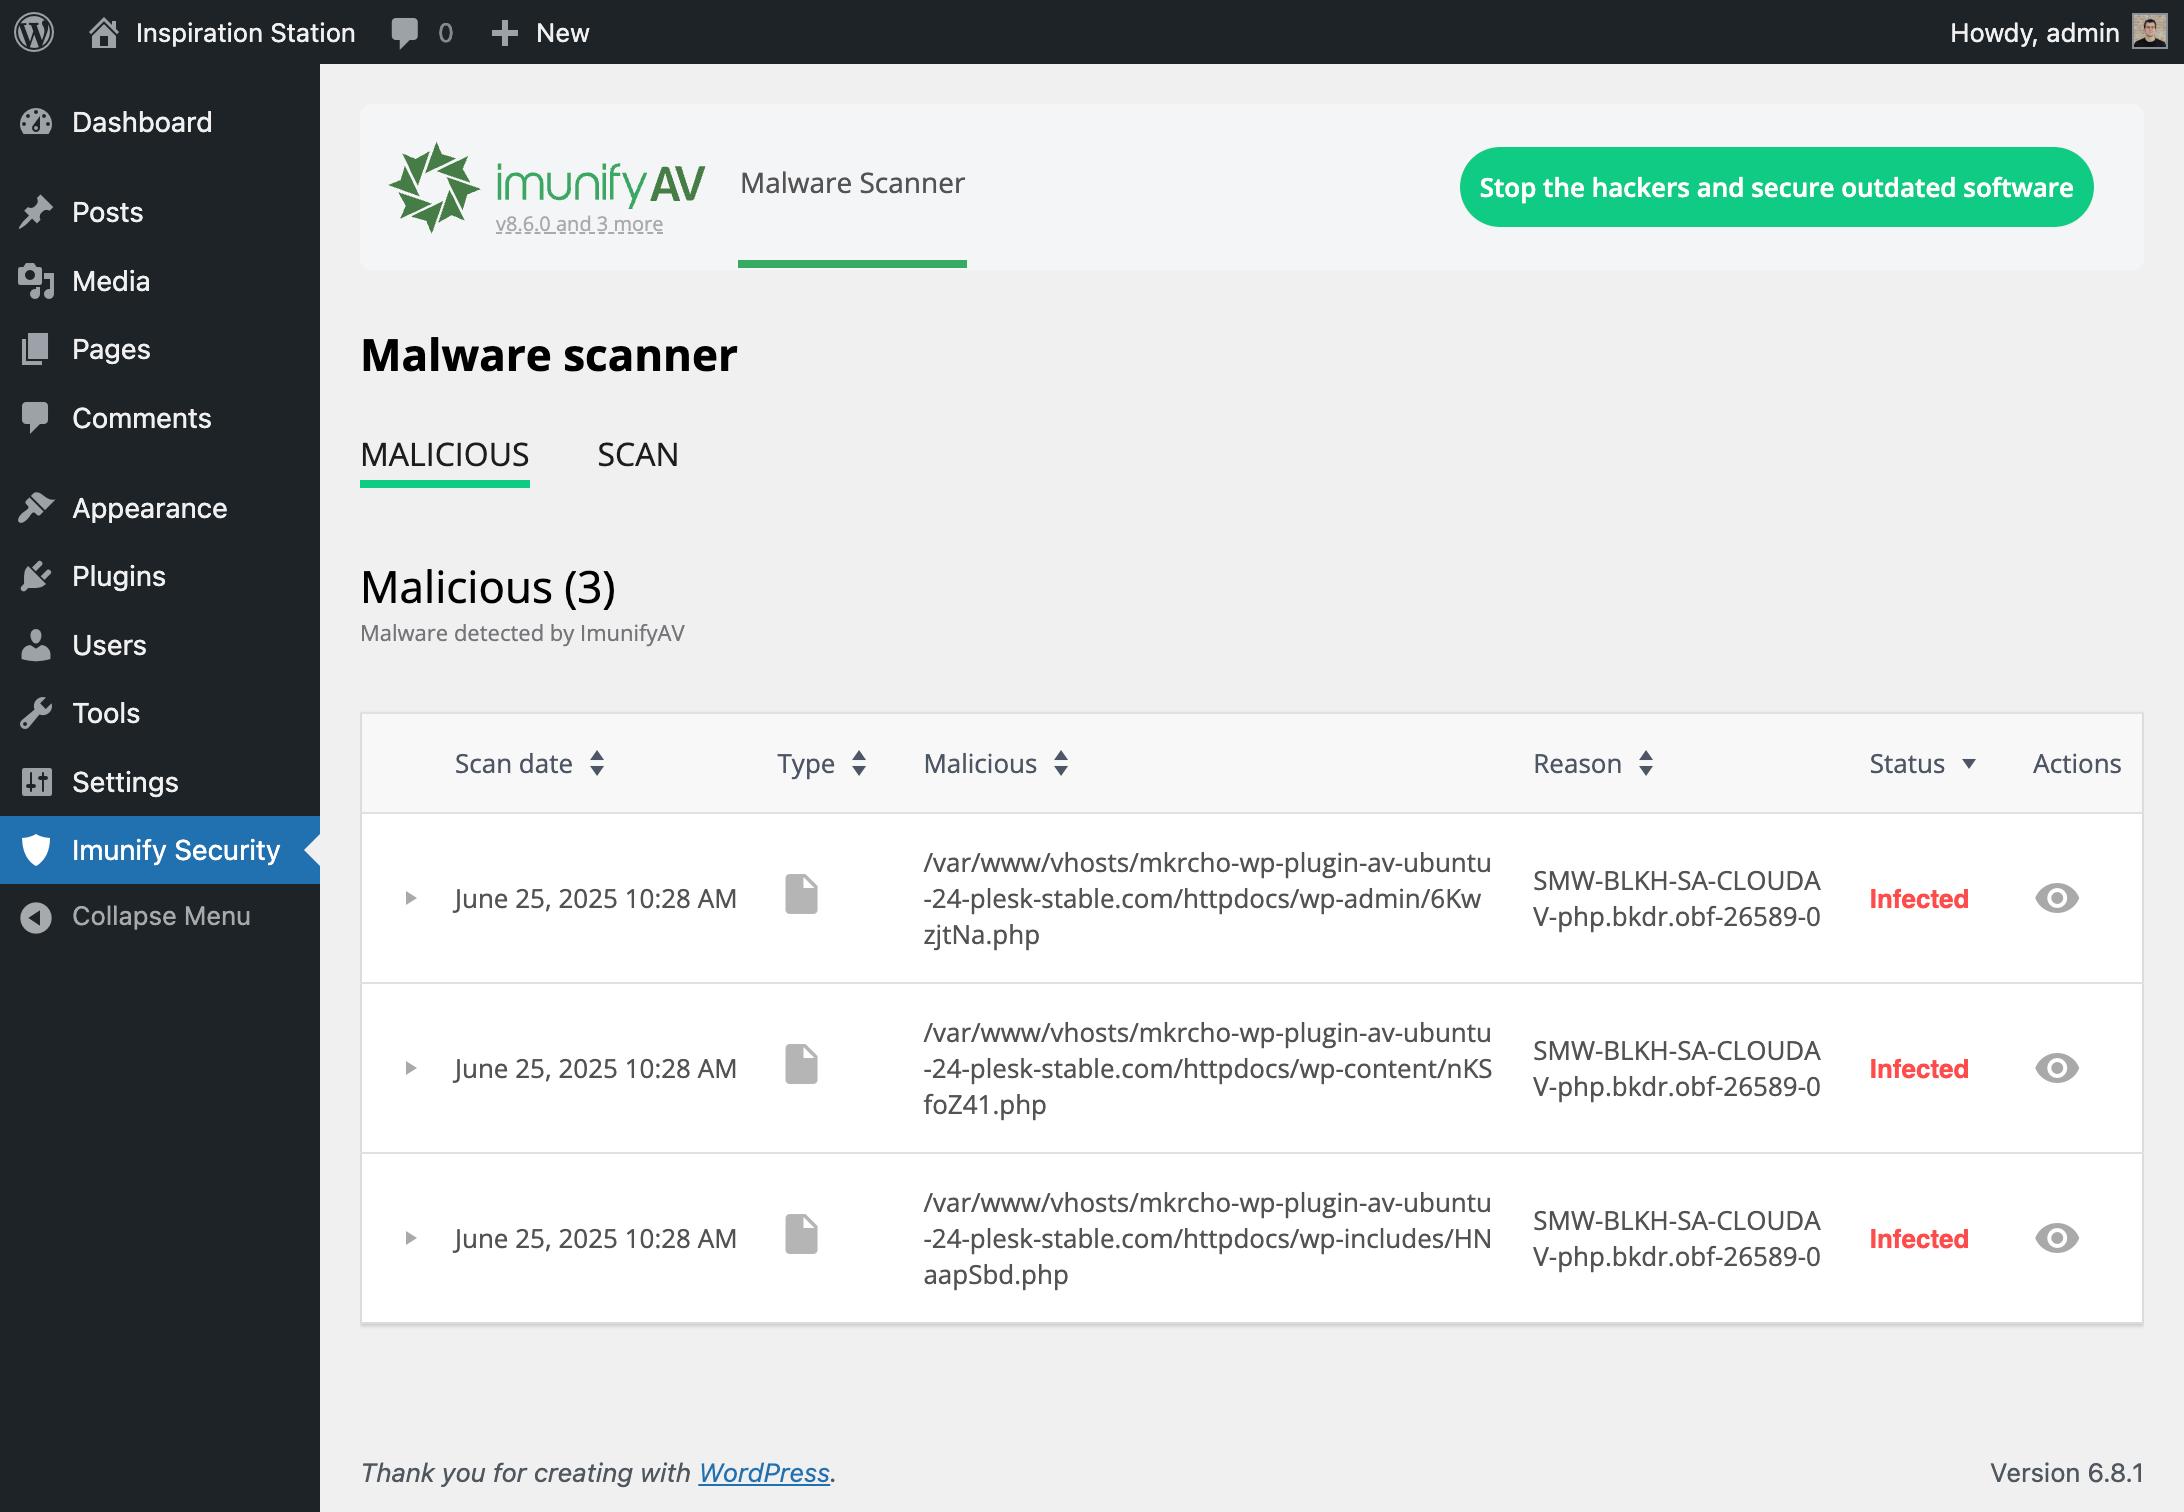 Malware Scanner as seen by ImunifyAV users.
Upgrade Prompt
ImunifyAV users are shown a limited interface and prompted to upgrade to Imunify360 for full protection and advanced features.
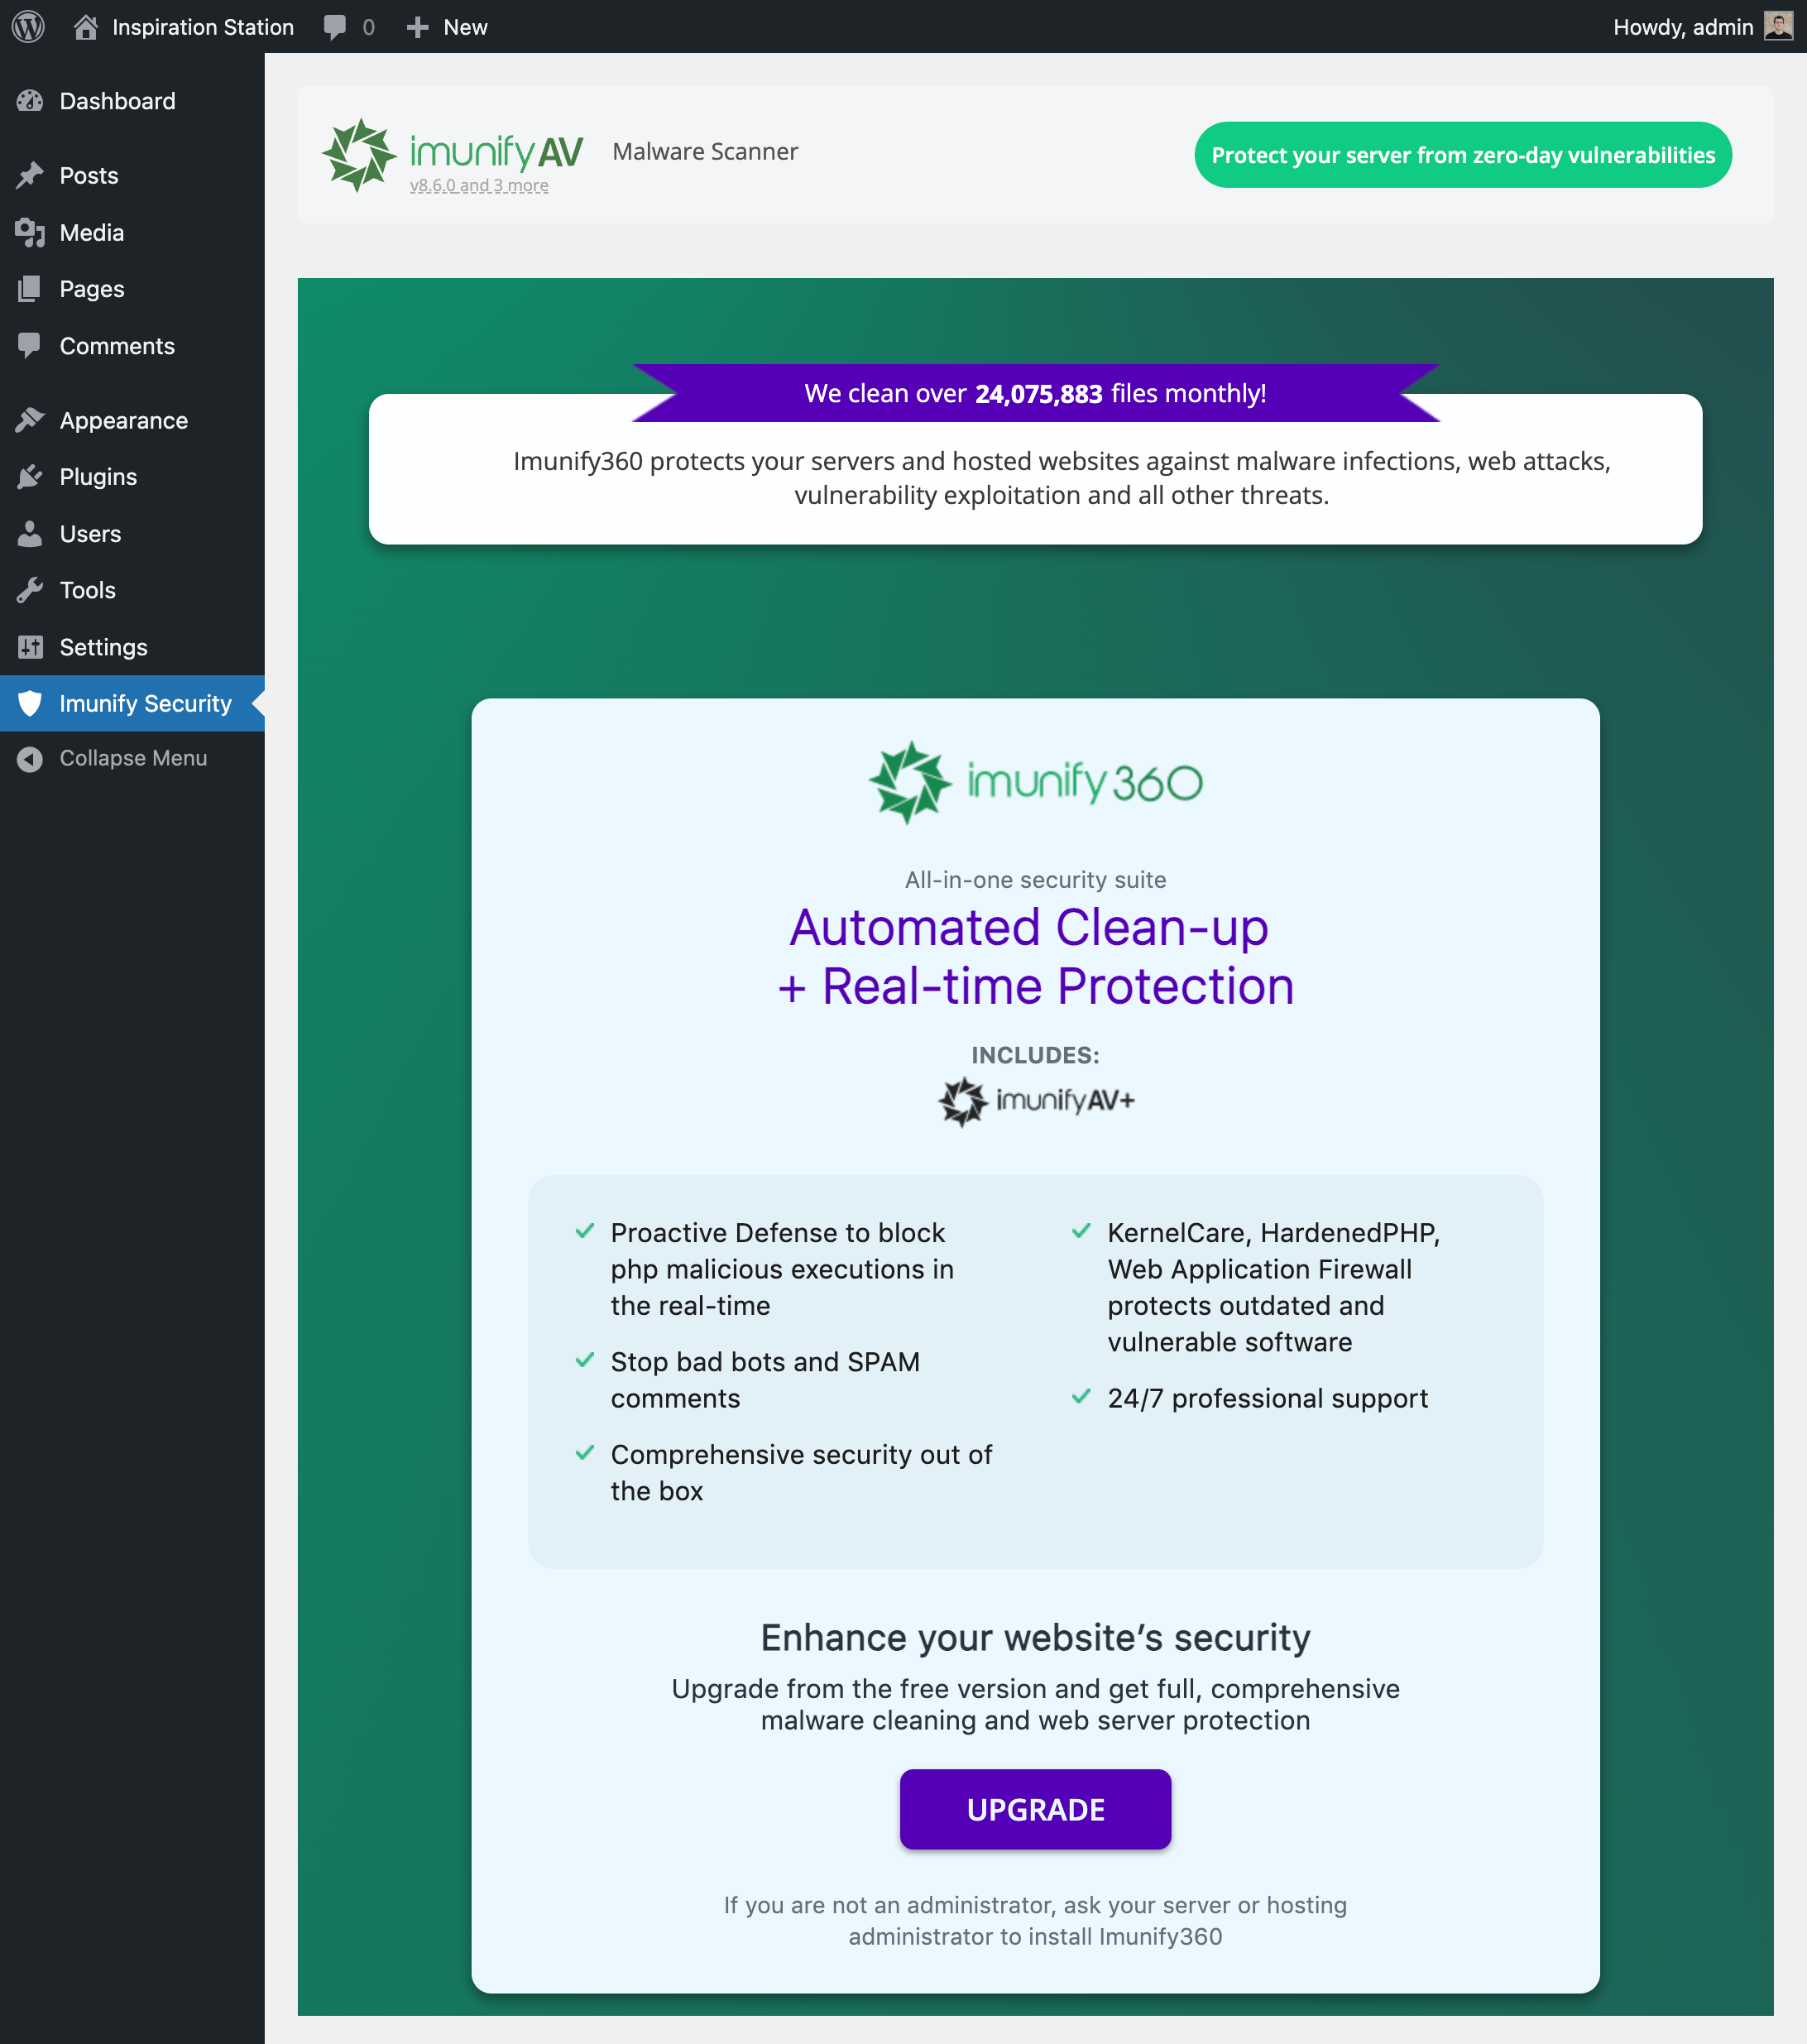 Upgrade prompt encouraging users to switch to Imunify360 for more features.
Web Application Firewall (Virtual Patching)
The Imunify Security plugin includes a Web Application Firewall (WAF) that provides virtual patching for WordPress. It protects your sites against known vulnerabilities (CVEs) in WordPress plugins, themes, and core — without modifying any of your site's files. When a plugin or theme you use has a known security flaw, the WAF blocks attempts to exploit it, giving you time to apply the real update.
Note
This WordPress WAF is a separate layer from the server-side WAF (ModSecurity) and from WordPress Account Brute-force Protection. It runs inside the WordPress plugin and focuses on blocking exploit attempts against vulnerable plugins and themes. In the Imunify control panel it is presented on the CMS WAF tab.
The feature needs a recent version of the plugin and of the Imunify software on the server. Your hosting provider manages both — see Requirements.
How it works
The Imunify agent regularly delivers an up-to-date set of virtual patches to each protected WordPress site. On every request, the plugin checks whether the request matches a rule for a component (plugin, theme, or core) that is actually installed on the site, and acts before the vulnerable code can run:
- In Imunify360, matching requests are blocked with an HTTP 403 response.
- In ImunifyAV and ImunifyAV+, matching requests are logged only — see Protection modes.
Every match is recorded as an incident. Because rules are matched only against the versions actually installed, protection adapts automatically as you install, update, or remove plugins and themes.
Protection modes: Enabled vs Monitoring
The WAF works in one of two modes depending on your Imunify product. There is no manual switch — the mode follows the product:
| Product | Mode | Status shown | Behavior |
|---|---|---|---|
| Imunify360 | Active protection | Enabled | Exploit attempts are blocked (HTTP 403). |
| ImunifyAV / ImunifyAV+ | Monitoring | Monitoring | Exploit attempts are logged but not blocked. |
In monitoring mode, the widget shows the message "Attacks are logged but not blocked. Upgrade to Imunify360 to enable full WAF protection." with an Upgrade now link.
In the WordPress dashboard widget
The Imunify Security dashboard widget includes a Web Application Firewall row showing the current status (Enabled or Monitoring) and the number of recent incidents. Below it, a Latest incidents (7 days) table lists the most recent detections, together with the current ruleset version:
- Date — when the incident occurred
- Component — the vulnerable plugin, theme, or core
- CVE — the vulnerability the rule addresses
- Severity — severity of the rule
- Count — how many times it was triggered
Use Show more results to open the full incident list on the CMS WAF tab.
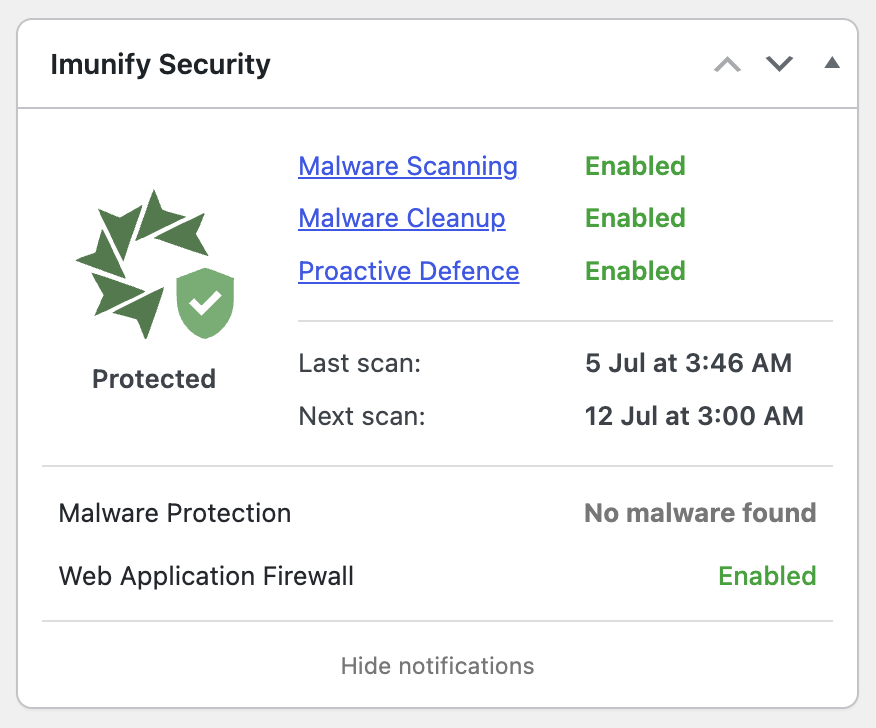
The Web Application Firewall row in the dashboard widget, showing Enabled with no recent detections (Imunify360).
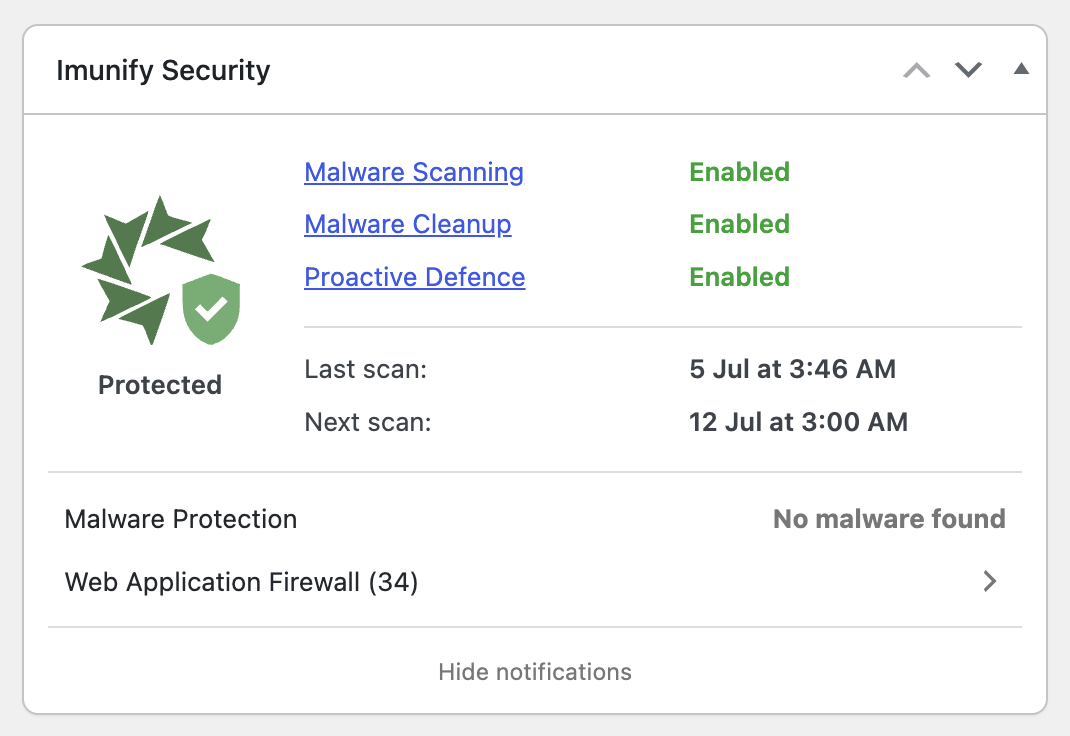
When there are recent detections, the row shows the incident count (here, 34); expand it to see the Latest incidents (7 days) list.
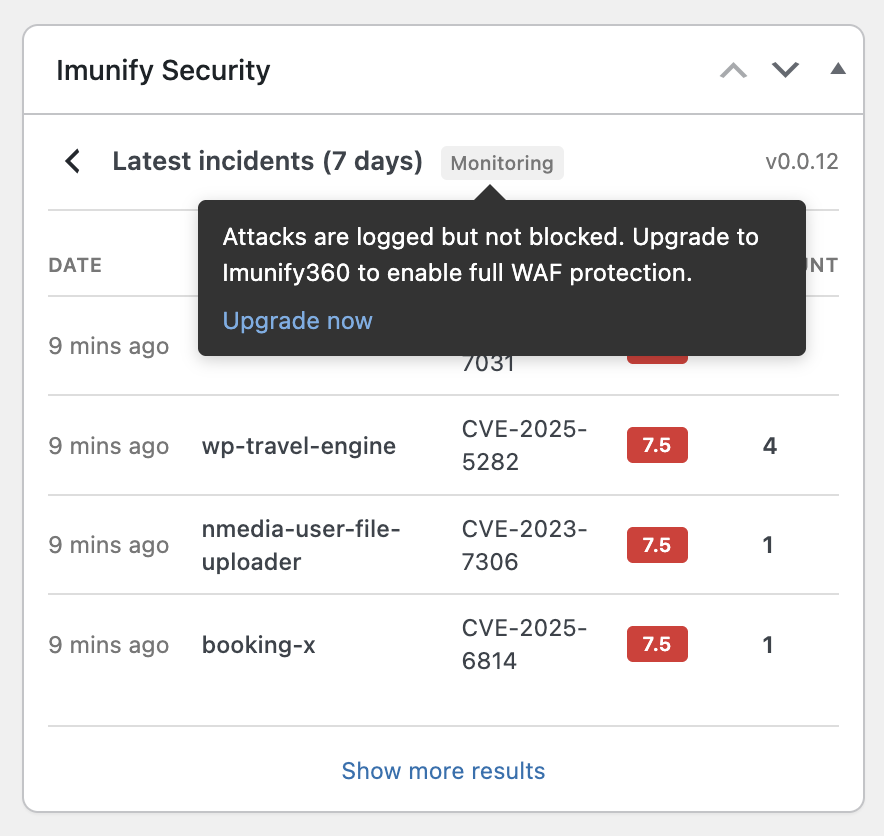
In ImunifyAV and ImunifyAV+, the WAF runs in Monitoring mode with a prompt to upgrade.
Managing WAF incidents
Open the Imunify Security page from the WordPress admin menu to review WAF activity and manage rules. Everything on this page applies to the site you are currently in.
Incidents
The Incidents tab lists every request the WAF acted on:
| Column | Description |
|---|---|
| Date | When the incident occurred (newest first by default). |
| IP | Source IP address. Click it to filter the list by that IP. |
| Country | Country the IP resolves to. |
| Count | How many times the incident repeated. |
| Severity | Severity of the matched rule (0–3 low, 4–6 medium, 7–10 high). |
| Rule | The rule that matched. When it references a CVE, it links to the CVE record. |
You can filter incidents by date range, or search by rule, description, or IP. Click a row to expand it and see the Sensor, Rule, and Abuser (source IP) details.
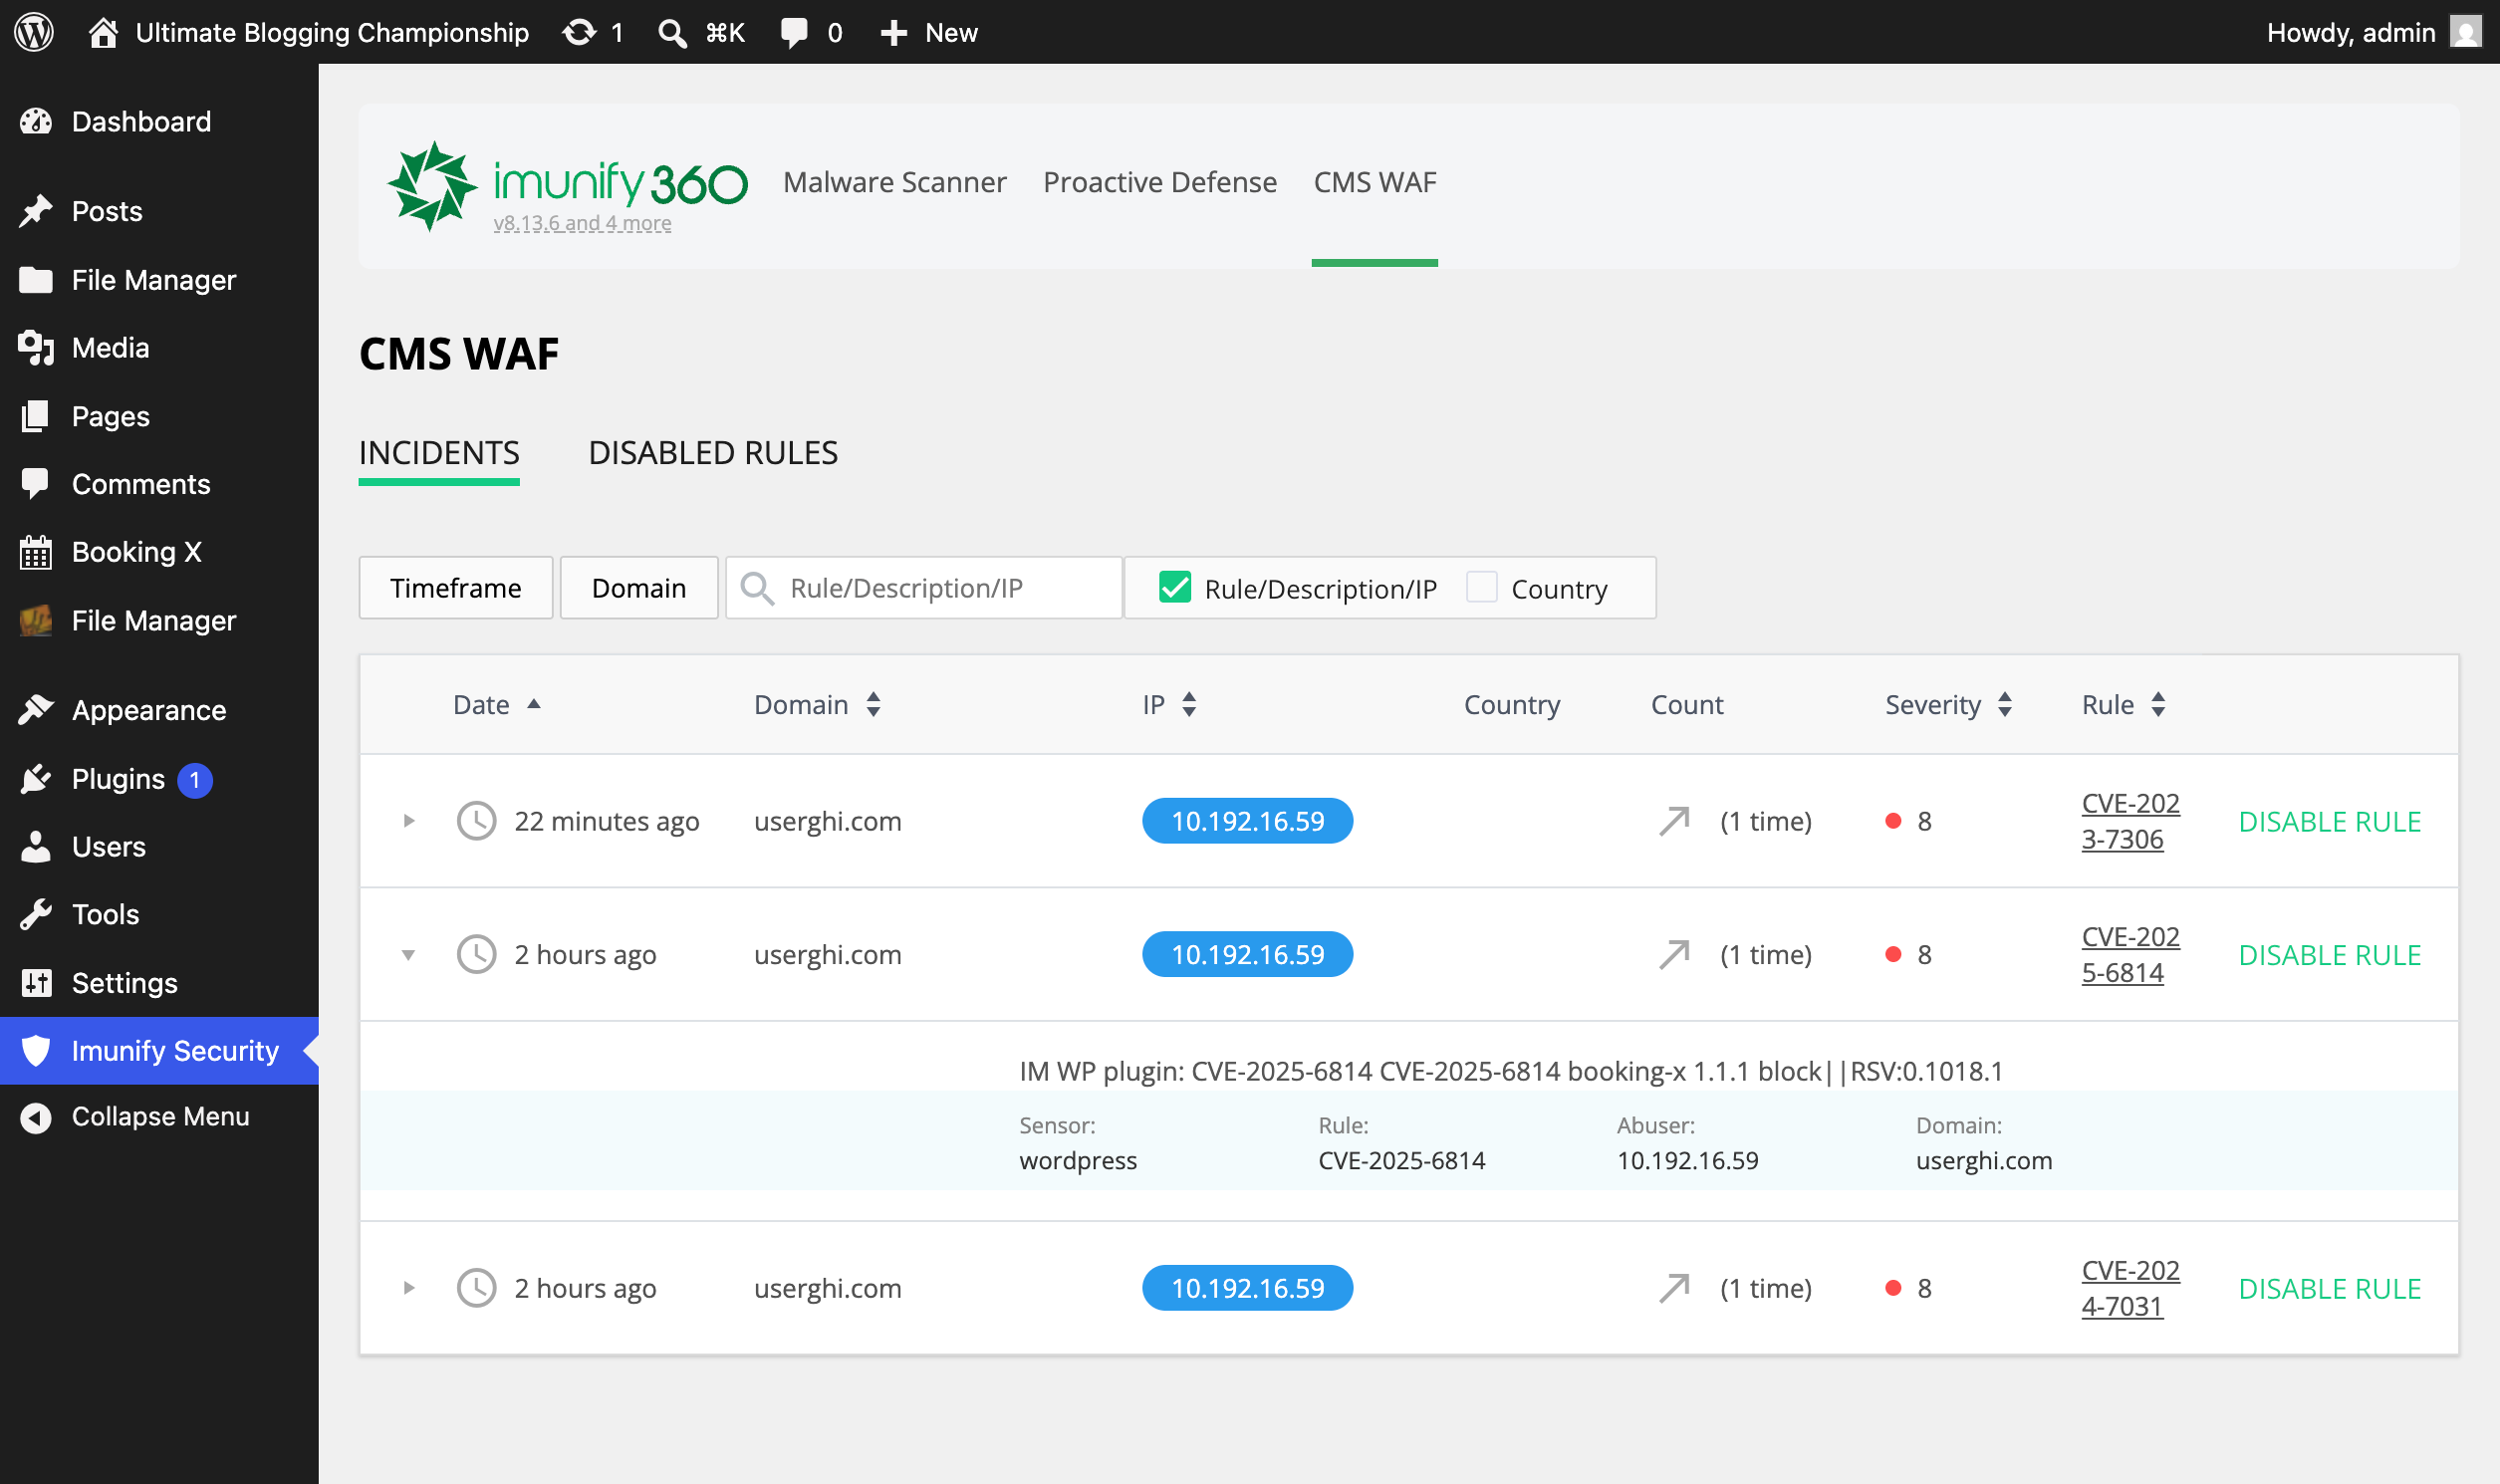 The Incidents tab.
Disabling a rule
If a WAF rule interferes with legitimate traffic, you can disable it. On the Incidents tab, click Disable rule for the incident, then click Yes, disable to confirm. The rule is turned off for your site. The change may take a few minutes to take effect.
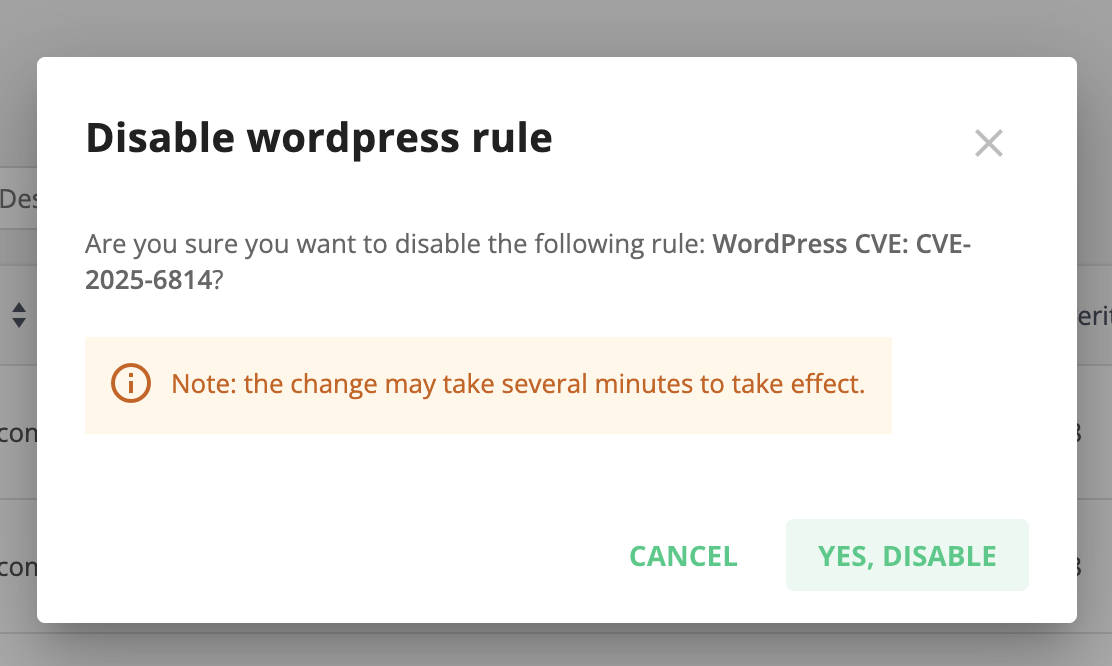
Confirming that a WAF rule should be disabled.
Disabled Rules
The Disabled Rules tab lists the rules you have turned off, showing the affected Component, Version, and Rule. To turn a rule back on, click Enable and confirm.
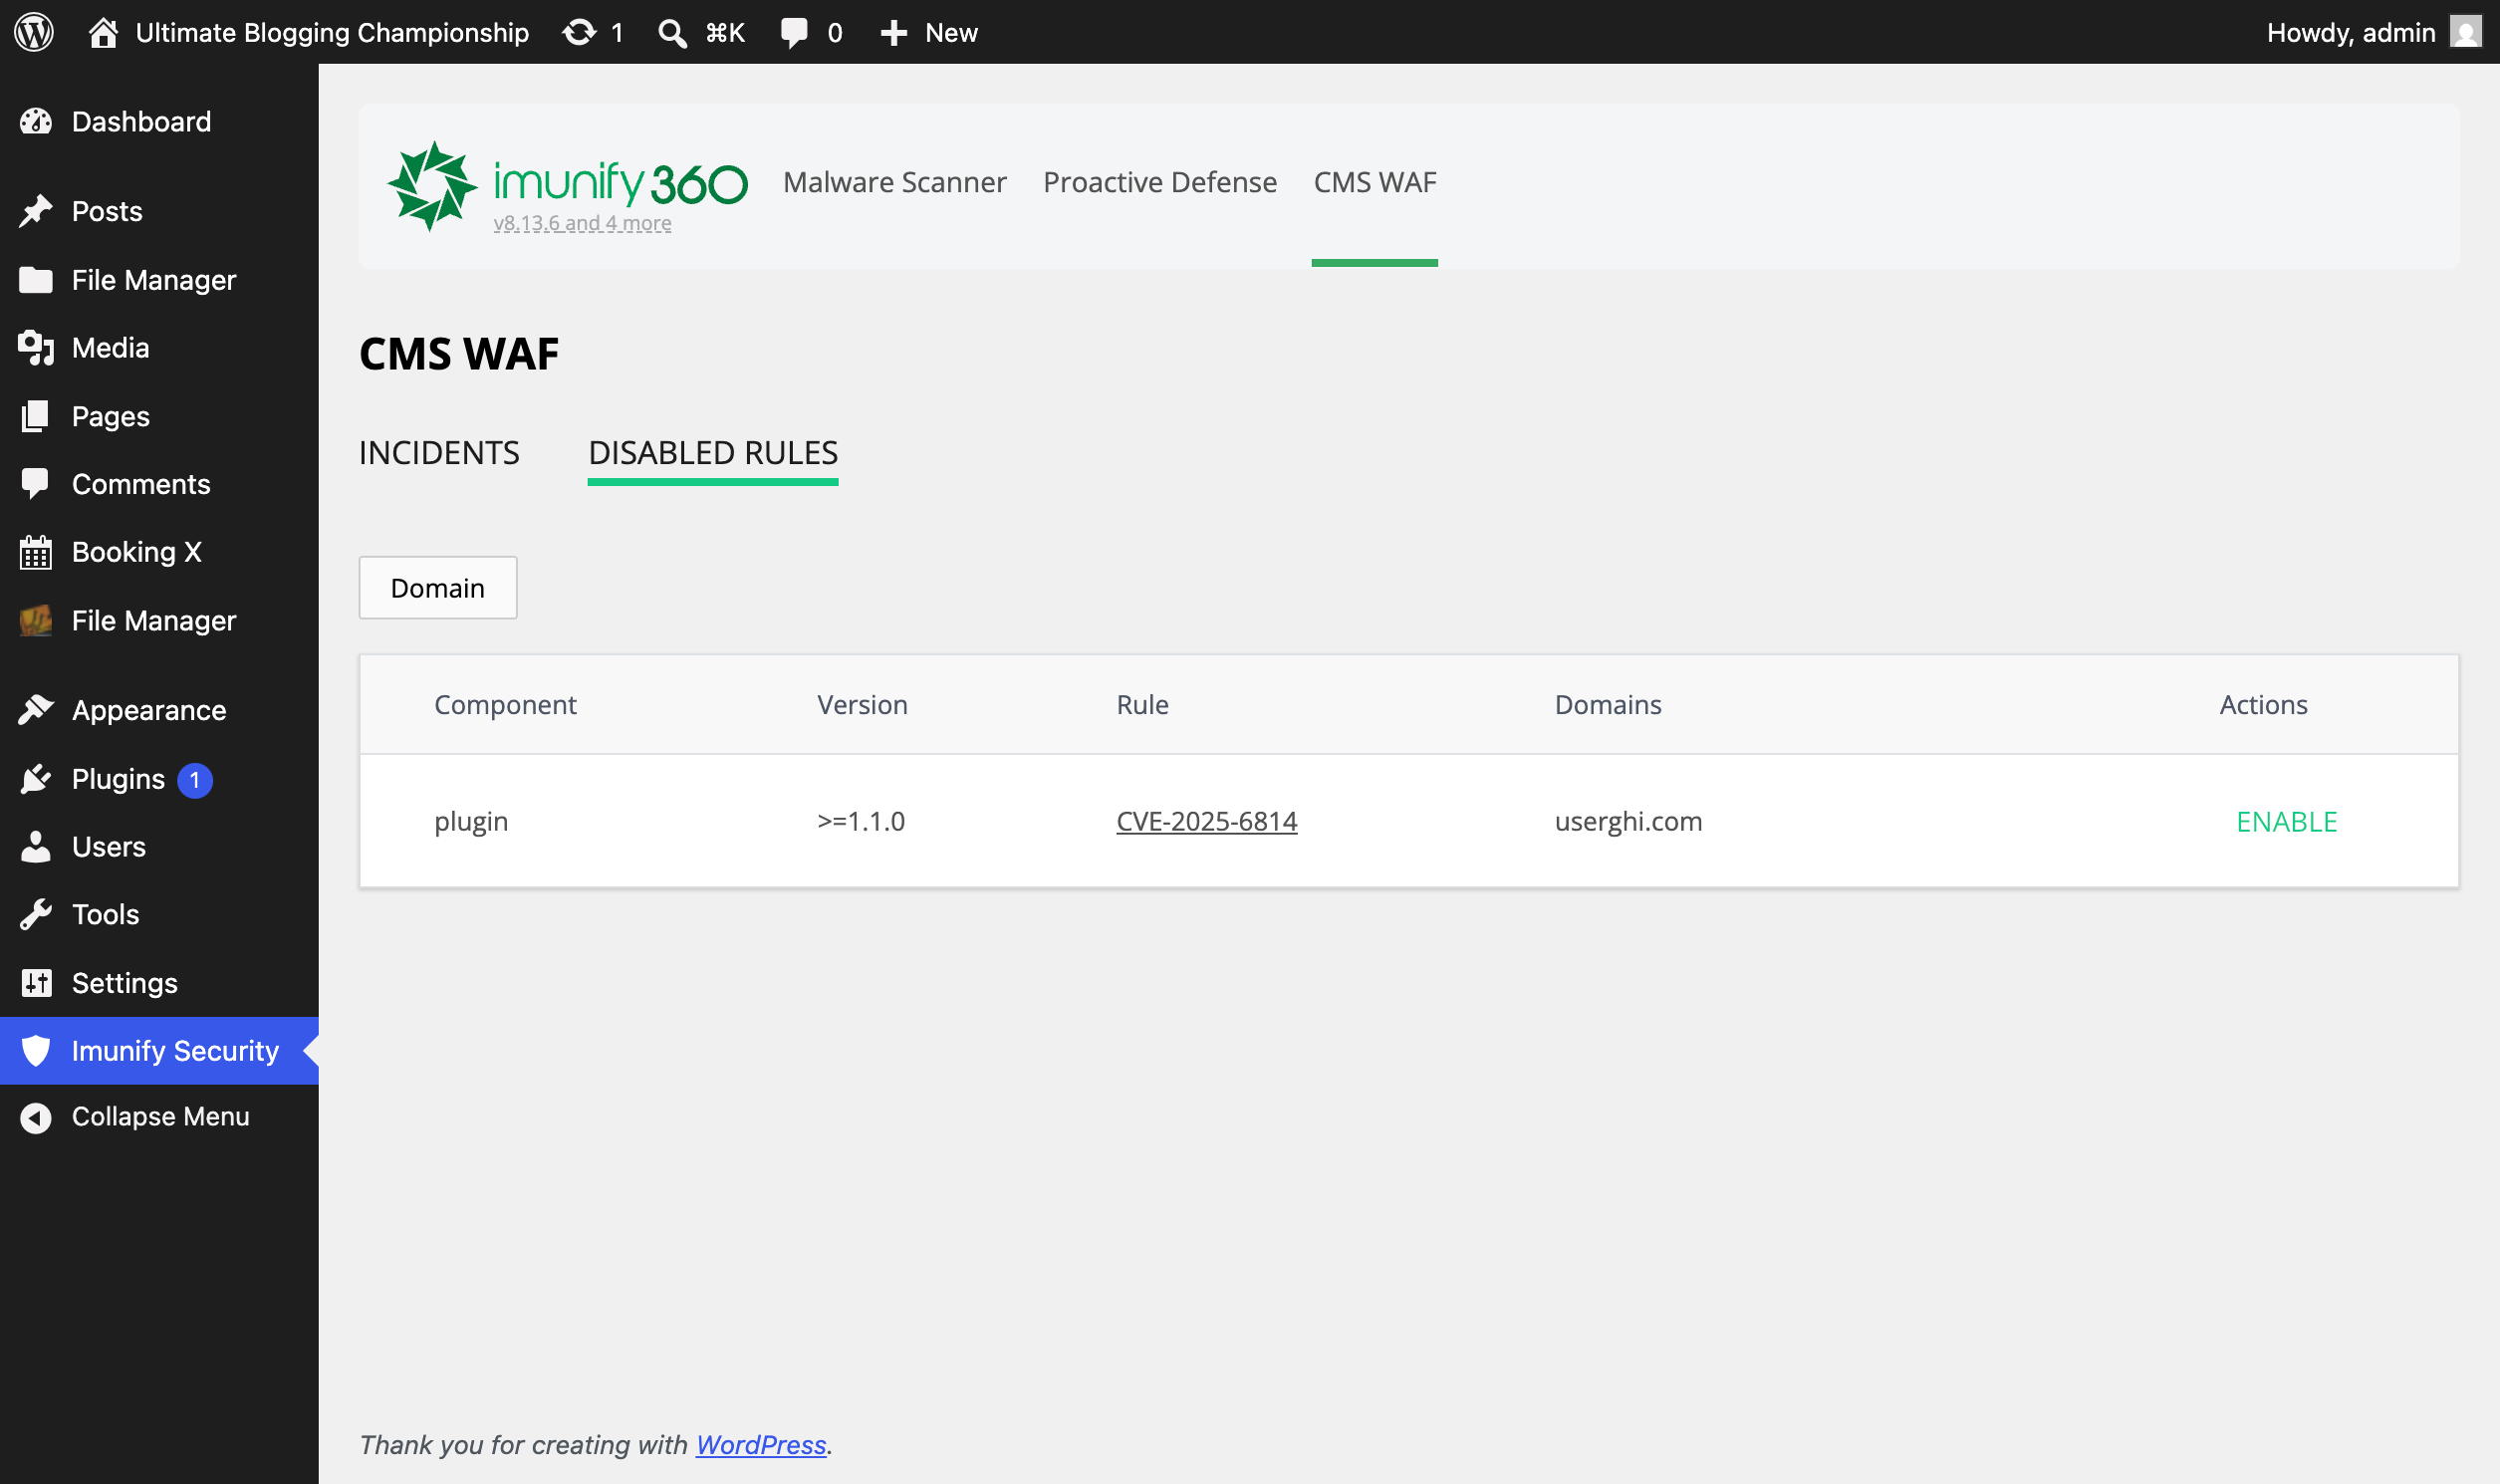 Re-enabling a previously disabled rule.
Turning the WAF on or off
Your hosting provider decides whether the WAF runs on the server, and can turn it on or off for individual hosting accounts. If you need it changed for your site, contact your provider. See Web Application Firewall in the hosting provider guide.
AI Bot Management
Imunify Security includes AI Bot Management — a layer that identifies automated traffic (search-engine crawlers, AI/LLM crawlers, scrapers, and malicious bots) before WordPress finishes loading and applies a per-minute request limit to each kind of bot, while leaving real visitors untouched. It protects sites from aggressive crawling and bot-driven resource abuse — increasingly from the wave of AI training and scraping crawlers — without slowing down legitimate users.
Note
AI Bot Management is a separate layer from the server-side WAF (ModSecurity), from WordPress Account Brute-force Protection, and from the plugin's own Web Application Firewall. In the WordPress dashboard it appears as Bot Protection.
The feature needs a recent version of the plugin and of the Imunify software on the server. Your hosting provider manages both — see Requirements.
How it works
The feature runs as a must-use plugin, so it evaluates each request before the rest of WordPress (and other plugins) load. For every request it:
- Classifies the visitor into one category — a verified search engine, a verified AI crawler, a verified SEO crawler, an unknown automated client, an unverified bot, a malicious bot, or a human. Clients that claim to be a known crawler (for example, Googlebot) are confirmed by forward-confirmed reverse DNS, so a spoofed user-agent does not earn a crawler's higher limit.
- Applies the category's limit. Each non-human category has a requests-per-minute allowance set by the active preset. Requests over the limit are refused with HTTP 429 (Too Many Requests) and a
Retry-Afterhint; malicious bots are blocked outright with HTTP 403 (Forbidden). Clients that keep exceeding their limit can be escalated to a temporary block.
Human visitors are never rate-limited. The check is fail-open: if anything goes wrong (for example, the backing storage is unavailable), the request is allowed through, so the feature can never take a site down.
Traffic that is never limited
AI Bot Management never limits or blocks these requests:
Human visitors.
IP addresses on the server's whitelist. On Imunify360, your hosting provider can add an IP address or subnet to the server whitelist. Requests from it are never limited or blocked, even when they hit the honeypot. They are shown in the Bot Traffic report as Whitelisted IPs.
Requests your site sends to itself. WordPress often calls its own address, for example to run scheduled tasks. A request counts as coming from the site itself when all of these are true:
- it comes from the same server (
127.0.0.1,::1, or the server's own IP address); - it did not pass through a CDN or proxy;
- its user-agent is empty or starts with
WordPress/.
- it comes from the same server (
Requests to the REST APIs of known partner plugins. These plugins call your site's REST API often, and limiting them would break their features. Today the list is:
- WooCommerce —
/wp-json/wc/… - Atarim —
/wp-json/atarim/… - Elementor —
/wp-json/elementor/…, including the endpoint that AI assistants use to edit pages
The list is updated automatically together with the bot data, so it can change without a plugin update. The WordPress core REST API (
/wp-json/wp/…) is never on this list.- WooCommerce —
Requests from your own server and requests to partner REST APIs are not counted in the Bot Traffic report.
Sites behind a CDN or proxy
When your site is behind a CDN, every request reaches the server from one of the CDN's IP addresses. To tell visitors apart, AI Bot Management reads the real visitor IP address from the header the CDN adds:
| CDN | Header |
|---|---|
| Cloudflare | CF-Connecting-IP or True-Client-IP |
| Akamai | True-Client-IP |
| Fastly | Fastly-Client-IP |
| Sucuri | X-Sucuri-ClientIP |
| Imperva (Incapsula) | Incap-Client-IP |
| Amazon CloudFront | CloudFront-Viewer-Address |
The header is used only when the request really comes from that CDN's published IP ranges, so a visitor cannot fake their address by sending the header themselves. For requests from a known CDN without its own header (for example, QUIC.cloud), the standard X-Real-IP and X-Forwarded-For headers are used. In all other cases, the IP address of the connection is used.
Bot categories
| Category | What it is |
|---|---|
| Verified search engines | Crawlers confirmed by reverse DNS to belong to a search engine (Google, Bing, and similar). Given a high allowance so indexing is never disrupted. |
| Verified AI crawlers | Confirmed crawlers from AI/LLM providers (training or retrieval). |
| Verified SEO crawlers | Crawlers of SEO tools (for example, AhrefsBot), confirmed by the tool's published IP addresses or by reverse DNS. An SEO crawler that cannot be confirmed is treated as an unverified bot. |
| Unknown automated | Automated clients that do not match a known, verified crawler. |
| Unverified bots | Clients claiming to be a known bot but failing reverse-DNS verification. |
| Malicious bots | Known-bad clients, and clients caught by the honeypot. Blocked in every preset except Monitor only. |
| Humans | Regular visitors. Never rate-limited. |
| Whitelisted IPs | IP addresses on the server's whitelist (Imunify360 only). Never rate-limited or blocked. See Traffic that is never limited. |
Protection presets
The active preset decides the per-minute limits. Balanced is the default.
| Category (requests / minute) | Balanced | Strict | Monitor only |
|---|---|---|---|
| Verified search engines | 300 | 300 | Not enforced |
| Verified AI crawlers | 10 | 3 | Not enforced |
| Verified SEO crawlers | 60 | 20 | Not enforced |
| Unknown automated | 5 | 2 | Not enforced |
| Unverified bots | 2 | 1 | Not enforced |
| Malicious bots | Blocked | Blocked | Not enforced |
- Balanced — sensible limits for a typical site. Recommended for most sites.
- Strict — tighter limits for sites under heavy bot pressure.
- Monitor only — classifies traffic but does not block or limit anything. Useful for trying the feature out before enforcing it.
ImunifyAV and ImunifyAV+
On servers with ImunifyAV or ImunifyAV+, AI Bot Management always uses Monitor only. It classifies and reports traffic, but does not limit or block anything. The preset cannot be changed in the widget or in wp-config.php, and the widget shows an upgrade link instead. Blocking and rate limiting need Imunify360.
In the WordPress dashboard widget
Once your hosting provider has enabled AI Bot Management, the Imunify Security dashboard widget shows a Bot Protection row with the current status, the active preset, and the number of requests blocked in the last 24 hours.
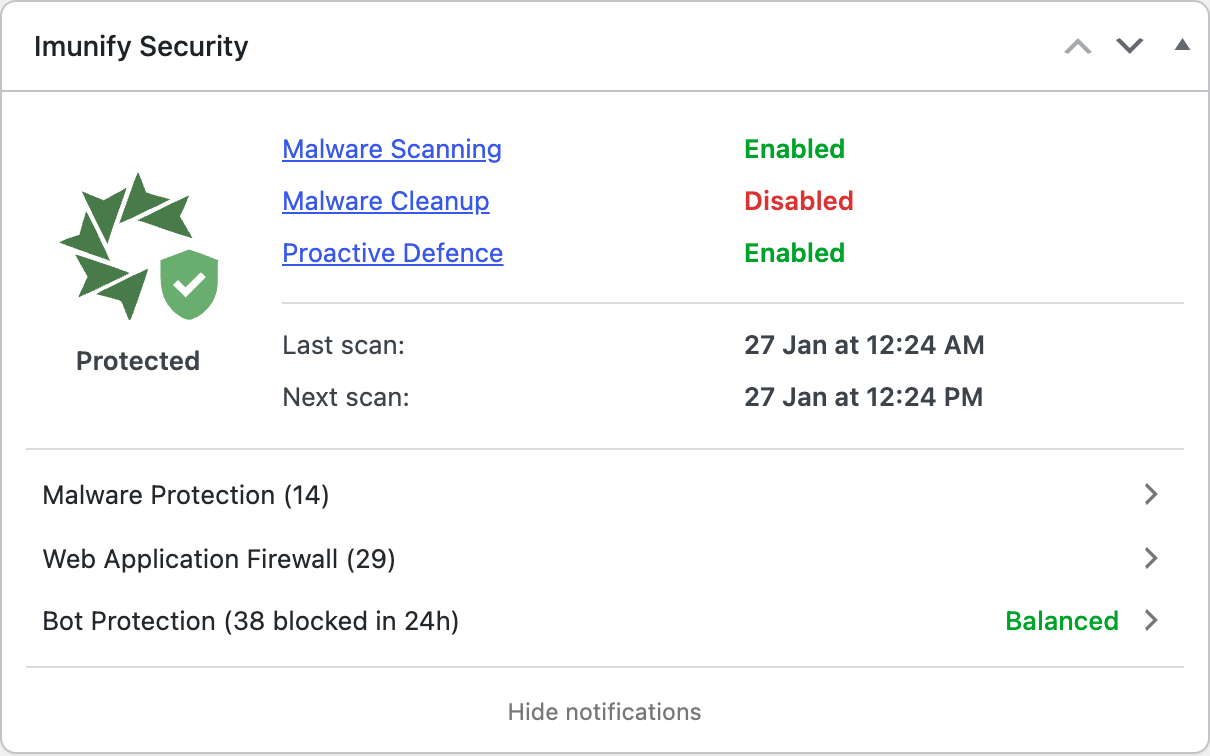
The Imunify Security dashboard widget. The Bot Protection row shows the active preset and the number of requests blocked in the last 24 hours.
Click the row to open the detail pane, where you can:
- see the current Status and Blocked (24h) count;
- view the active preset and its live Rate limits (requests / minute) table, and switch preset with change → Save;
- turn protection off for this site — or back on.
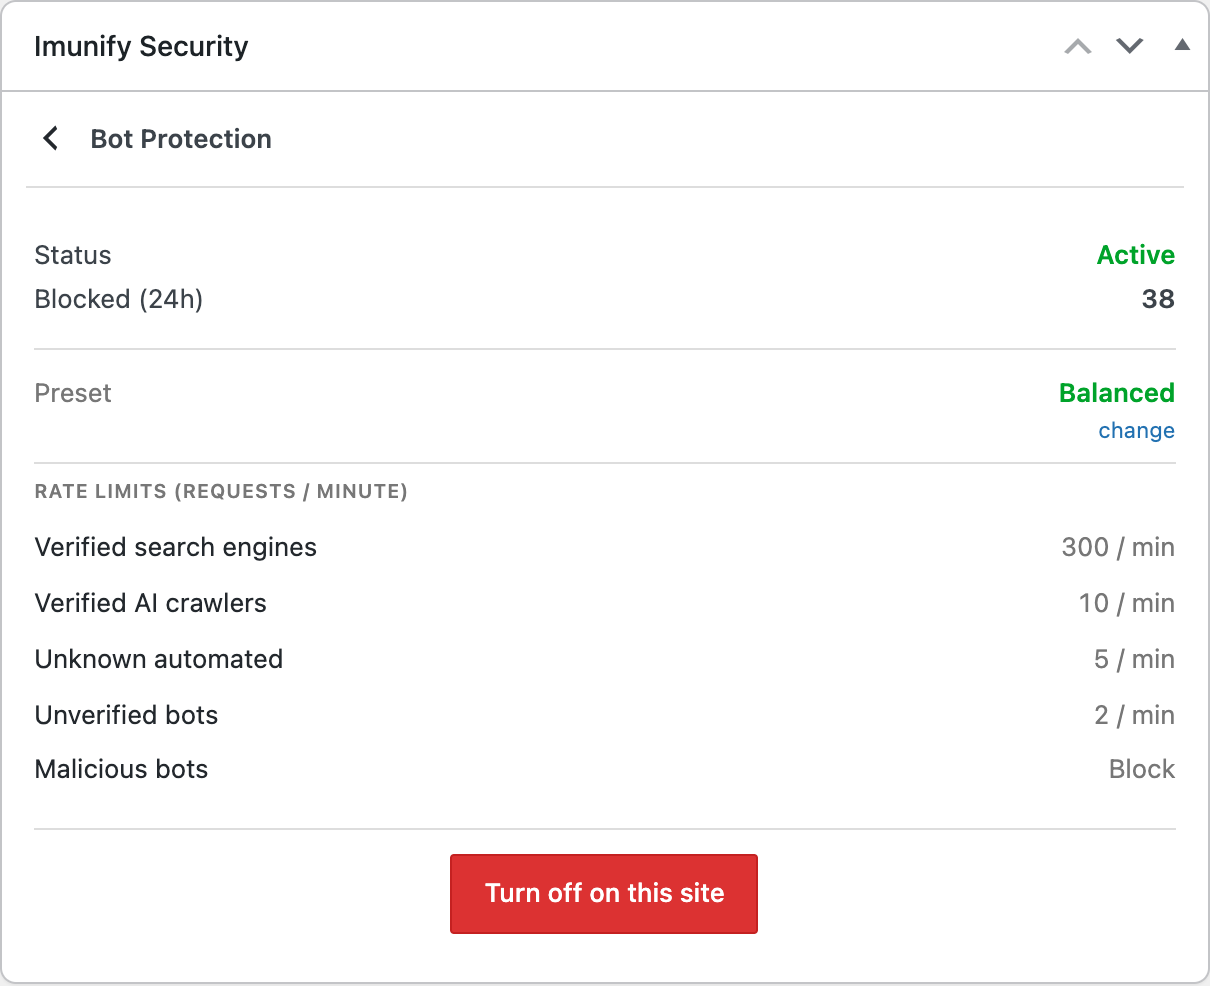
The detail pane: status, the 24-hour blocked counter, the preset picker, and the per-category rate limits for the selected preset.
Only WordPress administrators (users who can manage options) can change these settings.
Note
If your site cannot reach itself over HTTP, the pane shows a "Your site can't reach itself" warning — scheduled tasks, including automatic bot-data updates, may not run. Fix the loopback connectivity (for example, a local DNS or firewall issue) and click Re-check.
Bot Traffic report
The Bot Traffic page shows the automated traffic on your site in the last 24 hours: how it was classified, how much there was, and what AI Bot Management did with it. To open it, go to Imunify Security → Bot Traffic in the WordPress admin menu, or click View full bot traffic report in the dashboard widget.
Only WordPress administrators can see the page. It is shown only when your hosting provider has turned on AI Bot Management. It needs plugin version 4.1.0 or later.
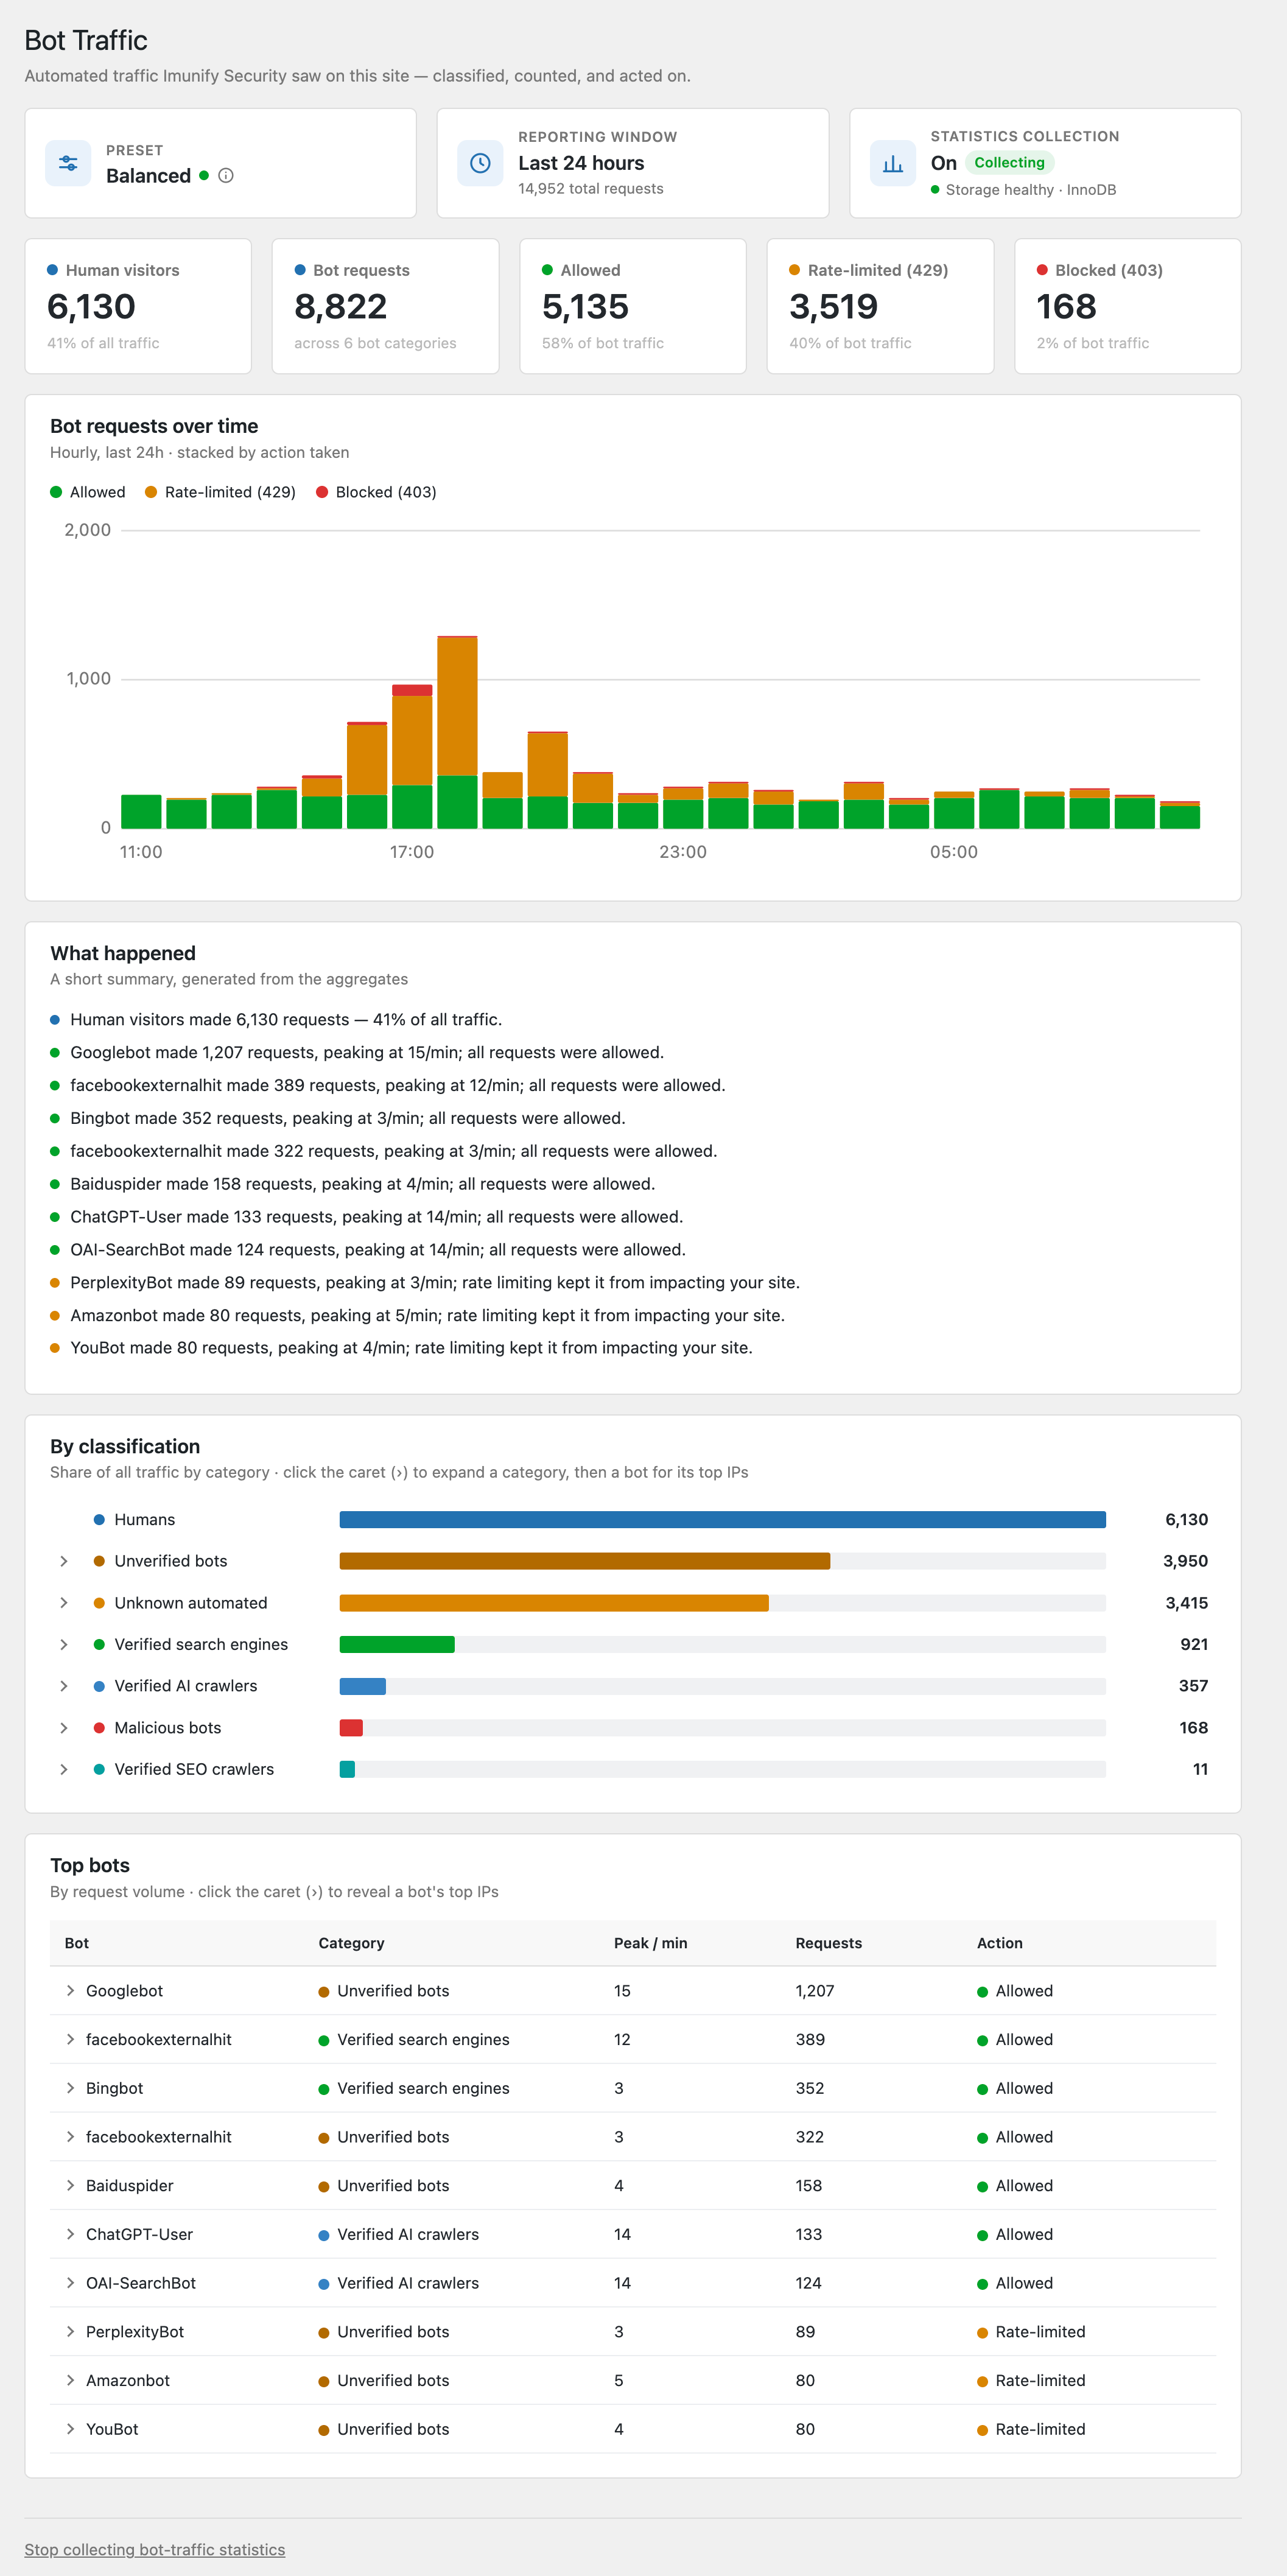 The Bot Traffic page.
At the top of the page you see:
- Preset — the active preset. The info icon shows its rate limits.
- Reporting window — the time range of the report (the last 24 hours) and the total number of requests in it.
- Statistics collection — whether the plugin is collecting statistics right now.
- Totals for Human visitors, Bot requests, Allowed, Rate-limited (429), and Blocked (403).
Below that, the report has these sections:
| Section | What it shows |
|---|---|
| Bot requests over time | An hourly chart of bot requests for the last 24 hours, split into allowed, rate-limited, and blocked requests. Human visitors are not included. |
| What happened | A short summary in plain words. For example, which bot sent the most requests, its peak rate, and what was done with it. |
| By classification | The share of all traffic in each bot category. Expand a category to see its bots, and expand a bot to see its top IP addresses. |
| Top bots | The named bots that sent the most requests, with their Category, Peak / min, Requests, and the Action taken. Expand a bot to see its top IP addresses. |
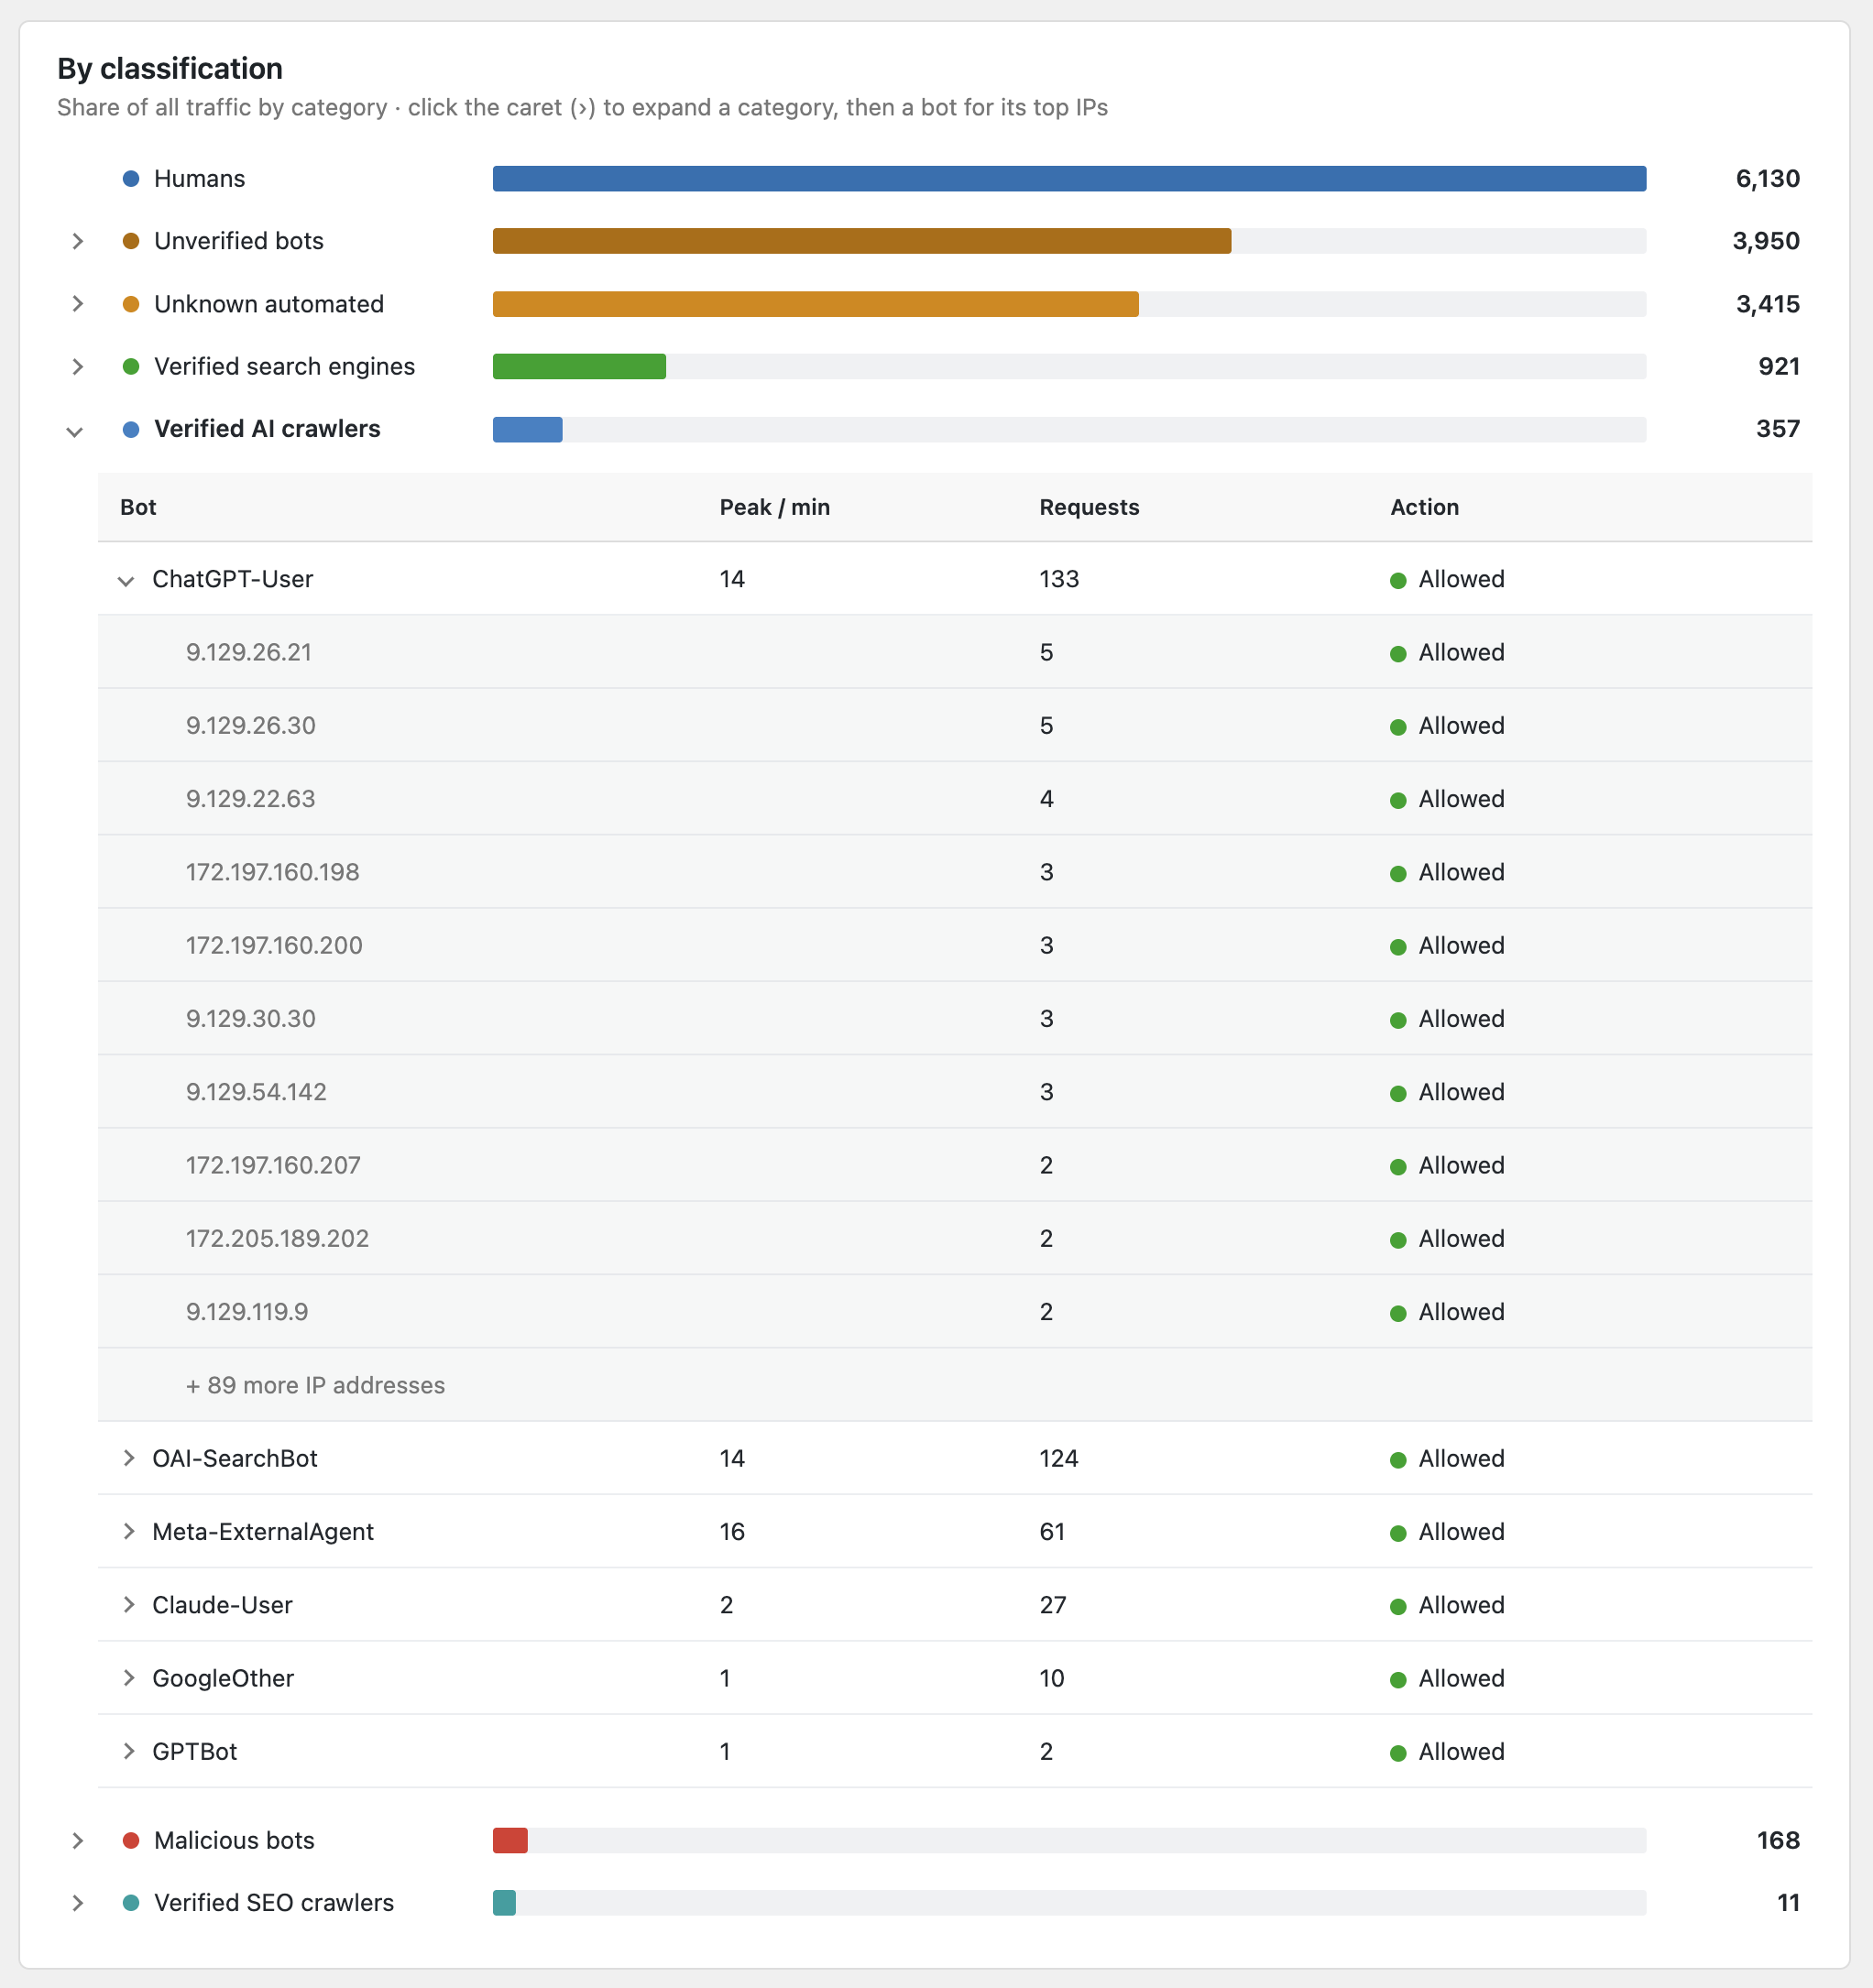 The By classification section with a category and a bot expanded.
For each bot and IP address, the Action column shows Allowed, Rate-limited, or Blocked. Up to 10 IP addresses are listed for each bot.
At the bottom of the page, you can click Stop collecting bot-traffic statistics to stop collecting statistics for your site. Protection keeps working, but the report is no longer updated. Click Resume collecting bot-traffic statistics to start again.
Turning it on or off
AI Bot Management is controlled at three levels:
- Hosting provider (server-wide). The provider enables the feature and sets the default preset. When it is off at the server level, the Bot Protection row does not appear. See AI Bot Management in the hosting provider guide.
- Site owner (WordPress admin). Once the provider has enabled it, the WordPress administrator turns it on or off for their own site and chooses the preset from the Bot Protection widget.
wp-config.php(advanced). Definitions inwp-config.phpoverride the widget:
// Force AI Bot Management off for this site (overrides the widget):
define( 'IMUNIFY_AI_BOT_PROTECTION', false );

// Force a specific preset (balanced | strict | monitor):
define( 'IMUNIFY_AI_BOT_PROTECTION_PRESET', 'strict' );
When AI Bot Management is disabled in wp-config.php, the widget shows Disabled in wp-config.php and the controls are locked.
Frequently asked questions
Why did the Imunify Security plugin appear on my site? I did not install it
Your hosting provider installed it for you. The Imunify security software on the server adds the plugin to the WordPress sites it protects, so you get the security information of your site inside the WordPress dashboard. It is part of your hosting plan, not something you bought or downloaded.
Why is the plugin not in the WordPress.org plugin directory?
The plugin only works together with the Imunify software running on the hosting server, so it is delivered by that software instead of the public directory. This is also why it is updated automatically, without an update notice in WordPress.
Do I have to pay extra for the plugin?
No. It is included in the Imunify security service your hosting provider already runs. Some features depend on which Imunify product your provider uses — see Protection modes.
Can I deactivate or delete the plugin? Will it come back?
Yes, you can deactivate or delete it like any other WordPress plugin.
Deleting it also removes the data it stored for your site. A job on the server does this clean-up once a day, so it can take up to 24 hours. The same job records that you removed the plugin, so the server does not install it again by itself.
If you want the plugin back later, ask your hosting provider. They can restore it for your site with one command.
Deactivating or deleting the plugin turns off the protection it provides inside WordPress — the Web Application Firewall and AI Bot Management stop working for your site. Malware scanning on the server continues, but you no longer see the results in your WordPress dashboard.
Does the plugin slow down my website?
The plugin is built to keep the work inside WordPress small:
- Malware scanning runs on the server, not inside WordPress.
- The Web Application Firewall only loads rules for the plugins, themes, and WordPress version you actually have installed.
- The bot check runs before the rest of WordPress loads. It costs very little compared to building the page for that visitor, so every request it blocks saves your site far more work than the check itself uses.
Do I still need my other security plugin?
Imunify Security does not replace a general-purpose security plugin, and it does not require you to remove one. It adds protection layers that run on the hosting server and inside WordPress. If you run another security plugin, both may report the same event, so check both before you decide something is wrong.
Does the plugin work on a WordPress multisite network?
Multisite is only partly supported today, and it has not been fully tested. Some features may not behave as described on a multisite network, so do not rely on the plugin as your only protection there.
Where do I manage the settings?
It depends on the setting:
- In the WordPress dashboard, the Imunify Security widget shows the security status, and lets WordPress administrators change AI Bot Management for the site.
- On the Imunify Security page in the WordPress admin menu, you review WAF incidents and disable individual rules for your site. See Managing WAF incidents.
- Some settings are controlled on the server and cannot be changed from WordPress. If a control is missing or locked, see Why do I not see the Web Application Firewall or Bot Protection in the widget?.
What information does the plugin send?
The plugin reads the security information of your site from the Imunify software running on the same server, over a local connection that does not leave the machine. It does not send your site's files, database, or page content anywhere.
To keep protection current, it downloads updated data, such as the list of known crawlers used by AI Bot Management.
Imunify also collects security information from your site to improve protection:
- WAF incidents — the exploit attempts the Web Application Firewall acted on. A record includes the rule that matched, the IP address the request came from, and partial details of the request.
- Traffic classification summary — once a day, how much traffic fell into each bot category, together with the 50 most active IP addresses per category. This data is used only to make the classification more accurate and to identify sources that abuse sites.
If your hosting provider has enabled error reporting, technical error reports may also be sent to Imunify.
A visitor to my site got an error page. What happened?
Two protections can refuse a request:
- HTTP 429 (Too Many Requests) — AI Bot Management refused a request from an automated client that went over its per-minute limit. Real visitors are never rate-limited.
- HTTP 403 (Forbidden) — either the Web Application Firewall matched the request against a known vulnerability in a plugin, theme, or WordPress core, or AI Bot Management blocked a client that kept sending requests after it was already refused with HTTP 429. See Managing WAF incidents to check what the WAF blocked and why.
A WAF rule blocks legitimate traffic. How do I stop it?
Open the Imunify Security page in the WordPress admin menu, go to the Incidents tab, find the incident, and click Disable rule. The rule is turned off for your site — there is no list of domains to choose from, because the page only covers the site you are in. The change may take a few minutes to take effect.
If the traffic is still blocked, wait a few minutes and clear any page or object cache your site uses, then try again — the old response may still be cached. If it keeps being blocked after that, ask your hosting provider.
Bot Protection blocks something I need. How do I stop it?
Real visitors are never rate-limited, but a tool that calls your site — an uptime monitor, a backup or SEO service, or a plugin that fetches pages — is an automated client, so it can be refused with HTTP 429.
Open the Bot Protection row in the Imunify Security dashboard widget and choose one of these:
- Switch to a softer preset. Click change, pick a preset, and click Save. Monitor only still classifies traffic but does not block or limit anything, which is the quickest way to confirm that Bot Protection is the cause.
- Turn protection off for this site. The row has a switch that disables Bot Protection for your site only. You can turn it back on at any time.
- Ask your hosting provider to whitelist the tool. If the tool uses fixed IP addresses, your provider can add them to the server whitelist (Imunify360 only). Requests from those addresses are then never limited, and the rest of your site stays protected. See Traffic that is never limited.
See Turning it on or off for the wp-config.php settings that override the widget, and Protection presets for what each preset allows.
If the Bot Protection row is missing, see the next question. If the controls are locked, the feature is set in wp-config.php — see Turning it on or off.
Why do I not see the Web Application Firewall or Bot Protection in the widget?
A row is missing when the feature is not running for your site. There are two reasons for that:
- The software is older than the feature. Both features need recent versions of the plugin and of the Imunify software on the server. See Requirements for the exact versions.
- The feature is turned off for the server or for your hosting account.
Both are set on the server, so only your hosting provider can change them.
The widget says my site cannot reach itself. What does it mean?
WordPress needs to be able to open its own address over HTTP to run scheduled tasks. When it cannot, scheduled tasks — including automatic updates of the bot data — may not run. This is usually caused by a local DNS or firewall setting on the server. Report it to your hosting provider, then click Re-check.
Something is not working. What can I do?
Most of what site owners run into can be fixed from the WordPress dashboard, without any help:
- A visitor got an error page — see A visitor to my site got an error page.
- A WAF rule blocks legitimate traffic — you can disable that single rule for your site. See A WAF rule blocks legitimate traffic.
- Bot Protection blocks a tool you use — you can switch to a softer preset, or turn it off for your site. See Bot Protection blocks something I need.
- A feature is missing from the widget — see Why do I not see the Web Application Firewall or Bot Protection in the widget?.
A few things are set on the server, and only your hosting provider can change them: enabling a feature for your hosting account, restoring the plugin after you delete it, and anything about malware found outside your WordPress files.