Audience: This page is for hosting administrators and end users. Sections are marked accordingly.
Overview
Imunify Email is an Imunify360 add-on that protects your servers by filtering outgoing and incoming mail. It integrates directly with Exim MTA on cPanel/WHM servers, using Rspamd as a mail filter.
What it does
Stops outgoing spam at the source: Emails are scanned before they leave the server. Messages identified as spam, containing malicious content, or exceeding send-rate limits are quarantined for admin review. You can release legitimate emails or delete confirmed spam. This keeps your server IP off blocklists and ensures reliable delivery for your users.
Controls send rates per account, domain, email address, or script: Set hourly sending limits at the server level, override them for individual senders, and whitelist trusted senders when needed. This three-tier system gives you fine-grained control over outgoing mail traffic.
Filters incoming spam NEW: Enable server-wide incoming filtering to automatically route spam to recipients' Junk/Spam folders. Incoming filtering is an opt-in feature that must be explicitly enabled by the server administrator.
Prerequisites
Before proceeding with installation, confirm that you meet these requirements:
| Imunify360 | Must be installed and registered |
| Control panel | cPanel/WHM |
| OS | CloudLinux OS 7, 8, 9 · AlmaLinux 8, 9, 10 · CentOS 7, 8 |
| Architecture | x86_64 |
| RAM | 512 MB minimum (usage increases temporarily when scanning large messages) |
| Disk | 20 GB minimum (quarantine uses ~100 MB per account by default, adjustable) |
For full details, see System Requirements.
Compatibility
Imunify Email has been tested with the following tools and mail gateways:
| ConfigServer MailScanner | ✔ |
| ConfigServer Firewall (CSF) | ✔ |
| MailChannels | ✔ (Imunify Email 0.6+) |
| SpamAssassin | ✔ (incoming and outgoing configurations) |
| SMTP2GO | ✔ |
Imunify Email operates alongside these tools. If your setup includes a tool not listed here, contact support to confirm compatibility before installing.
Getting started
Audience: Hosting administrator.
Setting up Imunify Email takes four steps:
- Install Imunify360: To use Imunify Email, Imunify360 must be installed first. Follow the Installation Instructions to get started.
- Enable in CLN: Turn on Imunify Email for your account, key, or individual server in the CloudLinux Network portal. The add-on installs automatically within 24 hours, or run
imunify360-agent update-licenseto install immediately. - Verify installation: Run
ie-config statusto confirm all services are running, andie-config versionto check the installed version. - Configure limits: Navigate to WHM → Plugins → Imunify360 → Email → Settings to set your default sending limits. Adjust per-sender overrides in the Activity Monitor tab as needed.
For more information, see Installation.
System Requirements
Audience: Hosting administrator.
Supported Operating Systems
| CloudLinux OS | 7, 8, 9 |
| AlmaLinux | 8, 9, 10 |
| CentOS | 7, 8 |
Control Panel
cPanel/WHM is required. Other control panels (Plesk, DirectAdmin, etc.) are not supported.
Software
Imunify Email requires an active Imunify360 installation. If you do not have Imunify360 installed, follow the Imunify360 Installation Instructions before proceeding.
Hardware
| Architecture | x86_64 |
| RAM | 512 MB |
| Disk | 20 GB |
RAM usage depends on mail traffic. Imunify Email consumes minimal RAM while idle, but usage increases temporarily when scanning large messages. Disk usage depends on the number of accounts on the server: each account is allocated 100 MB of quarantine space by default, adjustable in the Quarantine settings.
Installation
Audience: Hosting administrator.
Installing Imunify Email is a two-stage process: you enable it in CLN (the licensing layer), and the on-server installation follows automatically. The sections below cover both stages and the components that get installed.
Enabling Imunify Email in CLN
Imunify Email must be enabled in CLN before it can run on your servers. You can manage it via the CLN UI or the CLN API. Changes take effect automatically within 24 hours. To apply a change immediately on a specific server, run the following as root:
imunify360-agent update-license
CLN UI: Enable / Disable Imunify Email
You can manage Imunify Email at three levels: Account, Key, and Server.
Account level
Select "Enable for all servers" to apply the setting across every Imunify360 server in your account. Enabling activates Imunify Email on all servers; disabling deactivates it. Both changes take effect within 24 hours.
The "Depends on lower level" option lets you delegate control to individual keys or licenses rather than managing everything at the account level.
Key level
Go to the Activation Keys tab and select Add-ons for the relevant key. Enabling at this level installs Imunify Email on all servers under that key within 24 hours. Disabling removes it from all servers under that key within 24 hours.
The "Depends on lower level" option delegates control to individual servers.
Server level
Go to the Servers tab and select Add-ons for the relevant server. Enabling installs Imunify Email on that server within 24 hours; disabling deactivates it on that server within 24 hours.
CLN API: Enable / Disable Imunify Email
Useful references:
- CLN API documentation
- CLN API Swagger In CLN, Imunify Email is a "feature" with ID 4600.
The relevant API endpoints are:
PATCH /api/v2/features/account | Enable/disable for entire account |
PATCH /api/v2/imunify/keys | Enable/disable for an Imunify360 key |
PATCH /api/v2/imunify/server | Enable/disable for a specific server |
Example: Enable Imunify Email on a specific server
Step 1 — Generate an API token:
token=$(login=YOUR_CLN_LOGIN; ts=$(date +"%s"); secret=YOUR_CLN_SECRET; \
  echo -n $login\|$ts\|$(echo -n $secret$ts | sha1sum) | cut -d " " -f1)
Step 2 — Get product type IDs:
curl -X 'GET' \
  -H 'accept: application/json' \
  -H 'Content-Type: application/json' \
  'https://cln.cloudlinux.com/api/v2/ip-license/licenses/types?token=YOUR_TOKEN'
Step 3 — Enable Imunify Email on the target server:
curl -X 'PATCH' \
  -H 'accept: application/json' \
  -H 'Content-Type: application/json' \
  'https://cln.cloudlinux.com/api/v2/imunify/server?token=YOUR_TOKEN' \
  --data '{"id": "SERVER_ID_HERE", "permissions": {"4600": "ENABLED"}}'
For account- or key-level changes, use the corresponding endpoints with the same pattern.
Activating / Disabling Imunify Email
Activating Imunify Email
Imunify Email is activated through your CLN account. Once enabled, the product installs automatically within 24 hours. To trigger installation immediately, run one of the following commands as root:
/usr/bin/imunify360-agent update-license
Or use the standalone deployment script:
wget https://repo.imunify360.cloudlinux.com/defence360/imunifyemail-deploy.sh
bash imunifyemail-deploy.sh
Disabling Imunify Email
Disable the corresponding option in CLN. The change takes effect automatically within 24 hours. To apply it immediately:
/usr/bin/imunify360-agent update-license
This removes the Rspamd filter configuration from Exim and stops all Imunify Email services.
What Gets Installed
System users
The following users are created during installation:
_rspamd_imunifyemail(also added to the_imunifygroup)
Components
Imunify Email is installed as the imunify-email RPM package, which includes the following sub-packages:
| Imunify Email Rspamd | imunify-email-rspamd | Acts as the email filter. Installed to /etc/rspamd, /usr/bin, /usr/lib, /usr/share/rspamd. Runs the rspamd service. |
| Quarantine | imunify-email-quarantine | Stores quarantined emails; serves as the backend for the UI and CLI. Installed to /var/imunifyemail/quarantine. Runs the ie-quarantine and ie-notification services. |
| CLI | imunify-email-cli | Command-line interface for managing the Quarantine and Activity Monitor. |
| Dec Node | imunify-email-dec-node | Statistical component that improves filtering accuracy. Installed to /var/imunifyemail/dec-node. Runs the ie-dec-node service. |
Exim Configuration
During installation, Imunify Email automatically modifies your Exim MTA configuration to route mail through Rspamd. This change is compatible with WHM's Advanced Editor — you can continue using it for other Exim modifications.
Version and Status
Check the Installed Version
ie-config version
Check Service Status
ie-config status
Accessing the User Interface
Hosting administrators (WHM): WHM → Plugins → Imunify360 → Email
Incoming Email Filtering
Audience: Hosting administrator.
When enabled, Imunify Email scans incoming messages and routes spam directly to recipients' Junk/Spam folders. The detection engine is the same Rspamd-based filter used for outgoing mail.
Incoming filtering is disabled by default and must be enabled explicitly.
Enabling and disabling
Enable from the command line:
ie-config enable-incoming
Filtering begins as soon as the feature is enabled.
Disable from the command line:
ie-config disable-incoming
WHM UI changes
Once enabled, the WHM-side Imunify Email interface (WHM → Security → Imunify360 → Email) gains the following:
Settings tab
- Toggle Switch — Disable incoming filtering for this specific cPanel account.
- Stats Table — Daily email counts, categorized by spam and legitimate traffic.
Statistics tab
- Detailed Analytics — Historical breakdown of incoming email trends over time.
Managing Incoming Filtering via CLI
The ie-cli utility allows administrators to manage incoming filtering and retrieve statistics from the command line.
For the full list of available commands, run:
ie-cli --help
Each subcommand also supports --help for detailed usage information.
Recipient Whitelists
The ie-cli whitelist command lets administrators manage recipient whitelists (email addresses and domains) that bypass incoming filtering. Use the following subcommands:
ie-cli whitelist recipient add | Add an email address or domain to the whitelist |
ie-cli whitelist recipient list | List all whitelisted recipients |
ie-cli whitelist recipient delete | Remove an email address or domain from the whitelist |
Quarantine
Audience: Hosting administrator.
Go to Imunify360 → Email → Quarantine tab. Here, there are emails that are considered viral or malicious for all accounts on the server. You can decline or confirm the Imunify Email decision and either release and send emails or remove them completely.
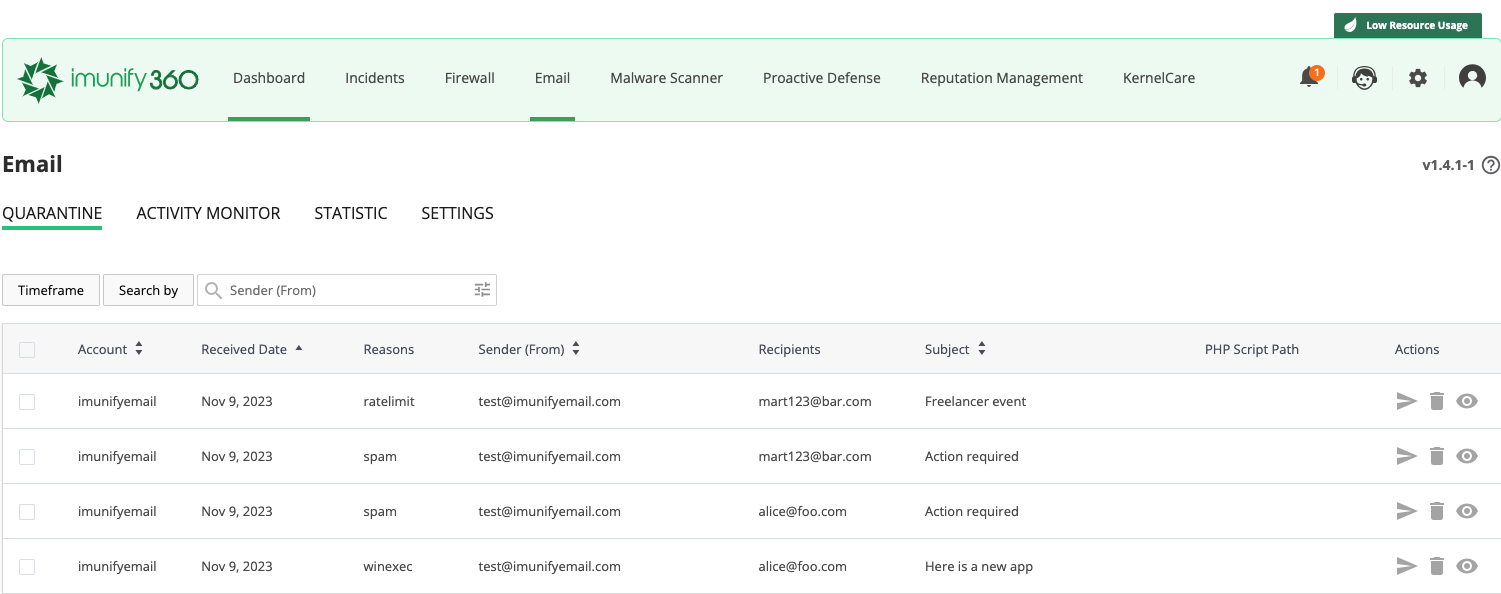
The table has the following columns:
Account — account name
Received Date — when an email was received by the server for sending
Reasons — the reason why message has been quarantined
- spam — means that a message has been classified as a spam
- winexec — means that a message contains windows executable attachments (you can allow that using ie-cli)
- ratelimit — means that a message exceeded a limit per hour for one of the Account/Domain/Sender email/Script. You might adjust the limit using the "Activity Monitor" tab.
Sender (From) — the user who sent the email
Recipients — recipients (including CC and BCC)
Subject — a subject from an email
Actions
- Release & Send — hosting admin can use multi-select and release & send several emails at once

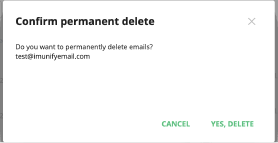
Delete — delete email permanently
View Email — view email content
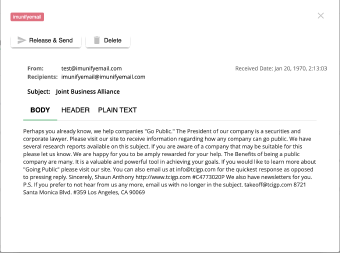
- Body - decoded email content with tags removed
- Header - email Headers section
- Plain text - headers plus original email body
Note
In this release, the notifications are not sent both when deleting or releasing an email. Will be added in the next release.
Activity Monitor and Sender limits
Audience: Hosting administrator.
Go to Imunify360 → Email → Activity Monitor. Activity Monitor provides a way to observe, control and regulate the flow of mail. From this tab the messages can be whitelisted or chosen to be explored in the Quarantine tab.
The table lists the following columns:
- Sender Object - a set of origination information that can be identified about an email is shown here. The four possible categories are:
- WHM account
- Domain
- PHP Script (able to send an email)
- Email address of a user
- Ham/Sent out - quantity of a non-spam emails that were sent out is shown corresponding to a Sender Object in a first column.
- Limit - the number of emails that corresponding Sender Object will be allowed to send out in a space of one hour. This number turns red and a warning sign is displayed as soon as the limit is exceeded.
- Whitelisted - the records in this column only have two states "true" and "false" and show if the whitelisting is on or off for a particular Sender Object.
- Quarantined - reflects emails from a particular Sender Object and their quantity.
- Actions - several actions to perform on a particular Sender Object are available:
- Go to quarantine allows to explore a particular Sender Object in a Quarantine tab.
- Update sender limit allows to enable/disable granular limits for a particular Sender Object that override limits set in the Settings tab.
- Whitelist sender allows to remove any limit on sending out emails for a particular Sender Object.
The Timeframe setting for the records visible in the table can be chosen from the following options under the Timeframe button.
Records in the table are searchable and the parameters of the search can be narrowed down by using the Account name, Sender address, Domain, and Script filters.
Sender limits
This is the second level of control for sender limits. Limits set for a particular Sender Object here override the limits set on the previous stage.
Go to Imunify360 → Email → Activity Monitor → Actions → Update sender limit. For a particular Sender Object the limit can be switched on and off. The limit value can be set higher or lower than the value in the Setting tab. This setting is aimed at providing a way to set needed exceptions from the general rules.
Whitelisting
This is the third level of control for sender limits. Limits set via this control override the limits set at the two the previous stages. Go to Imunify360 → Email → Activity Monitor → Actions → Whitelist sender. A particular Sender Object can be whitelisted, which means that the Sender limits will no longer be applied to this Sender Object - so it will be able to send out an unlimited number of messages. Only the domain and email of the user Sender Objects can be whitelisted, WHM account and PHP script cannot be whitelisted.
To confirm whitelisting for a particular Sender Object click Yes, add to whitelist.
Settings
Audience: Hosting administrator.
Go to Imunify360 → Email → Settings tab. The settings allow managing the space for quarantine and setting up limits for sending out the messages(set up a rate-limit) for all the Sender Objects adopts a 3-tier approach that is aimed to provide granular control over the outgoing messages to the administrator. An administrator can increase or decrease the space for the user's quarantine. If all space is consumed, the oldest emails in quarantine will be permanently deleted.
Activity Monitor Settings
This is the first level of control for sender limits. The values set at this level will be default for an entire server and will be applied by default to all Sender Objects. Go to Imunify360 → Email →Settings tab. Here, set a limit on the number of emails that can be sent by a particular entity - WHM account, domain, PHP Script, or email address of a user.
- The limit is set for the number of messages within the space of the last 60 minutes.
- The limits can be applied either to a number of emails or a number of recipients.
Once the values are chosen, press Save Changes to apply them.
Quarantine Settings
You can modify the default settings for storage capacity and release limits for all accounts.
Note: If you change these settings in an individual account, the default settings will no longer apply to that account.
To revert to the default settings, refer to the CLI section.
The table has the following columns:
- Account — user account name
- Storage Capacity MB — the space for the user's quarantine limit (default is 100 MB)
- Used Space MB — the space used by files in quarantine (slight excess of the limit is possible)
- Releases limit — limit for releases per hour for non-root user
- State — the state of the user's quarantine.
- Details — emails deleted permanently for the last hour
- Actions
Purge quarantine — purge all quarantine for an account
Add — change the limit of the space for the user's (account) quarantine
Imunify Email Command-Line Interface
The Command-Line Interface (CLI) is designed to simplify usage of Imunify Email and as an enabler for integration with other tools and platforms.
Main command for all operations with Imunify Email:
ie-cli
Basic usage
Imunify Email quarantine CLI application
Usage:
ie-cli [command] [arguments]
Use --help key to get list of the available commands and to get help for the particular command, e.g. ie-cli whitelist sender --help .
Available Commands:
accounts | interaction with accounts in the quarantine |
am | interaction with the Activity Monitor, same API as in ActivityMonitor UI |
emails | interaction with emails in the quarantine |
filter-settings | toggle the filter settings, without any parameters - returns the current settings |
quarantine-defaults | interaction with default settings in the Quarantine |
version | print the Imunify Email CLI version |
whitelist | interaction with the whitelist of authenticated users, senders and recipients |
Flags:
-h, --help | Help for ie-cli |
Operations with emails in the quarantine
Emails marked as spam by Imunify Email are stored in the quarantine. The following section describes CLI for operating with emails.
Note
The quarantine is keeping email for various users separately, but root users can see all the emails and perform any operations on them.
Note
Almost all CLI commands support output in plain text and JSON format. For switching output to JSON use --json
List emails in quarantine
In order to see all emails stored use the following command. By default 'root' account is used, so the command shows the whole content of the quarantine.
Usage
ie-cli emails list --help

list emails in the quarantine, order by quarantined date descending

Usage:
  ie-cli emails list [flags]

Flags:
  -a, --account string   an account name
  -h, --help             help for list
      --json             output in json format
  -l, --limit int        The maximum count of items to return (default 25)
  -s, --since string     show entries starting from [now - since] time
                         format: [DIGIT(s)][MODIFIER]
                         	supported modifiers 's' - seconds, 'm' - minutes, 'h' - hours, 'd' - days, e.g. 1h, 2d
                         	examples: 100s, 5m, 1h, 5d (default "30d")
Command
ie-cli emails list -a root --since 24h
That command shows all the quarantined emails for all accounts that have been quarantined within last 24 hours.
Output
-----------------------------------------------------------------------------------------------------------
Email_ID ef69f707-d547-4b29-b8f0-f5331821c930
Size_Bytes	      8190
Account_Name	  mws
Recipients	      me@somehost.com
Subject        	  Ge t G:eneric V1agra f:or as 1ow as $2.50 per 50 mg

----------------------------------------------------------------------------------------------------------
Email_ID faf96a73-5be4-481a-9c6c-7ab8fb2e3cf0
Size_Bytes	      8534
Account_Name	  mws
Recipients	      frank@yahooo.com
Subject           FWD: Want Pills V|AgR@ % Xan_a_x ^ Valiu|m| # At|v@`n \ Pn+ermin ' So+m+a  lNmAL

-----------------------------------------------------------------------------------------------------------
Email_ID fbc2efd0-1808-4e54-99ce-3082708b28ee
Size_Bytes	      8971
Account_Name	  oregdent
Recipients	      steve@hillcabinet.com
Subject        	  FWD:Xanax.x Valium.m Xanax.x Vicodin.n h ogzmwggi

-----------------------------------------------------------------------------------------------------------
Max Count	     3
Command for output in JSON format
ie-cli emails list -a root –-json
Output
{
  "items": [
    {
      "email_id": "ef69f707-d547-4b29-b8f0-f5331821c930",
      "size_bytes": 8190,
      "account_name": "mws",
      "recipients": ["me@somehost.com"],
      "subject": "Ge t G:eneric V1agra f:or as 1ow as $2.50 per 50 mg",
      "script_header": {
        "raw": "",
        "domain": "",
        "path": ""
      }
    },
    {
      "email_id": "faf96a73-5be4-481a-9c6c-7ab8fb2e3cf0",
      "size_bytes": 8534,
      "account_name": "mws",
      "recipients": ["frank@yahooo.com"],
      "subject": "FWD: Want Pills V|AgR@ % Xan_a_x ^ Valiu|m|  lNmAL",
      "script_header": {
        "raw": "",
        "domain": "",
        "path": ""
      }
    },
    {
      "email_id": "fbc2efd0-1808-4e54-99ce-3082708b28ee",
      "size_bytes": 8971,
      "account_name": "oregdent",
      "recipients": ["steve@hillcabinet.com"],
      "subject": "FWD:Xanax.x Valium.m Xanax.x Vicodin.n h ogzmwggi",
      "script_header": {
        "raw": "",
        "domain": "",
        "path": ""
      }
    }
  ],
  "max_count": 3
}
Show Email message
Root user, if needed, can see any message held in a quarantine. In order to do this email ID is needed. It can be taken from the list command above.
Note
Don’t forget to specify a user account. For root user use -a root.
Command
ie-cli emails show --id <EMAIL_ID> [-a <ACCOUNT_NAME>] [--json]
Example
ie-cli emails show --id f3367f1b-4216-4f4f-9617-f8be9f5a6e76 -a root
Output
EmailID:                      f3367f1b-4216-4f4f-9617-f8be9f5a6e76
SizeBytes:                    8534
AccountName:                  mws
Sender:                       mws@mywebsite.com
Recipients:                   me@somehost.com
ReceivedDate:                 1643805800
Subject:                      FWD: Want Pills V|AgR@ % Xan_a_x ^ Valiu|m| # At|v@`n \ Pn+ermin ' So+m+a  lNmAL

Content-Transfer-Encoding:    quoted-printable
Content-Type:                 text/html; charset="iso-8859-7"
Date:                         Fri, 13 Feb 2019 04:48:28 +0300
From:                         "wilhelmina rivard" <rivard1792@hinet.net>
MIME-Version:                 1.0
Received:                     from [70.100.200.300] (port=56330 helo=Myaccout) by 70.100.200.300.cprapid.com with esmtpsa  (TLS1.2) tls TLS_ECDHE_RSA_WITH_AES_256_GCM_SHA384 (Exim 4.94.2) (envelope-from <mws@mydomain.com>) id 1nFEym-0005TO-Qs for me@somehost.com; Wed, 02 Feb 2022 12:43:20 +0000
To:                           <abazis@iit.demokritos.gr>

X-ImunifyEmail-Filter-Action: reject
X-ImunifyEmail-Filter-Score:  6.1
X-Mimeole:                    Produced By Microsoft MimeOLE V6.00.2900.2527
X-Msmail-Priority:            Normal
X-Priority:                   3
X-Failed-Recipients:          []

Body: PCFET0NUWVBFIGh0bWwgcHVibGljICItLy9XM0MvL0RURCBIVE1MIDQuMDEgVHJhbnNpdGlvbmFsLy9FTiIgPQoiaHR0cDovL3d3dy53My5vcmcvVFIvaHRtbDQvbG9vc2UuZHRkIj4KPEhUTUw+CjxIRUFEPgo8VElUTEU+QWxsIFlvdXIgTWVkcyBIZXJlPC9USVRMRT4KPE1FVEEgaHR0cC1lcXVpdj0zRCJDb250ZW50LXR5cGUiIGNvbnRlbnQ9M0QidGV4dC9odG1sOyA9CmNoYXJzZXQ9M0RJU08tODg1OS0xIj4KPFNUWUxFIHR5cGU9M0QidGV4dC9jc3MiPgo8IS0tIC5zdHlsZTUge2ZvbnQtZmFtaWx5OiBBcmlhbCwgSGVsdmV0aWNhLCBzYW5zLXNlcmlmOyBmb250LXNpemU6ID0KMTRweDsgfT0yMAo8IS0tIC5zdHlsZTgge2ZvbnQtZmFtaWx5OiBBcmlhbCwgSGVsdmV0aWNhLCBzYW5zLXNlcmlmOyBmb250LXNpemU6IDhweDsgPQp9PTIwCi0tPjwvU1RZTEU
Release or Remove a message from the quarantine
Messages can be released from the quarantine and sent to recipients if they are false positives. They can also be deleted if needed to free up space.
Note
The quarantine will automatically delete the oldest messages when the user's quarantine limit is reached. The limit can be adjusted in settings.
Note
Non-root users are currently limited to releasing only 5 messages from quarantine per hour. This limit can be adjusted using the ie-cli command-line interface (CLI) tool.
Release
Command
ie-cli emails release --ids EMAIL_ID_1,EMAIL_ID_2 -a root
Example
ie-cli emails release --ids fb7c3537-8e5e-43d8-bc66-bd954c22d587 -a root
Output
OK
Remove
Command
ie-cli emails remove --ids fb7c3537-8e5e-43d8-bc66-bd954c22d587 -a root
Output
OK
Accounts settings
ImunifyEmail stores emails marked as spam in a quarantine space. The space is divided into virtual subspaces for every system account. Subspace is created when the first spam message is quarantined. It is filled with spam messages for a particular account until the size limitation is reached. When the size limitation is reached, the oldest messages will be automatically deleted.
Note
Default limit for a quarantine subspace is 100 MB.
Note
In some cases Imunify Email can’t attribute an email to a system account. In such cases the email will be stored under root user quarantine space.
There are command-line commands for managing quarantine space.
List all accounts in the quarantine
Command
ie-cli accounts list [--json]
Output
Name      	     LimitBytes	     UsedBytes	     State
mysite           125829120  	 810692     	 active
dentistcenter    104857600  	 0          	 active

Max Count 2
Output (JSON)
{
  "items": [
    {
      "name": "mysite",
      "limit_bytes": 125829120,
      "used_bytes": 810692,
      "state": "active"
    },
    {
      "name": "dentistcenter",
      "limit_bytes": 104857600,
      "used_bytes": 0,
      "state": "active"
    }
  ],
  "max_count": 2
}
Edit account size limit
Sometimes it is necessary to give more (or less) space in the quarantine for some user accounts. It is possible to do using the following command.
Command
ie-cli accounts edit -a ACCOUNT_NAME [--state=active|block] [--limit=1024]
Example
ie-cli accounts edit -a mydomain --state=active --limit=8096
Output (JSON)
Name       LimitBytes	 UsedBytes	 State
mws        8096          810692      active
Output
{
  "name": "mws",
  "limit_bytes": 8096,
  "used_bytes": 160461,
  "state": "active"
}
Edit account releases-limit
Users' hourly releases-limit values can be adjusted according to your needs. This allows for a more dynamic and responsive management of user activity, ensuring optimal operational efficiency.
To view the current account settings, use the following command:
Command
ie-cli accounts list --name=imunifyemail
Output
Name             LimitBytes      UsedBytes       State   ReleasesLimit (hourly)
imunifyemail     104857600       8324            active          5
To modify the release limit, use the ie-cli accounts edit command followed by the --name parameter (to specify the account) and the --releases-limit parameter (to set the new limit). For example:
Command
ie-cli accounts edit --name=imunifyemail --releases-limit=50
Output
Name             LimitBytes      UsedBytes       State   ReleasesLimit (hourly)
imunifyemail     104857600       8324            active          50
Clean all quarantine for an account
If needed all quarantine for an account can be cleaned with one command.
Command
ie-cli accounts remove -a <ACCOUNT_NAME>
Example
ie-cli accounts remove -a root
Output
OK
Whitelisting
Imunify Email supports whitelisting configuration. It is possible to whitelist domains and/or email addresses of a sender.
Warning
When sender is whitelisted Imunify Email bypasses it’s emails without filtering. It may affect hosting reputation if a whitelisted sender will send spam.
Available commands
In general, all whitelisting operations could be described by the next pattern:
ie-cli whitelist WHO OPERATION [value1 value2 ... valueN]
Where WHO is one of:
- authuser (only email address)
- sender (email address or domain name)
OPERATION is one of:
- add
- list
- remove
value1 valu2 ... valueN - email addresses and domains (actual for the add and remove commands)
Command
ie-cli whitelist --help
List/Add/Delete authenticated users, senders and recipients to/from whitelist.
Where :
    - authenticated user could be only an email address
    - sender and recipient could be one of domain or email address

Usage:
  ie-cli whitelist [command]

Available Commands:
  authuser    operation with the whitelist of the authenticated users (email addresses)
  sender      operation with the whitelist of senders (email addresses and domains)

Flags:
  -h, --help   help for whitelist

Use "ie-cli whitelist [command] --help" for more information about a command.
See all whitelist senders
Command
ie-cli whitelist authuser list [--json]
Output
EMAILS
1@example5.com
pp@ppp.com
qq@qq.com
me@mydomain.com

DOMAINS
No available data
Output (JSON)
{
  "success": true,
  "emails": ["1@example5.com", "pp@ppp.com", "qq@qq.com", "me@mydomain.com"],
  "domains": []
}
Whitelist a sender
To whitelist a domain or/and an email address use the following command.
Command
ie-cli whitelist sender add domain.com some_email@domain.com
Output
Adding sender(s) to the whitelist:
1. domain    domain.com
2. email     some_email@domain.com
OK
Remove sender from the whitelist
If needed, the sender can be removed from the whitelist. See the following commands.
Command
ie-cli whitelist sender remove domain.com
Output
Removing sender(s) from the whitelist:
1. domain    domain.com
OK
Quarantine default settings (releases limit and storage capacity)
Two commands are available: set and edit Please run with --help flag to get more info
Command
ie-cli quarantine-defaults --help
list Command
Note: The --json flag is available to output in JSON format.
Example
ie-cli quarantine-defaults list
Output
Setting          IntValue
limit_bytes      104857600
releases_limit   5
set Command
Command
ie-cli quarantine-defaults set --help

Set default settings for accounts. Use -1 to set common default value.

Usage:
ie-cli quarantine-defaults set [flags]

Flags:
-h, --help help for set
--json output in json format
-r, --releases-limit Limit for releases per hour for non-root user
-s, --storage-capacity Limit in MB for the storage in the Quarantine for the account
Example
ie-cli quarantine-defaults set --releases-limit 50 --storage-capacity 120
That command sets the releases limit to 50 per hour and storage capacity to 120 MB.
Output
Setting          IntValue
limit_bytes      125829120
releases_limit   50
Activity Monitor
To get understanding of Activity Monitor see the next section. ie-cli provides and API to get the same information as UI does from the Activity Monitor. ie-cli allows to
- get the Activity Monitor statistics
- set/remove/update sender limits for the particular account/domain/email/script
- get/update server limits that applied by default
Command
ie-cli am --help

This subcommand interacts with the Activity Monitor to return statistics, get/set settings for
the sender objects.
Activity Monitor operates by the sender objects. Sender object is an object on behalf of which
client sends email. It could be one of: "account", "domain", "script" or "sender_email"

Usage:
  ie-cli am [command]

Available Commands:
  limit           The limit value of sender object can be applied on particular domain, sender email and account
  server-settings Operates by the server sender limit settings and allows to set default limit that is applied for all sender objects
  stats           stats (statistics) returns the aggregated view of senders objects with various filters

Flags:
  -h, --help   help for am

Use "ie-cli am [command] --help" for more information about a command.
Usage of limit subcommand
The ie-cli am limit command is a versatile tool that enables you to assign a limit value to any sender object. This object could be an account, domain, sender email, or script. The command can be further customized with the use of specific flags and subcommands.
The set subcommand is available for use with this command. Its primary function is to establish a limit for the designated sender object(s).
In the context of the "ie-cli am limit set" command, the flags that can be used include "--id string", "--limit int", and "--so-type string".
Note
In order to set a limit, it's essential to know the sender object's id. This id can be obtained from the ie-cli am stats subcommand. For guidance on how to obtain the sender object id, please refer to the ie-cli am stats documentation provided below.
Command
ie-cli am limit set --help
Output
set limit for the sender object(s)

Usage:
  ie-cli am limit set [flags]

Flags:
  -h, --help             help for set
      --id string        The id of sender object
      --limit int        The limit value, 0 means unlimited (default -1)
      --so-type string   supported values: [account domain sender_email script]
The utilization of the limit subcommand varies according to the sender-object types (--so-type);
Command usage with --so-type="account" for set limit
ie-cli am limit set --id="11111111-1111-1111-1111-11111111111" --limit=3 --so-type="account"
Command usage with --so-type="domain" for set limit
ie-cli am limit set --id="22222222-2222-2222-2222-222222222222" --limit=5 --so-type="domain"
Command usage with --so-type="sender_email" for set limit
ie-cli am limit set --id="33333333-3333-3333-3333-333333333333" --limit=7 --so-type="sender_email"
Output
OK
Note
Modifications can be tracked by navigating through the User Interface (UI) via Imunify360 -> Email -> Activity Monitor.
Usage of server-settings subcommand
The ie-cli am server-settings command is designed to manage server sender limit settings, allowing you to establish a default limit that is applied to any sender object by default. This command can be further customized with the use of specific flags and subcommands.
The ie-cli am server-settings set command is designed to modify the server sender limit settings. This command can be paired with specific flags to establish the limit mode and eliminate limits for certain sender objects.
The --limit-mode int flag is utilized to define the limit mode. The limit mode can be either 1 or 2, where 1 signifies limit mode by sender and 2 denotes limit mode by the number of recipients.
To eliminate the limit for any sender object, a value of 0 can be used. For instance, to remove the limit for an account, the --account=0 command can be employed. A value of 0 indicates that the sender object will have no restrictions, effectively rendering it unlimited.
Additional flags encompass --account int, --domain int, --script int, and --sender-email int. These are utilized to establish the threshold for any account, domain, script, or sender email, correspondingly. The default value for these flags is set to -1.
The existing server-settings can be accessed by utilizing the ie-cli am server-settings command.
Command
ie-cli am server-settings
Output
{
    "account": 0,
    "domain": 1,
    "limit_mode": 1,
    "script": 0,
    "sender_email": 0
}
To establish the limit mode to 2 (limit by the number of recipients) and designate any limit for a domain, the subsequent command could be utilized: ie-cli am server-settings set --limit-mode=2 --domain=100.
Command
ie-cli am server-settings set --limit-mode=2 --domain=100
Output
New server settings is:
{
    "account": 0,
    "domain": 100,
    "limit_mode": 2,
    "script": 0,
    "sender_email": 0
}
For instance, to configure the limit mode to 1 (limit by sender) and eliminate the limit for any account, the following command could be employed: ie-cli am server-settings set --limit-mode=1 --account=0.
Command
ie-cli am server-settings set --limit-mode=1 --account=0
Output
New server settings is:
{
    "account": 0,
    "domain": 100,
    "limit_mode": 1,
    "script": 0,
    "sender_email": 0
}
Usage of stats subcommand
The ie-cli am stats command provides a consolidated view of sender objects, complete with a variety of filters. This command can be paired with specific flags to refine the results.
The flags include --account-name string, --domain string, --limit int, --offset int, --script-name string, --sender-email string, and --since string. These are employed to filter by account name, domain, limit the quantity of results, set the offset for results, filter by script name, filter by sender email, and set the duration in seconds that has elapsed from the flag value until the present moment, respectively.
The --limit int flag also indicates that the limit applied pertains solely to the number of accounts in the response, with a default of 25.
The --since string flag defaults to a value of 1 hour - 1h.
Note
The functionality mirrors that of the ActivityMonitor user interface.
Command
ie-cli am stats --help
stats (statistics) returns the aggregated view of senders objects with various filters

Usage:
  ie-cli am stats [flags]

Flags:
      --account-name string   Account name to filter
      --domain string         Domain to filter
  -h, --help                  help for stats
      --limit int             How many results to return (pagination). The limit applied only for number of accounts in response (default 25)
      --offset int            From which offset results to return (pagination)
      --script-name string    Script name to filter
      --sender-email string   Sender email to filter
      --since string          show entries starting from [now - since] time
                              format: [DIGIT(s)][MODIFIER]
                              	supported modifiers 's' - seconds, 'm' - minutes, 'h' - hours, 'd' - days, e.g. 1h, 2d
                              	examples: 100s, 5m, 1h, 5d (default "1h")
By using the stats command directly, all sender objects are returned as follows. The --since flag can be used to retrieve sender objects within a certain period of time.
Command
ie-cli am stats --since 10h
Output
{
  "accounts": [
    {
        "domains": [
            {
                "account_id": "11111111-1111-1111-1111-11111111111",
                "exclusion": false,
                "id": "22222222-2222-2222-2222-222222222222",
                "limit": 0,
                "messages": 1,
                "name": "domain.com",
                "quarantined": 1,
                "rateLimited": false,
                "sender_emails": [
                    {
                        "account_id": "11111111-1111-1111-1111-11111111111",
                        "domain_id": "22222222-2222-2222-2222-222222222222",
                        "exclusion": false,
                        "id": "33333333-3333-3333-3333-333333333333",
                        "limit": 0,
                        "messages": 1,
                        "name": "test@domain.com",
                        "quarantined": 1,
                        "rateLimited": false,
                        "whitelisted": false
                    }
                ],
                "whitelisted": false
            },
        ],
        "exclusion": false,
        "id": "11111111-1111-1111-1111-11111111111",
        "limit": 0,
        "messages": 1,
        "name": "domain",
        "quarantined": 1,
        "rateLimited": false,
        "scripts": null,
        "whitelisted": false
    }
  ]
}
Command usage with --sender-email for get sender-object id
ie-cli am stats --sender-email=test@domain.com
Command usage with --account-name for get sender-object id
ie-cli am stats --account-name=domain --since 30d
Output
{
  "accounts": [
    {
        "domains": [
            {
                "account_id": "11111111-1111-1111-1111-11111111111",
                "exclusion": false,
                "id": "22222222-2222-2222-2222-222222222222",
                "limit": 0,
                "messages": 1,
                "name": "domain.com",
                "quarantined": 1,
                "rateLimited": false,
                "sender_emails": [
                    {
                        "account_id": "11111111-1111-1111-1111-11111111111",
                        "domain_id": "22222222-2222-2222-2222-222222222222",
                        "exclusion": false,
                        "id": "33333333-3333-3333-3333-333333333333",
                        "limit": 0,
                        "messages": 1,
                        "name": "test@domain.com",
                        "quarantined": 1,
                        "rateLimited": false,
                        "whitelisted": false
                    }
                ],
                "whitelisted": false
            },
        ],
        "exclusion": false,
        "id": "11111111-1111-1111-1111-11111111111",
        "limit": 0,
        "messages": 1,
        "name": "domain",
        "quarantined": 1,
        "rateLimited": false,
        "scripts": null,
        "whitelisted": false
    }
  ]
}
Uninstallation
Audience: Hosting administrator.
To remove Imunify Email, first disable it in CLN. This deactivates the product on the server. To also remove the RPM packages, run the following as root:
yum autoremove imunifyemail
This removes Imunify Email and all its associated components from the system.
For End Users
Audience: End users (cPanel account holders).
How to Access Imunify Email
Log in to your cPanel account and navigate to:
Security → Imunify360 → Email
Email Quarantine
When Imunify Email detects that an outgoing email from your account is spam or malicious, it places it in quarantine instead of sending it. You can review quarantined emails in the Email tab.
What You'll See
For each quarantined email, you can see:
- Received Date — When the email was queued for sending.
- Reason — Why it was quarantined (spam, contains a potentially dangerous file attachment, or rate limit exceeded).
- Sender and Recipients
- Subject Line
Actions You Can Take
- Release and Send — Sends the email to its intended recipients.
- Delete — Permanently removes the email from quarantine.
- View Email — Displays the email body, headers, and raw content to verify it before releasing.
Important: Non-root users can release up to 5 emails per hour by default. Your hosting provider may adjust this limit.
Quarantine Storage
Your quarantine has a storage limit. When the limit is reached, the oldest quarantined emails are automatically deleted to make room for new ones.
Sending Limits
Your hosting provider may set limits on how many emails you can send per hour. These limits help prevent abuse and protect the server's email reputation.
If you exceed your sending limit, additional emails will be quarantined with the reason ratelimit. Contact your hosting provider to request an adjustment.
Incoming Filtering
If your hosting provider has enabled incoming email filtering, incoming spam will be automatically delivered to your Junk/Spam folder.
Your hosting provider can disable this feature if needed.
Need Help?
If you are experiencing issues with email delivery or believe emails are being incorrectly quarantined, contact your hosting provider. They have access to the full administration tools and can adjust rate limits, whitelist your account or domain, and review server-wide email activity.
--