ImunifyAV(+) for cPanel, Plesk and DirectAdmin
Note
This ImunifyAV documentation is applicable for cPanel, Plesk and DirectAdmin control panels only.
- You can find documentation for ImunifyAV for Plesk (will be deprecated soon) here.
- You can find documentation for ImunifyAV for ISPmanager here
- You can find documentation for stand-alone (no-panel) version of ImunifyAV here
ImunifyAV provides malware scanning features for cPanel, Plesk and DirectAdmin control panels.
Installation Guide
Requirements
Supported operating system
- CentOS/RHEL 7, 8, 9
- CloudLinux OS 7, 8, 9
- Ubuntu 16.04 (LTS only), 18.04, 20.04 (LTS), 22.04 (cPanel, Plesk, DirectAdmin, and standalone), and 24.04
- Debian 9 (up to Imunify v6.11 (including)), 10 (requires buster-backports), 11, 12 and 13 (Plesk, DirectAdmin, and Stand-alone)
- AlmaLinux 8, 9, 10
- Rocky Linux 8, 9 (cPanel, Plesk, and standalone)
Virtualization
- OpenVZ - Works for Virtuozzo 7
Hardware
- RAM: 512 Mb
- HDD: 20 Gb available disk space
- CPU: 64bit version on x86_64 processors only
Supported hosting panels
- cPanel
- Plesk
- DirectAdmin
- No hosting panel systems
Required browsers
- Safari version 9.1 or later
- Chrome version 39 or later
- Firefox version 28 or later
- Edge version 17 or later
- Internet Explorer version 11 or later
Installation Instructions
Warning
- On DirectAdmin, Imunify UI requires the
proc_openPHP function to be enabled. If you are unable to open the Imunify UI, you might see a related message in theerrror.logof the web-server. If so, please remove it from thedisable_functionslist inphp.ini. - On Plesk panel you can install the Imunify extension from the Plesk Marketplace as an alternative of steps below.
To install ImunifyAV proceed the following steps:
Log in with root privileges to the server where ImunifyAV should be installed.
Go to your home directory and run the commands:
wget https://repo.imunify360.cloudlinux.com/defence360/imav-deploy.sh -O imav-deploy.sh
bash imav-deploy.sh
To install ImunifyAV beta version add argument --beta. For example:
bash imav-deploy.sh --beta
If you already have ImunifyAV+ license key you can use it during installation:
wget https://repo.imunify360.cloudlinux.com/defence360/imav-deploy.sh -O imav-deploy.sh
bash imav-deploy.sh --key YOUR_KEY
where YOUR_KEY is your license key. Replace YOUR_KEY with the actual key purchased at https://www.imunify360.com/.
If you have an IP-based license for ImunifyAV+, use IPL as license key:
wget https://repo.imunify360.cloudlinux.com/defence360/imav-deploy.sh -O imav-deploy.sh
bash imav-deploy.sh --key IPL
To view available options for installation script run:
bash imav-deploy.sh -h
In a case of registration key is passed later, then you can register an activation key via the imunify-antivirus command:
imunify-antivirus register YOUR_KEY
Where YOUR_KEY is your activation key or IPL in case of IP-based license.
SELinux support
If SELinux (Security-Enhanced Linux) is enabled on your server, you should install the Imunify360 SELinux policy module. You can check SELinux status by sestatus command. Policy is shipped with Imunify360 package and is located in the /var/imunify360/imunify-antivirus.te
To apply it, run the following commands:
checkmodule -M -m -o /var/imunify360/imunify-antivirus.mod /var/imunify360/imunify-antivirus.te
semodule_package -o /var/imunify360/imunify-antivirus.pp -m /var/imunify360/imunify-antivirus.mod
semodule -i /var/imunify360/imunify-antivirus.pp
After that, restart the imunify-notifier service:
systemctl restart imunify-notifier
If checkmodule command is not found, install it with:
- If you’re on CloudLinux/CentOS 7
yum install checkpolicy
- If you’re on CloudLinux/CentOS 8
yum install policycoreutils-python-utils
- If you’re on CloudLinux/CentOS 9
dnf install checkpolicy
(plus policycoreutils-python-utils if you need the other SELinux tools).
Update Instructions
To upgrade ImunifyAV, run the command:
yum update imunify-antivirus
To update ImunifyAV beta version, run the command:
yum update imunify-antivirus --enablerepo=imunify360-testing
To update ImunifyAV on Ubuntu/Debian, run the command:
apt-get update
apt-get install --only-upgrade imunify-antivirus
To update ImunifyAV beta on Ubuntu 16.04 LTS, run the command:
echo 'deb https://repo.imunify360.cloudlinux.com/imunify360/ubuntu-testing/16.04/ xenial main'  > /etc/apt/sources.list.d/imunify360-testing.list
apt-get update
apt-get install --only-upgrade imunify-antivirus
To update ImunifyAV beta on Ubuntu 18.04, run the command:
echo 'deb https://repo.imunify360.cloudlinux.com/imunify360/ubuntu-testing/18.04/ bionic main'  > /etc/apt/sources.list.d/imunify360-testing.list
apt-get update
apt-get install --only-upgrade imunify-antivirus
To upgrade ImunifyAV beta on Ubuntu 20.04, run the following command:
echo 'deb https://repo.imunify360.cloudlinux.com/imunify360/ubuntu-testing/20.04/ focal main'  > /etc/apt/sources.list.d/imunify360-testing.list
apt-get update
apt-get install --only-upgrade imunify-antivirus
To upgrade ImunifyAV beta on Debian 9, run the following command:
echo 'deb https://repo.imunify360.cloudlinux.com/imunify360/debian-testing/9/ stretch main'  > /etc/apt/sources.list.d/imunify360-testing.list
apt-get update
apt-get install --only-upgrade imunify-antivirus
To upgrade ImunifyAV beta on Debian 10, run the following command:
echo 'deb https://repo.imunify360.cloudlinux.com/imunify360/debian-testing/10/ buster main'  > /etc/apt/sources.list.d/imunify360-testing.list
apt-get update
apt-get install --only-upgrade imunify-antivirus
To upgrade ImunifyAV beta on Debian 11, run the following command:
echo 'deb https://repo.imunify360.cloudlinux.com/imunify360/debian-testing/11/bullseye main' > /etc/apt/sources.list.d/imunify360-testing.list
apt-get update
apt-get install --only-upgrade imunify-antivirus
To upgrade ImunifyAV beta on Debian 12, run the following command:
echo 'deb https://repo.imunify360.cloudlinux.com/imunify360/debian-testing/12/bookworm main' > /etc/apt/sources.list.d/imunify360-testing.list
apt-get update
apt-get install --only-upgrade imunify-antivirus
To upgrade ImunifyAV beta on Debian 13, run the following command:
echo 'deb https://repo.imunify360.cloudlinux.com/imunify360/debian-testing/13/trixie main' > /etc/apt/sources.list.d/imunify360-testing.list
apt-get update
apt-get install --only-upgrade imunify-antivirus
If you do not want to receive updates from beta, remove beta repository:
rm /etc/apt/sources.list.d/imunify360-testing.list
apt-get update
Gradual roll-out
New stable ImunifyAV versions are scheduled for the gradual roll-out from our production repository and are available for all customers in about two weeks or less from the release.
If you do not want to wait for the gradual roll-out, you can update ImunifyAV to the latest version by running the following commands:
wget -O imunify-force-update.sh https://repo.imunify360.cloudlinux.com/defence360/imunify-force-update.sh
bash imunify-force-update.sh
Uninstall
How to uninstall ImunifyAV
To uninstall ImunifyAV, run the command:
bash imav-deploy.sh --uninstall
This command should not purge state data or configuration files. To uninstall with a full cleanup, or to clean up after uninstalling, run:
bash imav-deploy.sh --purge
If you have already removed imav-deploy.sh then download it by running:
wget https://repo.imunify360.cloudlinux.com/defence360/imav-deploy.sh
And proceed to the directory with the script.
How to stop ImunifyAV
For CentOS/CloudLinux OS 6, run the following command:
service imunify-antivirus stop
For all other operating systems, run the following command:
systemctl stop imunify-antivirus
Localization
ImunifyAV supports the following languages in addition to default (en-US):
- de-DE
- es-ES
- fr-FR
- ja-JP
- it-IT
- tr-TR
- nl-NL
- ru-RU
- pt-BR
- zh-CN
How to perform a translation to your own language using our language file
Contact ImunifyAV support to request the latest language file.
The file is actually in JSON format, which values are the translation.
We use this syntax to translate plurals and other dynamic content: https://messageformat.github.io/messageformat/page-guide
Note, that you can use it to provide translation for each plural case in your language: http://www.unicode.org/cldr/charts/latest/supplemental/language_plural_rules.html
You can use this tool to simplify the process: https://translation-manager-86c3d.firebaseapp.com/
Send the translated version to us and we will gladly include it in one of the nearest releases of ImunifyAV.
Hoster Interface
Click ImunifyAV in the main menu. There are following tabs in ImunifyAV hoster interface:
Users
Go to ImunifyAV → Users tab. Here, there is a table with a list of users on the server, except users with root privileges.
 |
|---|
The table has the following columns:
- User name — displays a user name.
- Home directory — a path to a user home directory starting from the root.
- Infection status — a current status depending on the last action made:
- On-Demand scanning — scanning is in progress.
- Cleaning up — user's files are now cleaning up.
- Number of threats — a number of infected files detected after scanning. Click to go to the Files tab where you can see all malicious files.
- No malware found — no malware was found during scanning.
- Malware cleaned – click a link to go to the History tab and see details.
- Actions:
- Scan for malware — click Scan icon to start scanning files for a particular user.
- View report — click View Report icon to go to the Files tab and display the results of the last scan.
- CleanupAV+ — click Cleanup to start cleaning up infected files for a user.
- Restore originalAV+ — click Restore original to restore the original file after cleaning up if a backup is available. To perform a bulk action, tick required users and click the corresponding button above the table.
Note
Cleaning up all files of all users and scanning all files is available in ImunifyAV+. To upgrade to ImunifyAV+, click Upgrade to ImunifyAV+ , you will be redirected to the ImunifyAV+ upgrade page. Or click Cleanup all button, you will be redirected to the ImunifyAV+ upgrade page.
The badge in the History tab shows the number of missed events in the Malware Scanner’s History.
The following filters are available:
Items per page displayed — click the number at the table bottom.
The table can be sorted by User name and Infection status (by the date of the last action).
Note
Starting from ImunifyAV(+) v. 5.5, all filter and view options are stored in the browser's local storage so you can select filter preference options once and next time you'll open the tab, the options will be preset.
Files
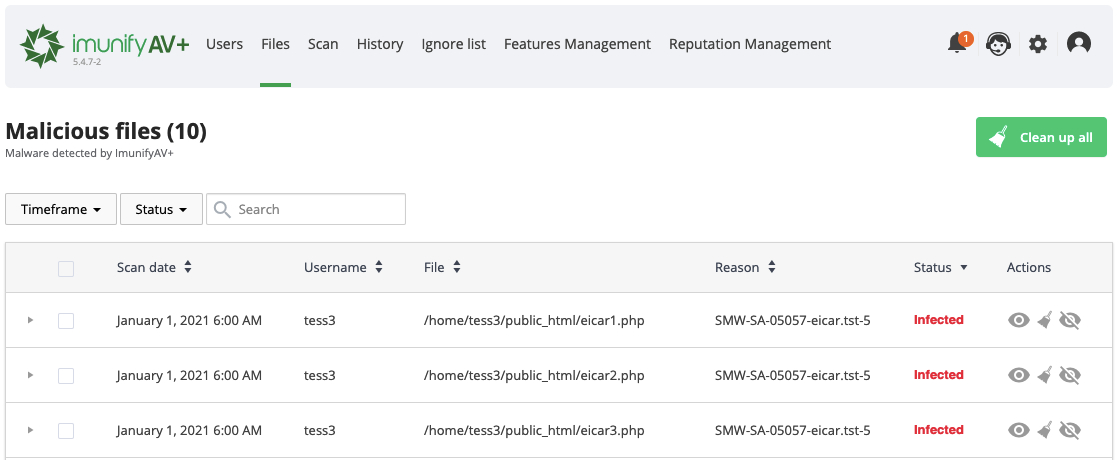
Go to ImunifyAV → Files tab. Here, there is a table with a list of infected files within all domains and user accounts.
 |
|---|
The table has the following columns:
- Scan date — displays the exact time the scanning process has started.
- Username — displays a file owner name.
- File — a path where a file is located starting with root
- Reason — describes the signature which was detected during the scanning process. Names in this column depend on the signature vendor. You can derive some information from the signature ID itself.
SMW-SA-05155-wshll– in this Signature ID:- The first section can be either
SMWorCMW.SMWstands for Server Malware andCMWstands for Client Malware - The second section of ID can be either
INJorSA.INJstands for Injection (means Malware is Injected to some legitimate file) andSAstands for StandAlone (means File is Completely Malicious) - The third section is
05155. This is simply an identification number for the signature. - The fourth section
wshll/mlw.wp/etcexplains the category and class of malware identified. Here,wshllstands for web shell (mlwstands for malware). - The fifth section is
0, which provides the version number of the signature.
- The first section can be either
- Status — displays the file status:
- Infected — threat was detected after scanning. If a file was not cleaned after cleanup, the info icon is displayed. Hover mouse over info icon to display the reason.
- Cleaned — infected file is cleaned up.
- Content removed — a file content was removed after cleanup.
- Cleanup queuedAV+ — infected file is queued for cleanup. Actions:
- Add to Ignore List — add file to the Ignore List and remove it from the Malicious files list. Note that if a file is added to the Ignore List, ImunifyAV will no longer scan this file.
- View file — click eye icon in the file line and the file content will be displayed in the pop-up. Only the first 100Kb of the file content will be shown in case if a file has bigger size.
- Restore original — restore an initial infected file.
- Cleanup fileAV+ — click Clean up to clean up all infected files within the account.
To perform a bulk action, tick required users and click the corresponding button above the table.
Warning
Starting from ImunifyAV(+) v.6.2, the Quarantine and Delete actions were removed permanently from the UI as well as the CLI in ImunifyAV(+). Previously quarantined files are also subject to deletion. After this change is implemented, the restoration of the previously quarantined files will become impossible. For more information see this this blog post.
Note
Cleaning up all files of all users is available in the ImunifyAV+. To upgrade to the ImunifyAV+, click Upgrade to ImunifyAV+, you will be redirected to ImunifyAV+ upgrade page. Or click Cleanup all button, you will be redirected to the ImunifyAV+ upgrade page.
The following filters are available:
- Scan date — displays the results filtered by chosen period or date.
- Result — displays the results filtered by chosen status.
- Total files – displays the results with descending/ascending filtering.
- Items per page displayed — click the number at the table bottom.
The table can be sorted by detection date (detected), user name, file path (file), reason, and status.
Note
Starting from ImunifyAV(+) v. 5.5, all filter and view options are stored in the browser's local storage so you can select filter preference options once and next time you'll open the tab, the options will be preset.
Scan
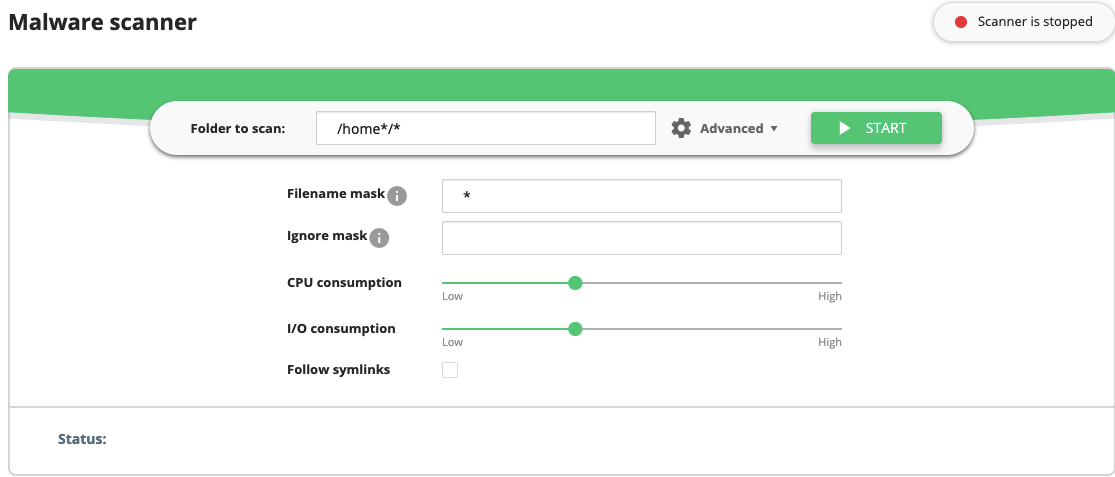
Malware scanner allows users to scan a specific directory or file for malware. Go to ImunifyAV → Scan tab. Then proceed the following steps:
- Type a folder name to scan in the Folder to scan field. Start typing with the slash
/. It is possible to use Advanced settings:
- Filename mask allows to set file type for scanning (for example,
*.php- all the files with the extension php). The default setting is*which means all files without restriction. - Ignore mask allows to set file type to ignore (for example,
*.htmlwill ignore all files with the extension html). - CPU consumption. Defines the CPU consumption for scanning without decreasing efficiency: from Low to High.
- I/O consumption. Defines the I/O consumption for scanning without decreasing efficiency: from Low to High.
- Follow symlinks. Follow all symlinks within the folder to scan.
Note
If ImunifyAV is running on CloudLinux OS, LVE is used to manage scan intensity. If it is running on other operating systems, “nice” is used to control CPU and “ionice” is used when the I/O scheduler is CFQ.
- Click Start.
 |
|---|
At the top right corner scanning progress and status are displayed:
- Scanner is stopped means that there is no scanning process running.
- Scanning…% means that the scanner is working at the moment. A percentage displays the scanning progress. You can also see the scanning status beneath the Mask or Advanced options.
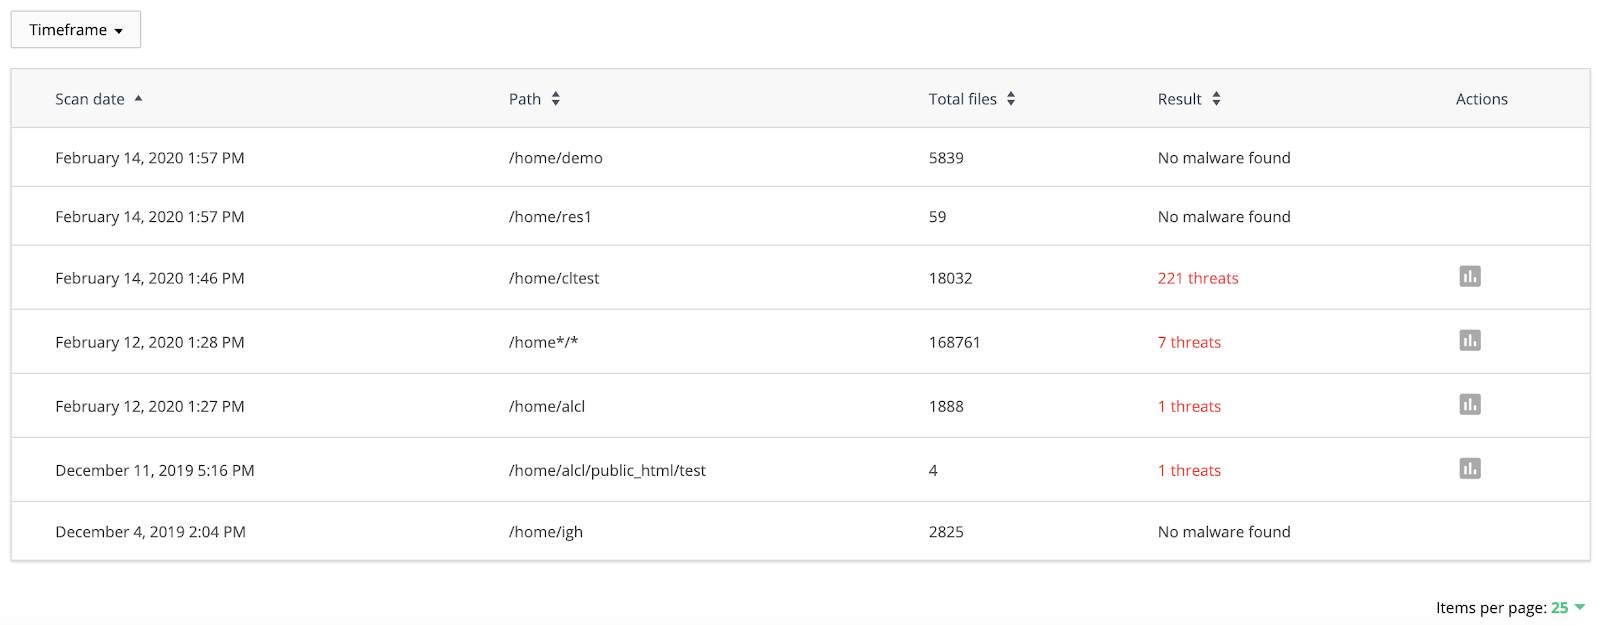
When scanning is completed, the results are shown in the table below with the following information:
- Date — scan date;
- Path — scanned folder path;
- Total files — total number of scanned files;
- Result — displays a number of threats and a number of files detected as suspicious during scanning;
- Action:
- View report — click View Report icon to go to the Files tab and display the results of the last scan.
 |
|---|
The following filters are available:
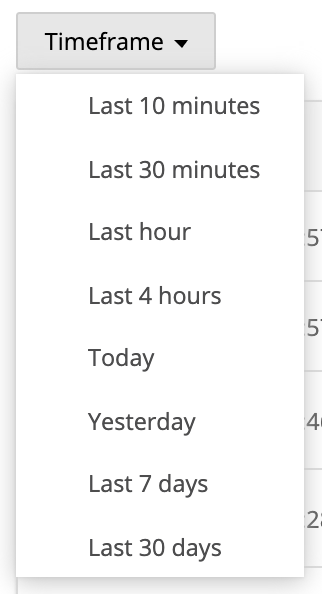
Timeframe — displays the results filtered by chosen period or date. To review and manage suspicious files go to the Files tab.
The table can be sorted by Date, Path, Total files, and Result.
Note
Starting from ImunifyAV(+) v. 5.5, all filter and view options are stored in the browser's local storage so you can select filter preference options once and next time you'll open the tab, the options will be preset.
 |
|---|
History
The History tab contains data of all actions for all files. Go to ImunifyAV → History tab. Here, there is a table with a list of files within all domains.
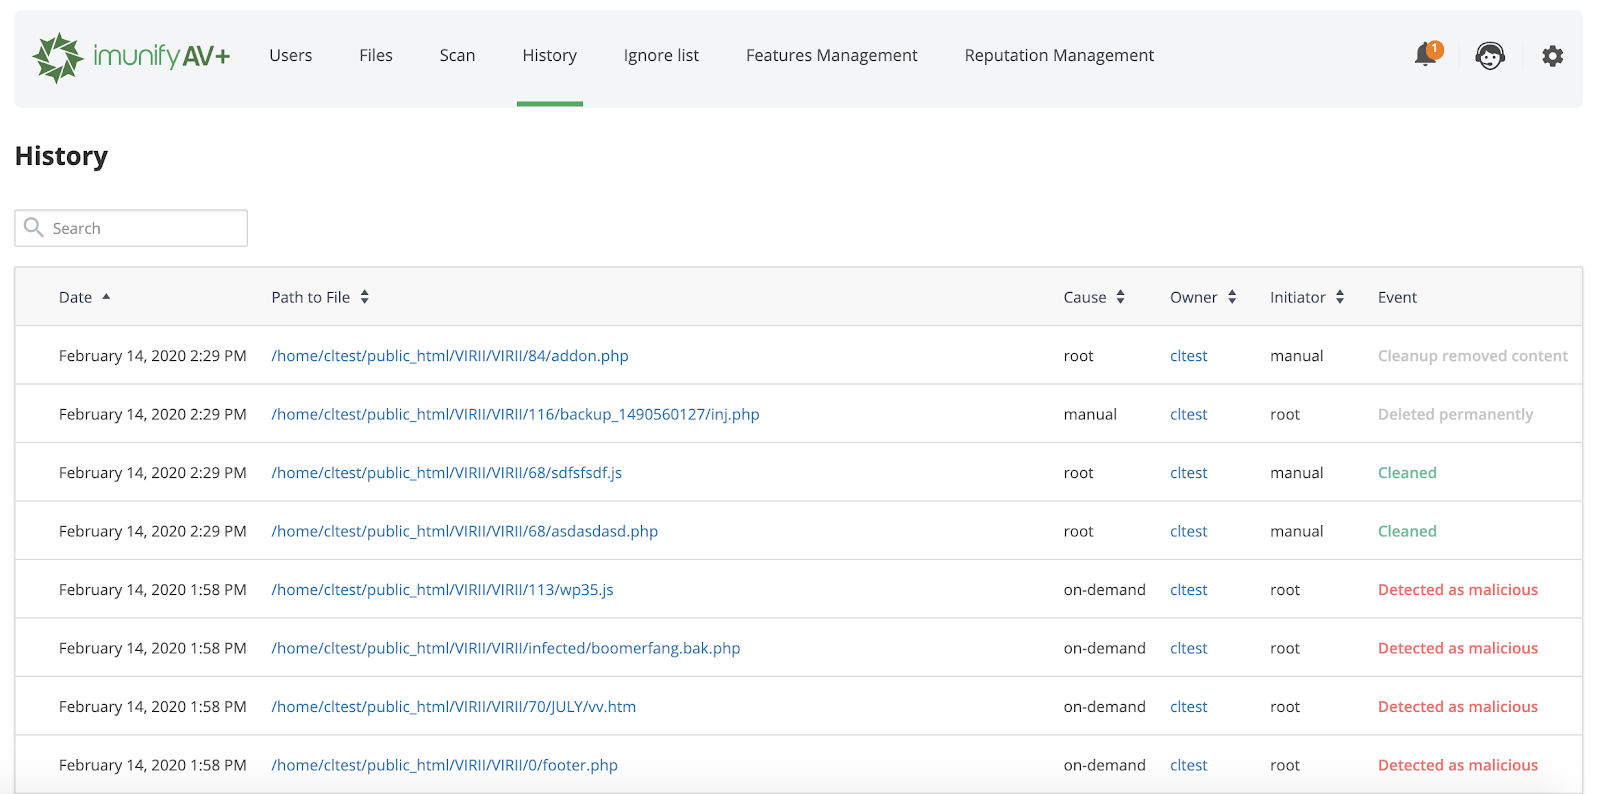 |
|---|
The table has the following columns:
- Date — action timestamp.
- Path to File — path to the file starting from the root.
- Cause — displays the way malicious file was found:
- Manual — scanning or cleaning was manually processed by a user.
- On-demand — scanning or cleaning was initiated/made by a user.
- Real time — scanning or cleaning was automatically processed by the system.
- Owner — displays a user name of a file owner.
- Initiator — displays the name of a user who was initiated the action. For system actions the name is System.
- Event — displays the action with the file:
- Detected as malicious — after scanning the file was detected as infected;
- Cleaned — the file is cleaned up.
- Failed to clean up — there was a problem during cleanup. Hover mouse over the info icon to read more.
- Added to Ignore List — the file was added to the Ignore List. ImunifyAV will not scan it.
- Restored original — file content was restored as not malicious.
- Cleanup removed content — a file content was removed after cleanup.
- Deleted from Ignore List — the file was removed from the Ignore List. ImunifyAV will scan it.
- Deleted — the file was deleted.
- Submitted for analysis — the file was submitted to the Imunify team for analysis.
- Failed to ignore — there was a problem during adding to the Ignore List. Hover mouse over the info icon to read more.
- Failed to delete from ignore — there was a problem during removal from the Ignore List. Hover mouse over the info icon to read more.
The table can be sorted by Date, Path to File, Cause, and Owner.
Note
Starting from ImunifyAV(+) v. 5.5, all filter and view options are stored in the browser's local storage so you can select filter preference options once and next time you'll open the tab, the options will be preset.
Ignore List
The Ignore List tab contains the list of files that are excluded from Malware Scanner scanning. Go to ImunifyAV → Ignore List tab. Here, there is a table with a list of files within all domains.
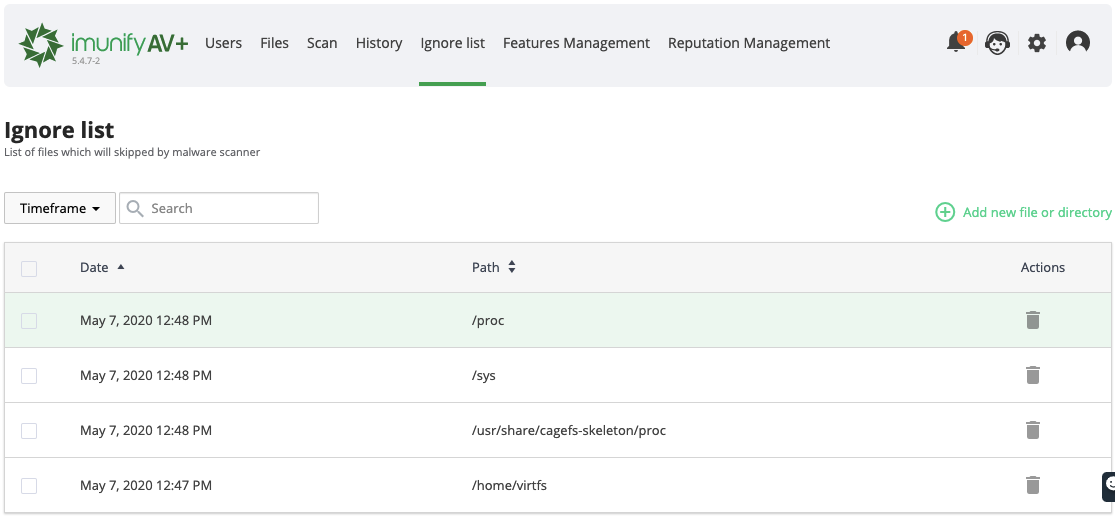 |
|---|
| The table has the following columns: |
- Added — the date when the file was added to the Ignore list.
- Path — path to the file starting from the root.
- Actions:
- Remove from Ignore List — click Bin icon to remove the file from the Ignore list and start scanning.
- Add new file or directory — click Plus icon to add a new file or directory to the Ignore list. To perform a bulk action, tick the required files and click the corresponding button above the table.
Note
Wildcards are not supported when adding paths to the Ignore List. For example, the following paths are not supported:
/home/*/mail//home/user/*.html/home/*
The following filters are available:
Timeframe — displays the results filtered by chosen period or date. Items per page displayed — click the number at the table bottom. Path – displays the results filtered by a path in a direct or reverse alphabetical order.
The table can be sorted by Added and Path. By default, it is sorted from newest to oldest.
Note
Starting from ImunifyAV(+) v. 5.5, all filter and view options are stored in the browser's local storage so you can select filter preference options once and next time you'll open the tab, the options will be preset.
Features Management
Features Management tab allows to enable or disable ImunifyAV features for each customer. Go to ImunifyAV → Features Management tab.
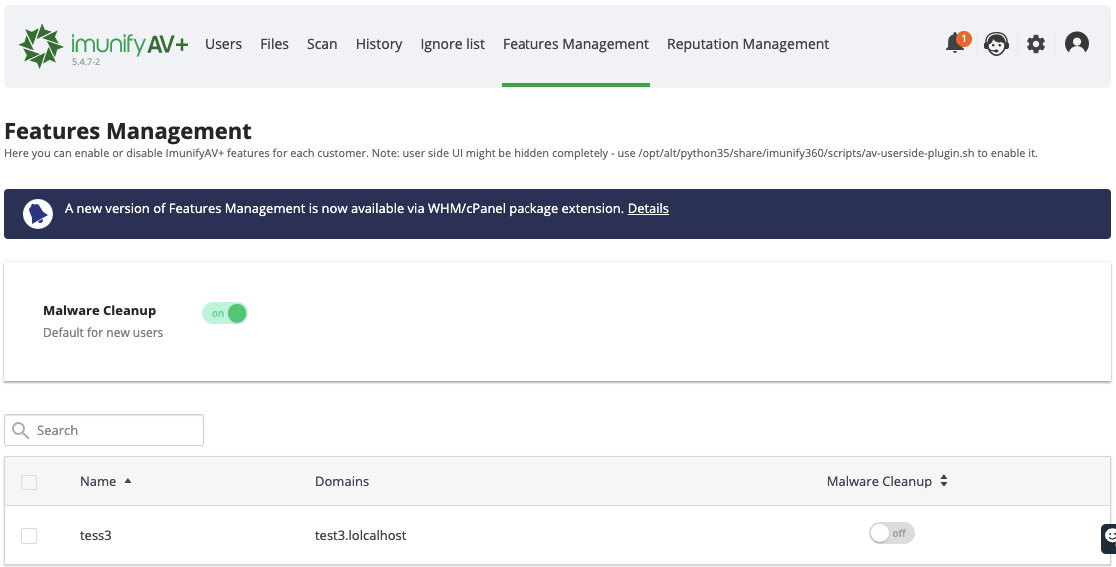 |
|---|
To enable Malware Cleanup feature for new users by default, move the Malware Cleanup slider.
The table has the following columns:
- Name — user name
- Domains — user domain name
- Malware Cleanup — allows to enable or disable Malware Cleanup feature for selected user by moving the slider.
To perform a bulk action, tick required users and move the Malware Cleanup slider at the table header. Confirm the action on the confirmation popup.
Reputation Management
Note
Reputation Management is available in ImunifyAV+ only.
Reputation Management is an analyzing and notifying tool intended to inform about websites blocking and blacklisting.
Choose Reputation Management in the main menu of the ImunifyAV+ user interface to get to the Reputation Management page.
Reputation Management allows to check if a domain registered on your server is safe or not based on the following reputation engines:
How does it work:
- We get a list of domains periodically (via crontab)
- Send it to the central Imunify server
- Get results from it
- Add bad domains to the list of Reputation Management
If a domain or an IP is blocked, then this information will be available in the table below. If a user’s website appears in this table, then it would be useful to send this link to the user. This instruction can help to solve problems with the domain.
At the top of the page (also in the main menu near Reputation Management item), ImunifyAV+ shows the number of affected domains. This number is a quantity of affected domains that exist on the server.
The table shows:
- ID – domain owner username
- Domain – the affected domain link
- Threat type – read more about types on the link (we still do not support THREAT_TYPE_UNSPECIFIED and POTENTIALLY_HARMFUL_APPLICATION)
- Vendor – where the threat was detected
- Detection time – exact time when the Reputation Management detected the domain
- Action – a link to the actions guide
 |
|---|
Note
Reputation Management online and browser look may differ. This is because Google Safe Browsing has an issue described on github.
Note
Starting from ImunifyAV(+) v. 5.5, all filter and view options are stored in the browser's local storage so you can select filter preference options once and next time you'll open the tab, the options will be preset.
Settings
Go to ImunifyAV → Settings tab to set up the behaviour of ImunifyAV scanner. Here you can configure the following:
Resource consumption
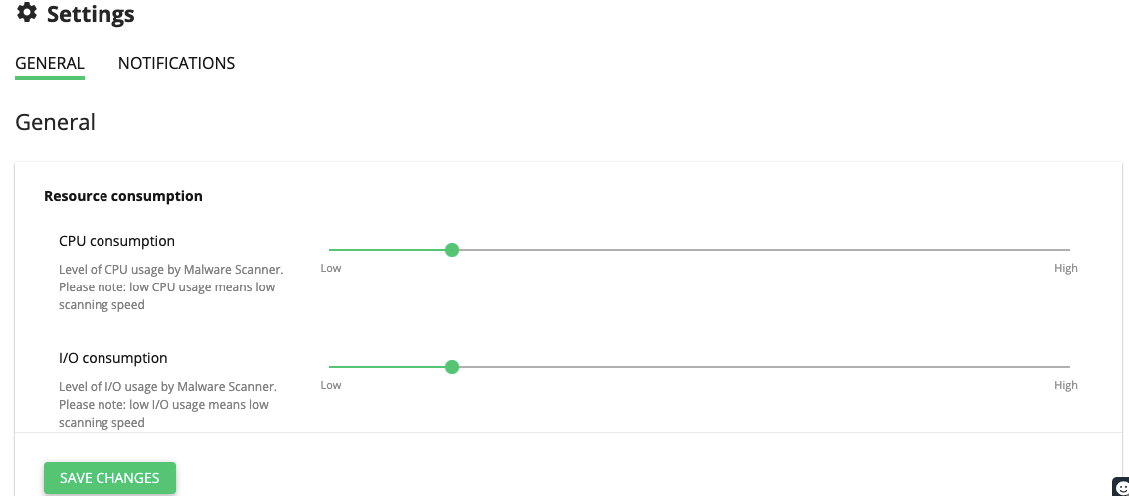 |
|---|
CPU consumption – enables to set a level of CPU usage by Malware Scanner.
Note
Low CPU usage means low scanning speed
I/O consumption – enables to set a level of I/O usage by Malware Scanner.
Note
Low I/O usage means low scanning speed
Note
If ImunifyAV is running on CloudLinux OS, LVE is used to manage scan intensity. If it is running on other operating systems, “nice” is used to control CPU and “ionice” is used when the I/O scheduler is CFQ.
General
 |
|---|
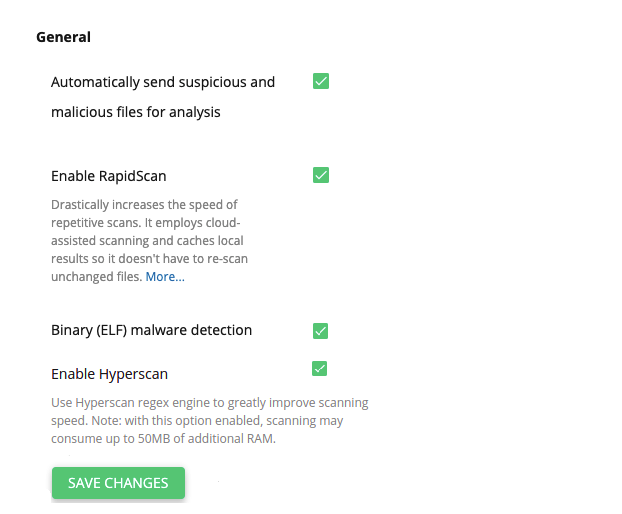
- Automatically send suspicious and malicious files for analysis – malicious and suspicious files will be sent to the ImunifyAV Team for analysis automatically.
- RapidScan – dramatically speeds up repeated scans based on smart re-scan approach, local result caching and cloud-assisted scan. When you first enable the RapidScan feature, the first scan will run as before. But subsequent scans will see a dramatic speed improvement, anywhere between 5 to 20 times faster. You can find the details here: https://docs.imunify360.com/features/#rapidscan)
- Binary (ELF) malware detection – this option allows to scans user home directories for malware.
- Enable Hyperscan – this option allows to use the regex matching Hyperscan library in Malware Scanner to greatly improve the scanning speed. Hyperscan requires its own signatures set that will be downloaded from the files.imunify360.com and compiled locally. There are few platform requirements to use this feature:
- Hyperscan supports Debian, Ubuntu and CentOS/CloudLinux 7 and later.
- SSE3 processor instructions support. It is quite common nowadays, but may be lacking in virtual environments or in some rather old servers.
Crontab files Scanning
This is the mechanism allowing to address Crontab infections with our powerful Malware scanner. Enabled, it will catch any event of Crontab file modification on the fly in seconds and keep them malware-free in real-time.

The cleanup results are available on the Malware and History tabs of the Imunify360 interface as for any other type of malware.
Tick required checkboxes and click the Save changes button.
Background Scanning
Allows to set up automatic, scheduled, background scanning of user accounts.
- Run scanning — select the desired period:
- Never
- Daily*
- Weekly*
- Monthly
Note
The Daily and Weekly options are available for ImunifyAV+ and Imunify360 only. In ImunifyAV, the setting set to Daily and Weekly will be reset to Monthly - it is expected behavior.
 |
|---|
Depending on the selected period, precise settings.
- If Run scanning is set to Daily, choose the exact time at the Run at dropdown.
- If Run scanning is set to Weekly, choose the day of the week at the Run on the dropdown and the exact time at the Run at dropdown.
- If Run scanning is set to Monthly, choose the day of the month at the Day of month to run dropdown and the exact time at the Run at dropdown.
Malware Cleanup
- Trim file instead of removal — do not remove infected file during cleanup but make the file zero-size (for malwares like web-shells);
- Keep original files for … days — the original infected file is available for restore within the defined period. Default is 14 days.
 |
|---|
Error reporting
Tick the Enable Sentry error reporting checkbox to send reports to ImunifyAV error reports server.
 |
|---|
Note
Starting from ImunifyAV(+) v. 5.5, all filter and view options are stored in the browser's local storage so you can select filter preference options once and next time you'll open the tab, the options will be preset.
Upgrade
To upgrade to ImunifyAV+/Imunify360, click the Upgrade Imunify button. The upgrade page opens.
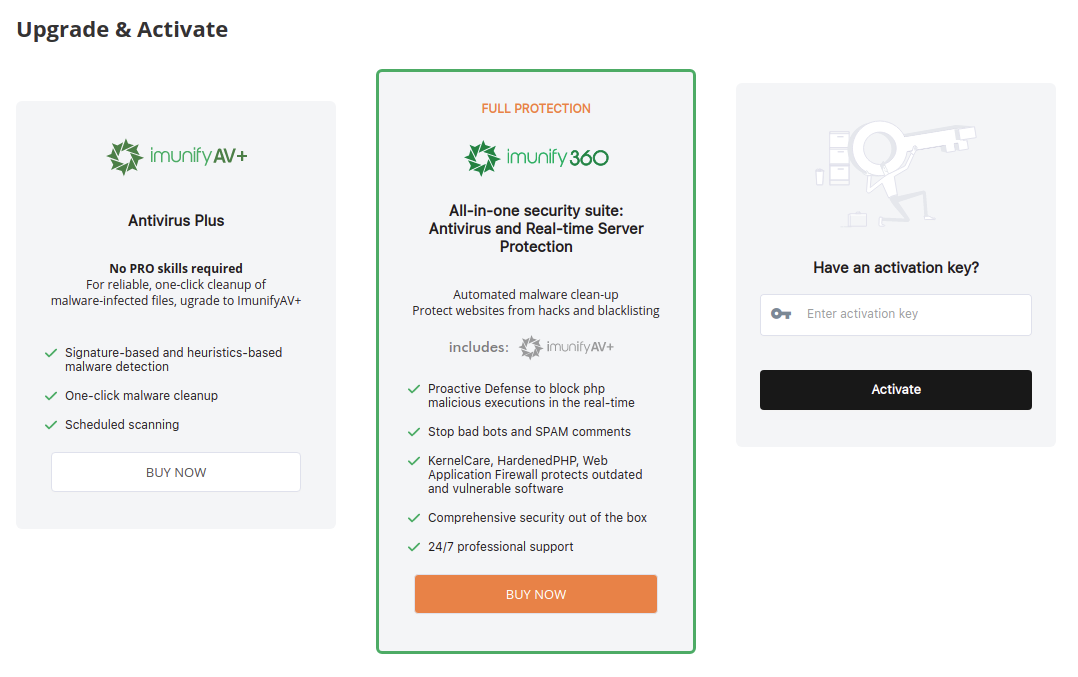
To upgrade, click Buy Now button, you will be redirected to the purchase page. Or activate the product using an activation key if you already have one.
Resellers can configure their own upgrade URLs:

These options are controlled by CUSTOM_BILLING.upgrade_url and CUSTOM_BILLING.upgrade_url_360 settings accordingly.
End User Interface
The user side is hidden by default and can be enabled by executing the following command:
/usr/share/av-userside-plugin.sh
To disable it back, run:
/usr/share/av-userside-plugin.sh -r
Click ImunifyAV in the main menu. There are following tabs in ImunifyAV end user interface:
Files
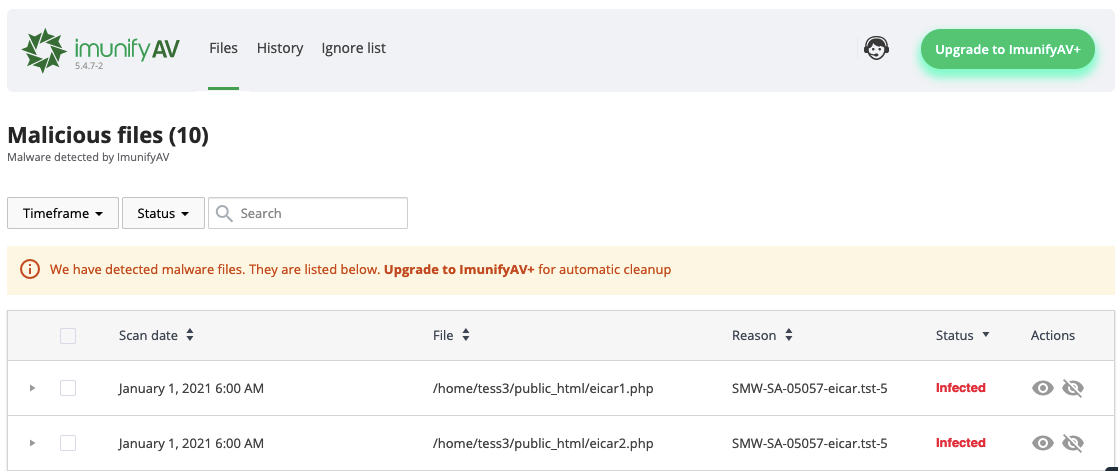
Go to ImunifyAV → Files tab. Here, there is a table with a list of infected files.
 |
|---|
The table has the following columns:
- Scan date — displays the exact time when a file was detected as malicious
- File — the path where the file is located starting with root
- Reason — describes the signature which was detected during the scanning process. Names in this column depend on the signature vendor. You can derive some information from the signature ID itself.
SMW-SA-05155-wshll– in this Signature ID:- The first section can be either
SMWorCMW.SMWstands for Server Malware andCMWstands for Client Malware - The second section of ID can be either
INJorSA.INJstands for Injection (means Malware is Injected to some legitimate file) andSAstands for StandAlone (means File is Completely Malicious) - The third section is
05155. This is simply an identification number for the signature. - The fourth section
wshll/mlw.wp/etcexplains the category and class of malware identified. Here,wshllstands for web shell (mlwstands for malware). - The fifth section is
0, which provides the version number of the signature.
- The first section can be either
- Status — displays the file status:
- Infected — threat was detected after scanning. If a file was not cleaned after cleanup, the info icon is displayed. Hover mouse over info icon to display the reason
- Cleaned — infected file is cleaned up
- Content removed — a file content was removed after cleanup
- Cleanup queued AV+ — infected file is queued for cleanup.
- Actions:
- Add to Ignore List — add file to Ignore List and remove it from the Malicious files list. Note that if a file is added to Ignore List, ImunifyAV will no longer scan this file
- View file — click eye icon in the file line and the file content will be displayed in the popup. Only the first 100Kb of the file content will be shown in case if a file has bigger size
- Cleanup AV+ — click to cleanup the file.
- Delete AV+ — remove the file from the server and from the list of Malicious files.
- Restore original AV+ — click Restore original to restore original file after cleaning up if backup is available.
To perform a bulk action, tick required users and click the corresponding button above the table.
If a user is allowed by the administrator to run a scan at any time on his own, he can see the Start scanning button.
The following filters are available:
- Timeframe — displays the results filtered by chosen period or date.
- Status — displays the results filtered by chosen status.
- Items per page displayed — click the number at the table bottom.
The table can be sorted by detection date (Detected), file path (File), Reason, and Status.
Note
Starting from ImunifyAV(+) v. 5.5, all filter and view options are stored in the browser's local storage so you can select filter preference options once and next time you'll open the tab, the options will be preset.
If a user is allowed by an administrator to scan his files, he can see the Start scanning button. See also: How to enable/disable the "Start scanning" button for ImunifyAV\AV+.

History
History tab contains data of all actions for all files. Go to ImunifyAV → History tab. Here, there is a table with a list of files.
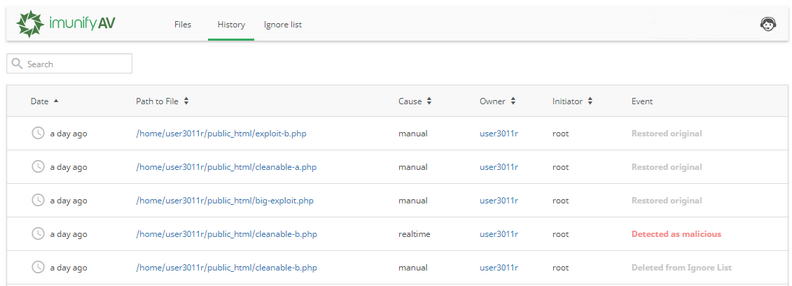
The table has the following columns:
- Date — action timestamp.
- Path to File — path to the file starting from the root.
- Cause — displays the way malicious file was found:
- Manual — scanning or cleaning was manually processed by a user.
- On-demand — scanning or cleaning was initiated/made by a user;
- Real time — scanning or cleaning was automatically processed by the system.
- Owner — displays a user name of file owner.
- Initiator — displays the name of a user who was initiated the action. For system actions the name is System.
- Event — displays the action with the file:
- Detected as malicious — after scanning the file was detected as infected;
- Cleaned — the file is cleaned up.
- Failed to clean up — there was a problem during cleanup. Hover mouse over the info icon to read more.
- Added to Ignore List — the file was added to Ignore List. ImunifyAV will not scan it.
- Restored original — file content was restored as not malicious.
- Cleanup removed content — file contend was removed after cleanup.
- Deleted from Ignore List — the file was removed from Ignore List. ImunifyAV will scan it.
- Deleted — the file was deleted.
- Submitted for analysis — the file was submitted to Imunify team for analysis.
- Failed to delete — there was a problem during removal. Hover mouse over the info icon to read more.
- Failed to ignore — there was a problem during adding to Ignore List. Hover mouse over the info icon to read more.
- Failed to delete from ignore — there was a problem during removal from Ignore List. Hover mouse over the info icon to read more.
The table can be sorted by Date, Path to File, Cause, and Owner.
Note
Starting from ImunifyAV(+) v. 5.5, all filter and view options are stored in the browser's local storage so you can select filter preference options once and next time you'll open the tab, the options will be preset.
Ignore List
Ignore List tab contains the list of files that are excluded from Malware Scanner scanning. Go to ImunifyAV → Ignore List tab. Here, there is a table with a list of files.

The table has the following columns:
- Added — the date when the file was added to Ignore List.
- Path — path to the file starting from the root.
- Actions:
- Remove from Ignore List — click Bin icon to remove the file from the Ignore List and start scanning.
- Add new file or directory — click Plus icon to add a new file or directory to Ignore List. To perform a bulk action, tick required files and click the corresponding button above the table.
The following filters are available:
- Timeframe — displays the results filtered by chosen period or date.
- Items per page displayed — click the number at the table bottom.
The table can be sorted by Added and Path. By default, it is sorted from newest to oldest.
Note
Starting from ImunifyAV(+) v. 5.5, all filter and view options are stored in the browser's local storage so you can select filter preference options once and next time you'll open the tab, the options will be preset.
Hooks
Warning!
You can use a new notification system via CLI.
Overview
Hooks are introduced as a script-based interface for various application events. This is a simple and effective way to automate ImunifyAV alerts and event processing. For example, an administrator can have ImunifyAV calling his own script when malicious files are detected or misconfigurations are detected and perform a custom processing or specific actions, for example, create a ticket. Hooks are available only via CLI.
Requirements
- You can use any programming language to create a hook script
- A hook script should be executable
- For Native hooks, you should use Python 3.5 only
How to start using hooks
Start using hooks with three simple steps:
- Create a script to handle an event (a hook handler):
- you can use our scripts example as a template
- the following events are available
- Register your hook handler in ImunifyAV agent - use registration command:
imunify-antivirus hook add --event <event name> --path </path/to/hook_script>
- Once the event added - check results and the log file (see below)
Available events and their parameters
agent
- subtype ( started | misconfig )
- started - the event is generated each time the Imunify agent is started/restarted
- params[]
- version / string / version of agent
- params[]
- misconfig - the event is generated when the agent detects agent misconfiguration / broken settings / etc.
- params[]
- error / string / error message where / what type of misconfiguration was detected and some details
- params[]
- started - the event is generated each time the Imunify agent is started/restarted
- subtype ( started | misconfig )
malware-scanning
- subtype ( started | finished )
- started - the event is generated when the malware scanning process is started (for on-demand and background scans only, yet not the ftp / waf / inotify)
- params[]
- scan_id / string / identifier of running scan
- path / string / path that’s scanning
- type / string / type of scanning (“on-demand”, “background”, “ftp”)
- scan_params[] / initial scanning params
- file_mask / string / file mask to scan
- follow_symlinks / boolean / shall scanner follow symlinks
- ignore_mask / string / file mask to ignore
- intensity / string / intensity type selected (“low”, “moderate”, “high”)
- params[]
- started - the event is generated when the malware scanning process is started (for on-demand and background scans only, yet not the ftp / waf / inotify)
- subtype ( started | finished )
{
"scan_id":"dc3c6061c572410a83be19d153809df1",
"home":"/home/a/abdhf/",
"user":"abdhf",
"type":"background",
"scan_params": {"file_mask":"*", "follow_symlinks":"true", "ignore_mask":"", "intensity":"low"}
}
- finished - the event is generated when the malware scanning process is finished (for on-demand and background scans only, yet not the ftp / waf / inotify)
- params[]
- scan_id / string / identifier of running scan
- path / string / path that’s scanned
- users[] / string array/ user that’s scanned
- started / int / unixtime when scan started
- total_files / int / total number of files that were scanned
- total_malicious / int / number of detected malicious files
- errors[] / string / error message if any occurred during scanning
- status / string / status of scan (“ok”, “has_errors”, “failed”)
- scan_params[] / initial scanning params
- file_mask / string / file mask to scan
- follow_symlinks / boolean / shall scanner follow symlinks
- ignore_mask / string / file mask to ignore
- intensity / string / intensity type selected (“low”, “moderate”, “high”)
- params[]
- finished - the event is generated when the malware scanning process is finished (for on-demand and background scans only, yet not the ftp / waf / inotify)
{
"scan_id":"dc3c6061c572410a83be19d153809df1",
"home":"/home/a/abdhf/",
"user":"abdhf",
"started":1587365282,
"total_files":873535,
"total_malicious":345,
"errors":[],
"status":"ok",
"type":"background",
"scan_params": {"file_mask":"*", "follow_symlinks":"true", "ignore_mask":"", "intensity":"low"}
}
- malware-detected
- subtype ( critical )
- critical
- params[]
- scan_id / string / unique id of the scan
- errors[] / string / error strings that happened during the last scan
- started / int / unixtime when the scan was started
- path / string / path that was scanned
- users[] / string array / users that have been scanned (if any)
- total_files / int / number of files checked within the last scanning
- total_malicious / int / number of detected malicious files
- tmp_filename / string / path to a temporary file with a list of detected threads. The list of threads is in the format of the following command:
imunify-antivirus malware malicious list --by-scan-id=... --json
- params[]
- critical
- subtype ( critical )
{

"scan_id":"dc3c6061c572410a83be19d153809df1",
"path":"/home/a/abdhf/",
"username":["imunify"],
"started":1587365282,
"total_files":873535,
"total_malicious":345,
"errors":[],
"files":[
{
  "username":"imunify",
  "hash":"17c1dd3659578126a32701bb5eaccecc2a6d8307d8e392f5381b7273bfb8a89d",
  "size":"182",
  "cleaned_at":1553762878.6882641,
  "extra_data":{


  },
  "malicious":true,
  "id":32,
  "status":"cleanup_removed",
  "file":"/home/imunify/public_html/01102018_2.php",
  "type":"SMW-INJ-04174-bkdr",
  "scan_type":"on-demand",
  "Created":1553002672
},
{
  "username":"imunify",
  "hash":"04425f71ae6c3cd04f8a7f156aee57096dd658ce6321c92619a07e122d33bd32",
  "size":"12523",
  "cleaned_at":1553762878.6882641,
  "extra_data":{


  },
  "malicious":true,
  "id":33,
  "status":"cleanup_done",
  "file":"/home/imunify/public_html/22.js",
  "type":"SMW-INJ-04346-js.inj",
  "scan_type":"on-demand",
  "Created":1553002672
},
...

}
Note
All results can be saved in a temporary file before handler invocation and then remove the file after the event is being processed
- malware-cleanup
- subtype ( started | finished )
- started - the event is generated when the malware cleanup process is started (for on-demand and background cleanup only, background auto-cleanup will be implemented later)
- params[]
- cleanup_id / string / unique id of the cleanup
- started / int / unixtime when the cleanup was started
- tmp_filename / string / path to a temporary file with a scanning report. The list is in the format of the following command:
imunify-antivirus malware malicious list --by-scan-id=... --json. See malware-detected hook section for details. - total_files / int / number of files that were sent for cleanup
- params[]
- finished - the event is generated when the malware scanning process is finished (for on-demand and background cleanup only, background auto-cleanup will be implemented later)
- params[]
- cleanup_id / string / identifier of running cleanup
- started / int / unixtime when cleanup started
- total_files / int / number of files that were sent for cleanup
- total_cleaned / int / number of files that were successfully cleaned
- tmp_filename / string / path to a temporary file with a list of results.
- errors[] / string / error messages if any occurred during cleanup
- errors[] / string / error messages if any occurred during cleanup
- params[]
- started - the event is generated when the malware cleanup process is started (for on-demand and background cleanup only, background auto-cleanup will be implemented later)
- subtype ( started | finished )
{
"scan_id":"dc3c6061c572410a83be19d153809df1",
"started":1587365282,
"total_files":873535,
"total_cleaned":872835,
"tmp_filename":”/var/imunify/tmp/hooks/tmp_02q648234692834698456728439587245.json”,
"errors":[],
"status":"ok"
}
Hooks CLI
The following CLI command is used to manage hooks:
imunify-antivirus hook [command] --event [event_name|all] [--path </path/to/hook_script>]
The following commands are supported:
- add - register a new event handler
- delete - unregister existing event handler
- list - show existing event handlers
- add-native - register a new native event handler
The third parameter event_name defines a particular event that invokes a registered handler as opposed to all keyword.
The fourth parameter /path/to/hook_script shall contain a valid path to a handler of the event, it shall be any executable or Python Native event handlers that agent will run upon a registered event.
Native
Native hook is a script written on Python 3.5 and allows to quickly process events. The Python file should contain only one method that customer would implement:
def im_hook(dict_param):
	….
	pass
where dict_param would hold the same data as JSON that non-Native hook will gate.
Log File
You can see all hook data in the log file. It is located at /var/log/imunify360/hook.log . When the event comes, the data is recorded to the log file in the following format:
timestamp event : id : started [native:] name : subtype : script_path
- native is prepended for the Native hook implementation
- id is a unique ID for each event
Once the listener is done, the data is recorded to the log file in the following format:
timestamp event : id : done [native:] script_path [OK|ERROR:code]
In case of an error, you can see the error code you have specified.
Structure and examples of a hook script
Regular (non-native) hook:
#!/bin/bash

data=$(cat)

event=$(jq -r '.event' <<< ${data})
subtype=$(jq -r '.subtype' <<< ${data})

case ${event} in
    malware-scanning)
        case ${subtype} in
            started)
                # do stuff here
            ;;
            *)
                echo "Unhandled subtype: ${subtype}" 1>&2
                exit 1
        esac
        ;;
    *)
        echo "Unhandled event: ${event}/${subtype}" 1>&2
        exit 2
esac
Native hook:
def im_hook(dict_param):
   event = dict_param['event']
   subtype = dict_param['subtype']

   if event == 'malware-scanning':
       if subtype == 'started':
           # do stuff here
           pass
       elif subtype == 'finished':
           # do other stuff here
           pass
       else:
           raise Exception('Unhandled subtype {}'.format(subtype))
   else:
       raise Exception('Unhandled event {}'.format(event))
Notifications
Starting from version 5.1, ImunifyAV/AV+ provides a completely new Hooks system configuration. Hooks can be configured via the separate UI “Notifications” tab in the Settings, or via the command-line interface (CLI).
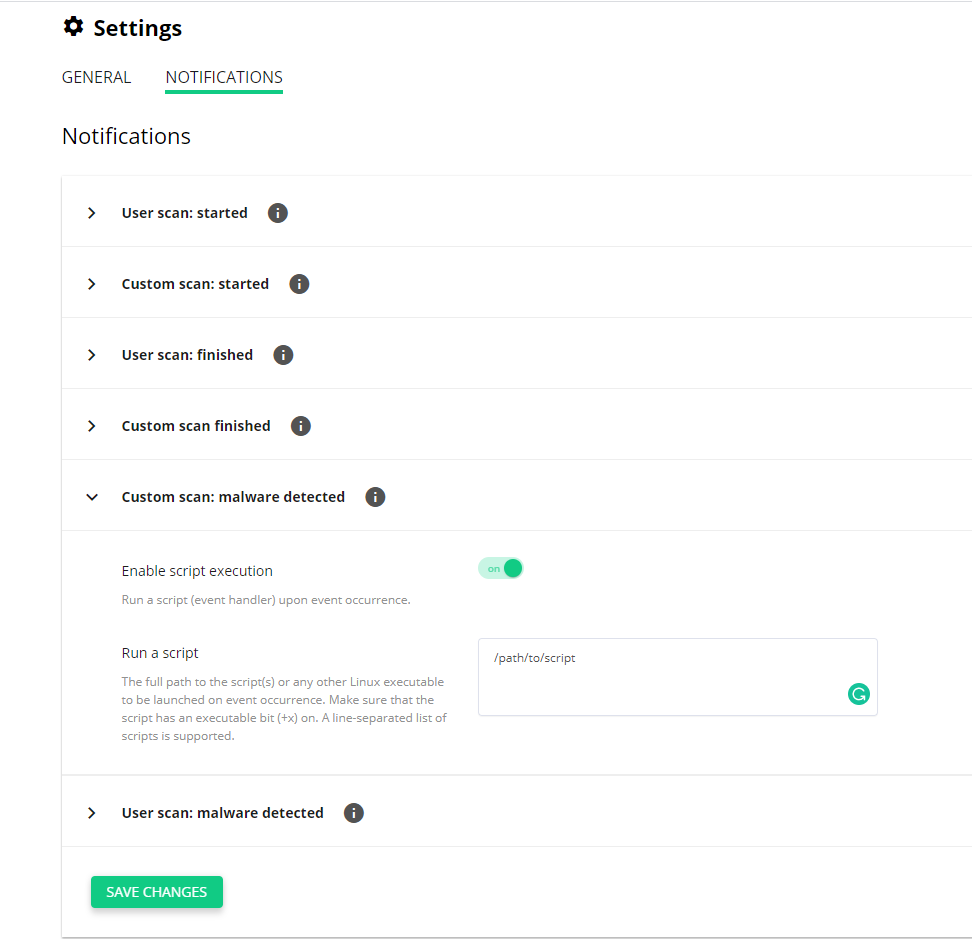
The administrator can configure to execute custom scripts (“hook handler”). Also, hooks support a new set of events and notification types:
- Events occurring in each type of scan (real-time scan, user account scan, custom folder scan)
- Events occurring at different stages of malware scanning process: upon scanning start, finish, when malware is found
Each hook can be configured from the UI and the CLI. Each hook type has the enable/disable toggle and event handler script.
Notes
- The hook script field accepts a fully qualified path
- The hook script requires “execution” (+x) permissions to be set to work
- Email notifications available in Imunify360


